Categories
Afternoon Snack | 3pm Meal Breakfast | 8am Meal Most Popular Posts

Almond Turmeric Bliss Balls | Badam Haldi Laddus

These almond turmeric bliss balls have the perfect blend of tasty and healthy.

We live in uncertain times with new diseases emerging every other day and making our already stressful lives even harder. It is natural to worry about our health and that of our loved ones. However, worrying and stressing only impairs one’s immunity. Easier said than done I know and I feel I take 5 steps ahead and 6 steps back. But staying away from negative media and constant reminders to bring yourself back to the present moment helps.

How Do You Live A Healthy Lifestyle?

It was on one such stressful afternoon when I watched a video by the famous and well respected holistic lifestyle coach Luke Coutinho. In that short video, he spoke about small steps that one can take to boost one’s immunity. It involved taking a balanced diet and including protein in every meal, and working out. He also highlighted certain food items like – almonds, turmeric, ginger, kiwi, pumpkin amongst others which have great immunity-boosting properties. But most importantly, I feel, were his closing lines that no matter how healthy and how well one eats, it is going to be of no help if we are not mentally healthy. In other words, positive thoughts and good quality sleep, are a holistically healthy lifestyle in the truest sense of the word. And I feel this is pertinent and poignant not just in the current times when the world is trying to fight COVID19 but at all times.

Boost Your Immunity With Almond Turmeric Bliss Balls

As I watched the video, I tried to figure the best way possible to get all the immunity boosters Luke mentioned in our diet. It had to be simple and more importantly kid-friendly. My instant thought was laddus or bliss balls. This is an extremely forgiving recipe. Play around with the ingredients and their quantities based on your taste. For example, I added some ghee roasted makhanas (fox nuts) to add more body and crunch to the laddus.

Try my other recipes for energy balls, bliss balls and laddus.

Immune Boosting Almond Turmeric Laddoos inspired by Luke Coutinho

When I make bliss balls or laddus I usually blended all the ingredients in a high-speed blender or NutriBullet. This time I did not have NutriBullet at hand so I powdered all ingredients separately and then eventually blitzed it together for a few seconds to give it a nice mix.

I used two tablespoons ghee in the recipe but if you like a smoother texture you can use a little extra. I recommend eating a laddu first thing in the morning on an empty stomach with warm water or enjoy it as an afternoon snack. Sharing this just in time for Holi for you to try.Immune Boosting Almond Turmeric Laddoos inspired by Luke Coutinho

Almond-Turmeric Laddoos

Prep Time: 10 minutes

Cook Time: 10 minutes

Total Time: 20 minutes

Yield: 100

Serving Size: Makes 12-15 medium sized laddoos

Ingredients

  • Almond- 1 cup
  • Fox Nuts or Makhana, roasted in ghee- 3/4 cup
  • Pumpkin seeds- 1/2 cup
  • Turmeric- 1 tsp
  • Ginger Powder- 1 tsp
  • Freshly pound Black Pepper- 3/4 tsp
  • Jaggery, powdered or chopped fine- 1.5 cups or as per taste (can be substituted with honey)
  • Pure Ghee or Cold-pressed Coconut Oil- 2 tbsp

Instructions

  1. Blend almonds, fox nuts and pumpkin seeds one at a time in a high speed blender
  2. Next, mix all the powdered ingredients with the remanding ingredients and blend for 10-15 seconds again
  3. Empty the contents in a bowl, grease palms with some ghee and make laddoos of desired size
  4. Place in an air-tight container at room temperature and consume within a week
https://onewholesomemeal.com/almond-turmeric-bliss-balls-badam-haldi-laddus/

Immunity Boosting Almond Turmeric Bliss Balls inspired by Luke Coutinho

Categories
Dinner | 8pm Meal

Crème Brûlée | Make It A Day Ahead

 I decided to end my mini-hiatus from the blog with an easy recipe for Crème Brûlée. Yes, I am using dessert as a peace offering for disappearing on you.

This year the plan was to shoot and share at least one recipe (if not more) every week. It’s March and I could not have fallen flatter on my face (if I can take liberties with the English language)! Forget sharing a recipe per week, I think I have not shared one in more than a month. A perfect example of “Man Proposes, God Disposes!”

It Is Okay To Take A Creative Break

I do not like to make excuses and am more in the category of – How do we make the best of the situation and get things done? But the more I try and do it, the more I realise that sometimes we are unkind to ourselves. We set unrealistic expectations and always try to swim against the tide. It is sometimes okay to let it be and go with the flow, don’t you think? So, while I could have pushed and pushed myself some more and posted recipes regularly, I am sure it would have impacted my quality and my sanity. The past couple of weeks my hands have been full homeschooling two children. Plus make sure they are engaged, entertained, the house was running smoothly and everyone at home kept their sanity. With all the tasks on hand, I decided to step back and take a creative break.

Instead, I chose to focus and stay in the moment, not to multitask, and to put all my energies into helping my family (and myself) get over these challenging times. Trust me no amount of crash courses in patience and perseverance could have prepared us for times like these! I am not trying to preach this life to others, but sharing my experience with what is working for me. Most importantly, because as my readers, I feel you all have the right to know the reasons behind my mini disappearing act.

Onward And Upward

I truly hope that I can come back to sharing and posting regularly soon enough. And that the testing times our global village is facing comes to an end. While we are at that, let us take a moment to be grateful for all the things that we have taken for granted thus far. Simple things we did not think twice before doing or enjoying which in the current times feel like a true luxury (threading my brows for example)! On a lighter note, let me share an anecdote on the topic. The other day I was catching up with a friend over the phone (cannot remember when I caught up with one in person last) and the conversation somehow turned to our current “brow status”. Yes, that is the kind of cool conversation I have with my “brows” or do I mean “bros”. She went on to say – I do not have two eyebrows anymore, they have grown and become one! Totally empathising and living the same scenario I had to share my depressing status – Mine looks like The Very Hungry Caterpillar! Now, I leave it to your imagination to figure who is living the worse nightmare.

Crème Brûlée To the Rescue

From brows to dessert. Today I share with you the recipe for this delicious Crème Brûlée. I had to go through my fair share of recipes online and some cookbooks to finally create this one. It was a commissioned work for which the client had shared a recipe too but when I am making something for a client that I am not very confident of, I try and not leave anything to chance. And hence all the research which benefitted the client and now all of you. While the measurements in my recipe are not exactly the same as her’s, I do recommend watching Sally’s video recipe to make a Crème Brûlée. It will help you get a hang of the method.

Crème Brûlée Dessert

A few things to keep in mind:

  1. Do not substitute castor sugar with regular sugar for best results.
  2. Tempering the egg yolks is a critical step.
  3. It is very easy to over bake a Crème Brûlée. Bake it until the centre is a tad wobbly while the edges are set.
  4. Using a kitchen torch is recommended. I did as I had one handy. In case you do not have one, please have a look at three alternative ways you can do it.

With the above steps taken care of, it is a great make-ahead dessert that comes together in a jiffy.

Crème Brûlée

Prep Time: 10 minutes

Cook Time: 40 minutes

Total Time: 50 minutes

Yield: 100

Serving Size: 6

Ingredients

  • Heavy Cream- 4 cups
  • Vanilla Bean, scraped- 1 or 1 tsp pure vanilla extract
  • Castor Sugar- 1 cup, divided
  • Egg Yolks- 6
  • Hot Water- 8 cups or as needed

Instructions

  1. Preheat your oven to 160 degrees centigrade
  2. On low heat bring heavy cream to a gentle boil (until you see bubbles start to form), then turn off heat
  3. While the cream is boiling, whisk 6 egg yolks with 1/2 cup sugar until well blended and the mixture has lightened in colour. This would require approximately 10-12 minutes of continuous whisking
  4. When the cream is warm (and not boiling hot), take about 1/2 a cup of it and gradually add to the egg yolk-sugar mixture, mixing gently
  5. Continuing to whisk the mixture, add the remaining heavy cream gradually and not all at one go
  6. Pour the mixture into six 8 ounce ramekins and place the ramekins into a large roasting pan making sure you have spaced them out well enough to be able to bring them out of the pan when still hot
  7. Pour hot water into the roasting pan so that it comes halfway to the ramekins and bake for 35-40 minutes or until the sides are set but the centre is still a tad wobbly
  8. Remove the ramekins from the baking tray, bring to room temperature and refrigerate overnight
  9. Next day, bring the ramekins out of the refrigerator and let them sit out for 30 minutes
  10. Then sprinkle the remaining half cup caster sugar, dividing it equally amongst the six ramekins and spreading evenly
  11. Using a blow torch caramelise the sugar to form a crispy top
  12. Let it sit for 5-7 minutes before digging in.
https://onewholesomemeal.com/creme-brulee-make-it-a-day-ahead/

Categories
Mid-Day Snack | 10 am Meal

No-Bake Dessert | Dark Chocolate and Strawberry

Craving dessert? Then why not try this no-bake dessert with dark chocolate?

Some days are for quick desserts. No matter how organised one is, there are days when a few balls do get dropped; but that doesn’t mean one just frets and does nothing about it. With just a few simple ingredients from your pantry, you can create these perfect mood-lifters. This no-fuss, easy and refined sugar-free, no-bake dessert recipe is one such treat. Set in a tray, it is the perfect dish to be carried along to any event or party and an absolutely gorgeous one at that! 

Make This No-Bake Dessert Your Own

And the best part? You can make it as little or as indulgent as you would like. Play with the ingredients to create your own unique flavour. For example, here I have used strawberry jam and fresh strawberries but you could use any other seasonal fruit like peach, stone fruit, figs (roasted or otherwise), or even mandarins.

Although I assembled it in a square tart tray so I could carry it easily to the party, you could also layer it in little parfait cups and serve. Refrigerating the nuts and dates base a good hour (or two) before pouring over the chocolate-cream layer is key. Then you need to further refrigerate it for an hour before topping it with fresh strawberries or fruit of your choice. Finally, cut a slice and indulge in the soft gooey melt in your mouth that is chocolate and berries heaven. To enhance the sweetness of the base, you can add some brown sugar. You can also play with other flavours by using a mix of jams to layer, or adding some finely chopped mint and basil to give it a summery feel. Just have fun!


Dark Chocolate and Strawberry No Bake Bites

Prep Time: 15 minutes

Cook Time: 2 hours

Total Time: 2 hours, 30 minutes

Serving Size: 6-8

Ingredients

    For the topping
  • Strawberry Jam- 1/3 cup
  • Full fat whipped cream- 160 ml (2/3 cup)
  • Unsalted butter- 25gm
  • Dark (eating) chocolate ,chopped fine- 200 gm
  • Strawberries, halved or quartered based on size - 6-8
  • For the base
  • Medjool Dates or any other variety of dates softened- 10-12
  • Almond meal-1.5 cups
  • Cashews- A little more than 1/2 cup
  • Vanilla- 1tsp

Instructions

  1. Blitz the cashews in a high speed blender and keep aside
  2. Blitz the dates in a high speed blender, scraping sides in between.If using a different (harder) variety of dates, soak them in warm water for 10-15 minutes to soften them up before blending
  3. Once the dates are pasty, add the cashew, almond meal, vanilla and blend for a few more seconds . If the mixture sticks to the side, take it out in a bowl and gently knead with your fingers
  4. Line a tart tray with a baking sheet or grease with some butter
  5. Evenly spread the above mixture in the tray, pressing and smoothing out gently making sure it it forms a uniform layer which isn’t too thin or it won’t hold the chocolate and cream layer well and then refrigerate for at least an hour, then spread the strawberry jam and refrigerate for another 20 minutes
  6. While the base is setting, bring a pot of water to boil and then place a slightly larger (but deep) pot on top. To this add cream and heat it. This indirect heating/ water bath technique makes sure one doesn’t overheat the cream
  7. Once the cream is hot, stir in butter and chocolate chips, then whisk until smooth
  8. Let it cool for 5-10 minutes then pour it evenly into the prepared refrigerated base
  9. Refrigerate for 2 hours , top it with strawberries and fresh fruit of choice to serve
https://onewholesomemeal.com/no-bake-dessert-dark-chocolate-and-strawberry/


Categories
Afternoon Snack | 3pm Meal Mid-Day Snack | 10 am Meal

Caramel Custard Pudding | A Childhood Favourite

For a change a have a recipe fronot my childhood, but my husband’s. I did not grow up eating this caramel custard pudding but it’s my husband’s favorite.

When I finally tried my mother-in-law’s recipe and shared it on my Instagram feed, so many friends shared how it reminded them of their childhood. Delighted that my wee ones love it too. There are many exotic names out there for this simple yet yummiest of desserts but I am just going to call it Caramel Custard Pudding. That is how I know it since I first learned the recipe. Anyway, what’s in a name right?

A Few Things To Keep In Mind

Although the recipe itself is a pretty simple one, one needs to be careful about a few things. Making the caramel for example. Read here the technique to caramelise the sugar. Once it has reached the right consistency, add some water so it is pourable. Be very careful while you do this as hot caramel splutters.

The other step which needs caution is steaming. If using a pressure cooker, add approximately 1.5 cups of water, then place a slightly elevated but flat pan inside the cooker (I used an inverted sieve). This would serve as a platform to place the dishes. See image below:

Caramel (Custard) Pudding

This not only ensures even distribution of heat but also prevents water from entering the bowls while steaming . Then bring water to boil, place the dishes inside and put the lid on without the whistle. Then steam for 15-20 minutes

Once these two steps are sorted , you will have a delicious caramel custard in no time.


Caramel (Custard) Pudding

Prep Time: 15 minutes

Cook Time: 15 minutes

Total Time: 30 minutes

Serving Size: 4

Ingredients

  • Sugar-5 tbsp and 3.5 tbsp
  • Water-1.5 tbsp
  • Hot water- 2 tbsp
  • Milk- 2.5 cup
  • Eggs-3
  • Chopped nuts- 1.5 tbsp
  • Chopped raisins (optional)- 1 tsp
  • Pure Vanilla extract-1 tbsp
  • Butter-1 tbsp for greasing

Instructions

  1. Grease the insides of serving dishes with butter and keep aside
  2. Mix 5 tbsp sugar and 1.5 tbsp water and heat in a pan on medium-high heat till bubbles start to form, then gently swirl the mixture
  3. When the mixture turns golden brown, working quickly but carefully remove from heat and then add 2 tbsp hot water( keeping the bowl away from your body) and give it one last swirl before pouring out the caramel into prepared serving dish/es pouring evenly and equally
  4. To prepare the pudding mix, crack and gently beat eggs, add vanilla extract and keep aside
  5. Heat milk in a pot and add 3.5 tbsp sugar and whisk till the sugar dissolves , then let it come down to just a tad warmer than room temperature and add it to the egg mixture, whisk gently to mix well and add chopped raisins and nuts
  6. Pour into prepared serving dishes, cover them with foil and steam for 15 minutes in a vessel deep enough to prepare a water bath
  7. After 15 minutes gently remove the dish/es out of the steamer and carefully invert them on a flat plate, refrigerate for at least an hour, garnish with chopped nuts and serve chilled.
https://onewholesomemeal.com/caramel-custard-pudding/


Categories
Afternoon Snack | 3pm Meal Breakfast | 8am Meal Mid-Day Snack | 10 am Meal Recipes

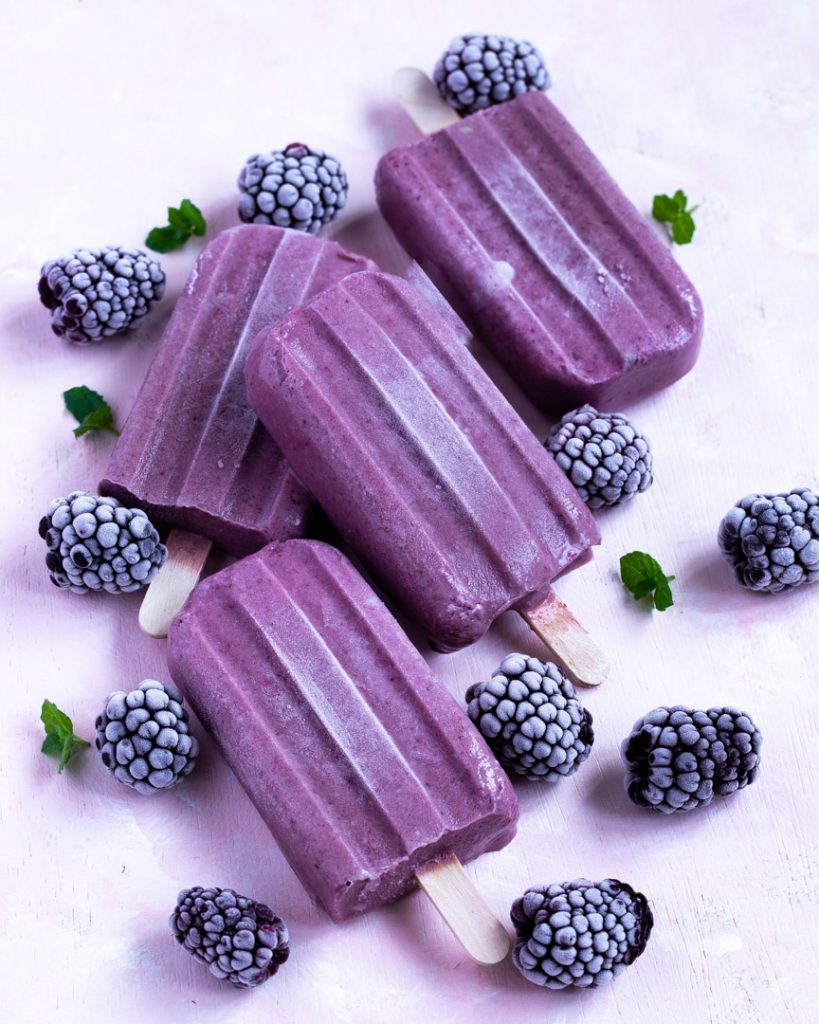
Blackberry and Mint Popsicles

These delicious blackberry and mint popsicles motivated me to get back to the blog!

I haven’t been very regular here off late. And my sincerest apologies for that. Not making any excuses but work and home have kept me on my toes and I have literally sleep-walked (without much sleep though) through the last few months and before I knew its full-blown summer which most of us were waiting for but are complaining about the weather yet again. Seriously! If there are two things which human beings absolutely love it is either complaining about the weather or passing judgments about people who are trying to do something with their lives no matter what the weather (rolls eyes)! Someone dear once told me, if people are talking about you then rest assured you are doing something right with your life. It was a great piece of advice and comes in handy every once in a while. It helps me focus on my goals big time!

Speaking of goals! Making and capturing popsicles this summer was one of my major short term goals! No kidding! These babies are as hard to shoot as easy they are to make! Numerous failed attempts last summer which never saw the face of daylight finally helped me succeed this season. I also prepped big time to capture the glory of these blackberry and mint popsicles.

How to Shoot Popsicles?

Here are some of my tips for you to improve your food photography of popsicles.

  1. I bought and froze an extra batch of blackberries
  2. Turned my bedroom into arctic with the air-con blasting at 16 degrees and all doors and windows shut before I brought these babies out
  3. Tested and retested the light, setup, and composition like crazy BEFORE bringing in the heroes
  4. Chilled a stainless steel tub in the freezer
  5. Prepared an ice bath, then placed the chilled stainless tub into the ice bath and then finally place the popsicles (still inside their mould) into the steel tub
  6. Donned a fleece because I was freeeeezing!
  7. Brought the babies out of their moulds and shot, shot, SHOT!

Blackberry and Mint Popsicles photography by OneWholesomeMeal

Blackberry-Mint Popsicles

Prep Time: 10 minutes

Cook Time: 5 minutes

Total Time: 15 minutes

Yield: 90%

Serving Size: Makes 6-8 medium sized popsicles

Ingredients

  • Black berries- 1.5 cups pureed
  • Greek Yogurt-1/2 cup
  • Mint leaves -1 tbsp
  • Honey-2 tbsp or as per taste
  • Almonds-5-6

Instructions

  1. Blend the ingredients in a high speed blender and freeze in popsicle moulds overnight
  2. Enjoy as an afternoon treat the day after
https://onewholesomemeal.com/blackberry-mint-popsicles/

Blackberry and Mint Popsicles photographed by OneWholesomeMeal


[kkstarratings]

Categories
Afternoon Snack | 3pm Meal Mid-Day Snack | 10 am Meal

Til Mawa Ke Ladoo | Sesame Energy Balls

This sweet is best enjoyed in winter. I know I am a little late, but this til mawa ke ladoo recipe had to be shared. It’s spring now and still a good time to try these little bites of heaven. I kid you not. Once you taste these, you would know what I am talking about.

If you are daunted by getting mawa for these ladoos, don’t be as most Indian provision stores will have it. For some reason, if you are unable to buy it from the store, I promise it is extremely easy to make at home using this method. However, for best results, although it would require some elbow grease, please do make it from scratch using this method. Trust me, it will be worth all the effort. Plus you can always make a little extra and freeze it to save you effort in the future.

Here is an easy to follow video, or scroll down for the recipe.

Quick Tips Before You Get Cooking

The most important ingredient is til or sesame itself. I cannot begin to stress the benefits of sesame, especially for women. These days most of the store-bought sesame is relatively clean but its always better to wash them once and air dry overnight on a flat surface before using them in this recipe. Another little hack to elevate the taste of these ladoos is blending the fennel seeds with the sugar. Powdered sugar mixes quick and easy with the ladoo mixture while the fennel gets homogeneously incorporated bringing out a beautiful flavour in the finished product.

Finally, it is the turn of my beloved coconut. I have to say, I look for excuses to include coconut in my desserts. This isn’t due to the current fads. I genuinely love how it adds a lovely dimension to a recipe without actually overpowering the taste completely. And who can resist its subtle crunch? Roasting the coconut for a minute or two on a low flame brings out the nutty flavour of the coconut but you could also use it as is.

So, without further ado, here is the Til Mawa Ke Ladoo recipe for you to try. You can also try my coconut ladoo recipe here and let me know which one you liked more.

Til Mawa Ke Ladoo by OneWholesomeMeal


Til-Mawa Laddoos

Prep Time: 10 minutes

Cook Time: 15 minutes

Total Time: 25 minutes

Yield: 100

Serving Size: 12-14 medium sized balls

Calories per serving: 134

Ingredients

  • White sesame-3/4 cup
  • Khoya/Mawa (reduced and thickened milk)-3/4 cup
  • Freshly desiccated coconut- 1/4 cup
  • Sugar-1/2 cup
  • Fennel seeds-1/2 teaspoon
  • Green Cardamom-3-4 pods
  • Chopped nuts-1.5 tbsp (optional)
  • Ghee-1 tsp

Instructions

  1. Blend the sugar with fennel seeds to get a powder like texture and keep aside
  2. In a thick bottomed skillet roast the sesame seeds on a medium-low flame with continuous stirring till the seeds just about start to turn light brown. Keep aside and let cool to room temperature
  3. Once the seeds have cooled off, blitz in a blender for a few seconds to get a coarse powder. Please be careful to not blend it too long and get smooth texture.
  4. Powder the cardamom seeds and keep aside
  5. In the same skillet add ghee followed by khoya (mawa) and on a low flame mix them well gently breaking the khoya lumps as you go. Make sure the mixture doesn't stick to the skillet. Continue this process for a minute or so. If the khoya you are using is too moist, then cook it on a low flame for approximately two minutes or until it reaches a semisolid consistency and starts to clump together.If the khoya is fairly dry you would need to "cook" it for a shorter duration and might need to add another teaspoon of ghee
  6. Turn off heat and add the reaming ingredients to the khoya and working quickly, mix well
  7. When the mixture cools down slightly, grease your palms with some ghee and form into tennis ball sized laddoos
  8. The laddoos need to be made when the mixture is fairly warm, a completely cold mixture would not come together well
  9. You could also wet your palms with some water and form the laddoos
https://onewholesomemeal.com/til-mawa-ke-ladoo-sesame-energy-balls/