Categories
Dinner | 8pm Meal Lunch | 1pm Meal

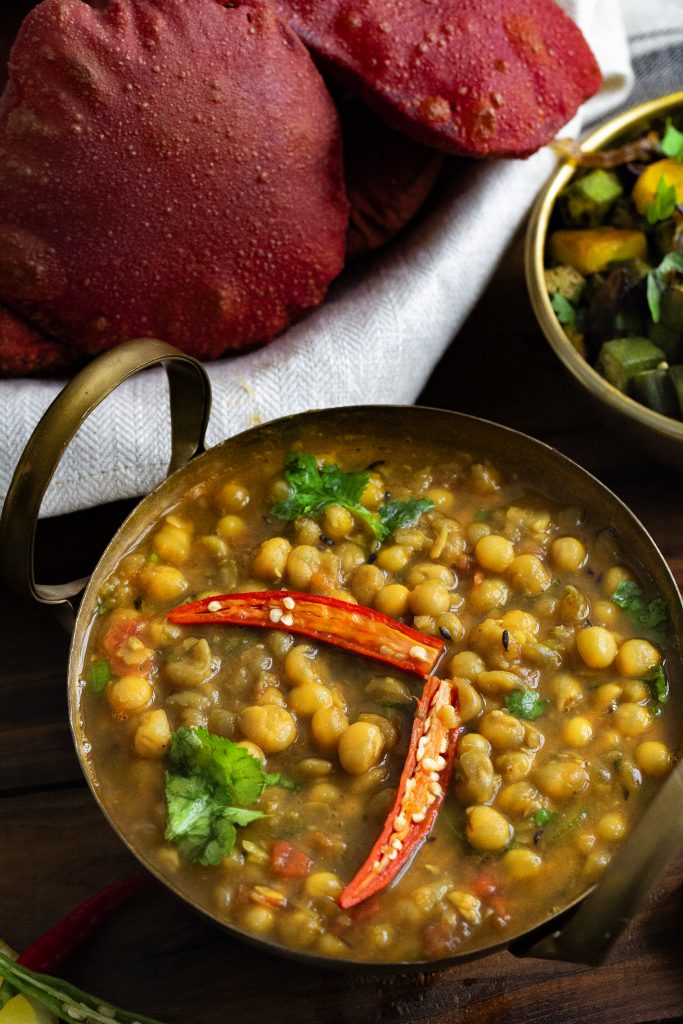
Besan Ki Sabzi | Authentic Bihari Recipe

The familiarity of the besan ki sabzi is a great way for me to connect with cherished childhood memories.

I hear and read about kitchens of the future. Kitchens where robots will whip up your favourites with the click of a button. Maximum output with minimal effort. Convenient indeed! Convenience is all one is after these days. Yet we have never lived in a more “inconvenient” time – the inconvenience of the soul. One has access to the best possible spas, medicine and gadgets. Yet one craves for the not so convenient times. Those times when we didn’t have just a button to access world news but knew how are neighbours were doing. The human and humane elements seem to be diminishing in our lives. And convenience is fast replacing compassion.

Traditional Bihari Recipe from Dadi Ma’s Kitchen

One can dine at the best restaurants and enjoy the most delectable of cuisines but nothing nourishes the soul as good old comfort food which transports you back into your grandma’s kitchen. With the pots, and pans clanking, an orderly frenzy with our favourite dishes being prepared. No robot can replicate that! After all, what made grandma’s food special was not just about the ingredients and their quantities, it was the love and affection she cooked with.

This besan ki sabzi is one such dish that will always remind me of my grandmother’s cooking. I recall us kids fighting over hot chickpea fries before they went into the gravy and in a matter of minutes, most of them would vanish. Daadi Ma (grandma) would shoo us out in her usual sweet angry way before she would whip up another batch for the curry. These fritters would make great lunch box snacks too!

Key Steps to Make the Perfect Besan Ki Sabzi

  1. The chickpea batter is made runny but not too watery as shown in the clip below.
  2. While cooking the batter one needs to work fast, keeping the flame low and constantly stirring so it cooks evenly. You may need to add a few tablespoons of oil in this step if the mixture starts to stick to the pan.
  3. The cooked mixture needs to be transferred to a greased plate right away and then kneaded to form an almost smooth dough. Then flatten it out as shown below before cutting out small squares to be fried.

Besan ki Sabzi

Prep Time: 15 minutes

Cook Time: 30 minutes

Total Time: 47 minutes

Serving Size: 3-4

Ingredients

  • Chickpea flour or Besan- 1 cup
  • Water - 1 cup and some extra
  • Ajwain- 1/2 tsp
  • Red chili powder-1/2 tsp (optional)
  • Cumin powder- 1/4 tsp
  • Coriander powder- 1/2tsp
  • Salt- 1.5 tsp or as per taste
  • Fried Onion paste- 3/4 cup ( fry onions in 1tsp oil till translucent, cool and then blend to make a paste)
  • Tomato paste- 1/2 cup
  • Ginger garlic paste- 1 tbsp
  • Cumin seeds-1 tsp
  • Bay leaf- 1
  • Cumin powder- 1/2 tsp
  • Coriander powder- 1 tsp
  • Garam Masala powder- 1/2 tbsp
  • Salt- 1.5 tsp or as per taste
  • Oil- For deep drying and some extra
  • Chopped coriander leaves for garnish -1.5 tbsp

Instructions

  1. In a deep bowl add chickpea flour, ajwain, red chili powder, Cumin powder- 1/4tsp, Coriander powder- 1/2tsp, Salt- 1.5tsp
  2. Gradually add water, mixing well with your clean hand till a smooth, pancake consistency batter , without any lumps is achieved ( see video for reference )
  3. Heat 1 tbsp oil in a non stick pan and add the prepared batter to it with constant stirring
  4. Cook on medium low flame with constant stirring till the batter starts to come together
  5. Turn off heat and transfer to a greased plate and knead with your hands to get an almost smooth dough
  6. Then flatten out the dough with your fingers gently till it reaches almost one centimetre thickness
  7. Cut out small two inch squares and deep fry on a medium flame, flipping sides till golden and drain them on a kitchen towel
  8. In the same pan heat almost approximately 1 tbsp oil and add bay leaf and cumin seeds
  9. Once the seeds start to splatter add the fried onion paste, ginger-garlic paste, 1/2 tsp cumin powder,1 tsp coriander powder, 1/2 tbsp garam masala powder and cook on a medium flame till oil starts to separate , then add tomato paste
  10. Cook for 3-5 minutes on a medium flame then add water and give it a nice mix , add salt as per taste
  11. Then add the fried chickpea squares to the gravy and let it simmer on a low flame uncovered for about 5 minutes
  12. The chickpea fries will absorb considerable amount of water so feel free to add some more hot water to the mix to thin out the gravy as per the desired consistency
  13. Turn off heat, garnish with chopped coriander and let it sit covered for 5 minutes
  14. Serve hot with rice or chapatis
https://onewholesomemeal.com/besan-ki-sabzi-authentic-bihari-recipe/

Categories
Afternoon Snack | 3pm Meal Mid-Day Snack | 10 am Meal

Caramel Custard Pudding | A Childhood Favourite

For a change a have a recipe fronot my childhood, but my husband’s. I did not grow up eating this caramel custard pudding but it’s my husband’s favorite.

When I finally tried my mother-in-law’s recipe and shared it on my Instagram feed, so many friends shared how it reminded them of their childhood. Delighted that my wee ones love it too. There are many exotic names out there for this simple yet yummiest of desserts but I am just going to call it Caramel Custard Pudding. That is how I know it since I first learned the recipe. Anyway, what’s in a name right?

A Few Things To Keep In Mind

Although the recipe itself is a pretty simple one, one needs to be careful about a few things. Making the caramel for example. Read here the technique to caramelise the sugar. Once it has reached the right consistency, add some water so it is pourable. Be very careful while you do this as hot caramel splutters.

The other step which needs caution is steaming. If using a pressure cooker, add approximately 1.5 cups of water, then place a slightly elevated but flat pan inside the cooker (I used an inverted sieve). This would serve as a platform to place the dishes. See image below:

Caramel (Custard) Pudding

This not only ensures even distribution of heat but also prevents water from entering the bowls while steaming . Then bring water to boil, place the dishes inside and put the lid on without the whistle. Then steam for 15-20 minutes

Once these two steps are sorted , you will have a delicious caramel custard in no time.


Caramel (Custard) Pudding

Prep Time: 15 minutes

Cook Time: 15 minutes

Total Time: 30 minutes

Serving Size: 4

Ingredients

  • Sugar-5 tbsp and 3.5 tbsp
  • Water-1.5 tbsp
  • Hot water- 2 tbsp
  • Milk- 2.5 cup
  • Eggs-3
  • Chopped nuts- 1.5 tbsp
  • Chopped raisins (optional)- 1 tsp
  • Pure Vanilla extract-1 tbsp
  • Butter-1 tbsp for greasing

Instructions

  1. Grease the insides of serving dishes with butter and keep aside
  2. Mix 5 tbsp sugar and 1.5 tbsp water and heat in a pan on medium-high heat till bubbles start to form, then gently swirl the mixture
  3. When the mixture turns golden brown, working quickly but carefully remove from heat and then add 2 tbsp hot water( keeping the bowl away from your body) and give it one last swirl before pouring out the caramel into prepared serving dish/es pouring evenly and equally
  4. To prepare the pudding mix, crack and gently beat eggs, add vanilla extract and keep aside
  5. Heat milk in a pot and add 3.5 tbsp sugar and whisk till the sugar dissolves , then let it come down to just a tad warmer than room temperature and add it to the egg mixture, whisk gently to mix well and add chopped raisins and nuts
  6. Pour into prepared serving dishes, cover them with foil and steam for 15 minutes in a vessel deep enough to prepare a water bath
  7. After 15 minutes gently remove the dish/es out of the steamer and carefully invert them on a flat plate, refrigerate for at least an hour, garnish with chopped nuts and serve chilled.
https://onewholesomemeal.com/caramel-custard-pudding/


Categories
Lunch | 1pm Meal

Bharwa Baingan | Stuffed Eggplant

Are you Team Baingan (eggplant/aubergine) or are you not? I am one huge fan. And this Bharwa Baingan might just me my favourite!

The gooey, metallic texture, and taste which some people tend to dislike, is what makes it extremely palatable to me. No kidding! The same isn’t true for the rest of my family though. The only way they will eat it is in bharta (roasted eggplant mash)or prepared Greek style with tons of parmesan. And I do not blame them. Eggplant is an acquired taste and more often than not, tastes best when cooked with citrus or tangy ingredient like tomatoes.

One of my childhood favourites is Methi-Baingan or eggplant cooked in mustard oil tempered with lots of garlic and panchforan (a five-spice mix) and flavoured with tomatoes and fresh fenugreek leaves. It is the best and will forever remain close to my heart but this Bharwa Baingan might just give it a close competition. It is THAT good!

I tried it first courtesy a friend who cooked it using her friend’s recipe. When I posted the behind the scenes images on my Instagram stories, another chef friend from my Taj days gave some fantastic suggestions which I incorporated when I made it again. It turned out amazing.

Let’s Get The Baby Eggplants Out

Baby eggplants are what we use for this dish. Not only do they cook quicker, but are also easy to work with. Make four slits but not all the way through and let them soak in cold saltwater for 15 minutes. Then drain and wipe off the excess moisture with a kitchen towel.

In a deep bowl, mix together coarsely ground roasted peanuts, toasted sesame, minced garlic, red chili powder, turmeric powder, desiccated coconut, coriander powder, and salt. Use your fingers to mix together the ingredients so the flavours get well incorporated. This is going to be our filling for the eggplants.


Prepare a wide dry plate. Spoon 1-2 tsp of the mixture into the slit eggplants making sure to fill them all the way to the top and place it on the prepared plate while you get ready for the tempering.

To a thick bottomed wide pan or skillet, add oil, and once hot, add the mustard and cumin seeds and curry leaves. Once the seeds start to crackle, add the stuffed eggplant, and reduce the flame to low. Cover and cook until 70% done.

Then add the remaining peanut-sesame masala mixture. Stir and mix on a low flame for a minute and add chopped tomatoes. Cover and cook for 5 minutes or until tomatoes are mushy and eggplant cooked through.

Turn off the heat and add fresh tamarind juice (prepared by soaking tamarind pulp in warm water, letting it sit in the water for 15 minutes and then straining) and jaggery. Mix well and let it sit for 10-15 minutes so the flavours absorb and serve hot with ghee rice or chapatis.

Bharwa Baingan (Stuffed Aubergine/Eggplant)

Prep Time: 20 minutes

Cook Time: 15 minutes

Total Time: 35 minutes

Yield: 100

Serving Size: 2-4

Ingredients

  • Baby eggplants, slit partially into fours-10-12(refer image above)
  • Roasted whole peanut- 1 cup
  • Roasted sesame- 4 tbsp
  • Desiccated coconut -3 tbsp
  • Turmeric powder-1 tsp
  • Chili powder- 1.5 tsp or as per taste
  • Coriander powder- 1.5tsp
  • Minced Garlic- 3-4 medium sized pods
  • Salt-1.5 tsp or as per taste
  • Mustard Seeds-1/2 tsp
  • Cumin Seeds-3/4 tsp
  • Curry Leaves- 10-12
  • Tomatoes- 1cup, finely chopped
  • Tamarind water-2 tsp
  • Jaggery-2.5 tsp
  • Chopped coriander-2 tbsp or as desired
  • Oil-3-4 tbsp

Instructions

  1. Slit the eggplants vertically but not all the way through and let it soak in cold salt water for 15 minutes. Then drain and wipe off the excess moisture with a kitchen towel.
  2. In a deep bowl, mix together coarsely ground roasted peanuts, toasted sesame, minced garlic, red chilli powder, turmeric powder, desiccated coconut, coriander powder and salt. Use your fingers to mix together the ingredients so the flavours get well incorporated. This is going to be our filling for the eggplants
  3. Prepare a wide dry plate.Spoon 1-2 tsp of the mixture into the slit eggplants making sure to fill them all the way to the top and place it on the prepared plate while you get ready for the tempering.
  4. To a thick bottomed wide pan or skillet, add oil and once hot, add the mustard and cumin seeds and curry leaves. Once the seeds start to crackle, add the stuffed eggplant and reduce the flame to low. Cover and cook until 70% done.
  5. Then add the remaining peanut-sesame masala mixture. Stir and mix on a low flame for a minute and add chopped tomatoes.Cover and cook for 5 minutes or until tomatoes are mushy and eggplant cooked through.
  6. Turn off the heat and add fresh tamarind juice(prepared by soaking tamarind pulp in warm water, letting it sit in the water for 15 minutes and then straining) and jaggery. Mix well and let it sit for 10-15 minutes so the flavours absorb and serve hot with ghee rice or chapatis.
https://onewholesomemeal.com/bharwa-baingan-stuffed-aubergine-eggplant/


Categories
Dinner | 8pm Meal Lunch | 1pm Meal

Lauki Chana Dal | Bottle Gourd with Lentils

Lauki Chana Dal is the perfect one-pot meal to give you the wholesomeness of bottle gourd and lentils.

As summer peaks it gets harder to spend time in the kitchen. But also, Mother Nature makes sure we stay hydrated by flooding us with the best summer bounty. Most veggies available through summer have high water content. This makes it easy to digest while having a cooling effect on our system. The gourd family is one such. Vegetables from this family such as cucumbers, angled luffas, pointed gourd, bottle gourd are all high in water and fibre, making them an almost complete meal in themselves.

Bottle gourd is one such staple summer veggie in our household. It is a popular vegetable in the south and southeast Asian region where summer gets extremely hot and sultry. Growing up, this vegetable featured regularly on our menus throughout the week during summer. Many of us from India also know it as Lauki. It is usually not a very well-liked vegetable due to its watery taste. However, if prepared well most people do grow to like it as my fussy husband has 😉 I remember enjoying it with hot ghee rice and chilled yogurt on a hot summer afternoon with some raw onions mixed with pickle masala on the side.

The Benefits of Lauki Chana Dal

Although very healthy, the veggie is low in protein. But that problem gets addressed as soon as you add Chana dal (split chickpeas) to it. It also makes for a much more delicious one-pot meal. Using mustard oil enhances the flavour multiple-fold but feel free to use the oil of your choice. Another key ingredient is fenugreek seeds. They are well known for their multiple benefits. However one needs to be careful while cooking with fenugreek as using an excessive amount makes the food bitter and so does overcooking it.

Using a pressure cook reduces the cooking time to a great extent, however you could use a normal thick bottomed wok as well. Here is a stepwise instruction with images to make this tasty dish.

First, I peeled and cubed a small-sized bottle gourd and kept aside. Then to hot oil, I added fenugreek (methi)seeds, finely chopped garlic, asafoetida, and green chilies (as per taste) and sautéed on medium-low flame for a few seconds making sure the methi doesn’t burn.

To that, I added pre-soaked chana dal (washed and soaked in water for 30 minutes) and turmeric and mixed everything well.

The last step – I added the cubed bottle gourd and salt, mix, and pressure cooked for 5 minutes till the pressure set in. Then turned off the heat and let the pressure release on its own and took off the lid and cooked till the water (good quality bottle gourd releases a lot of water) reduced to the desired consistency.

If you are using a normal wok, just cover and cook till done, keeping the flame to medium-low and stirring intermittently. There is no need to add additional water.

This curry is enjoyed best with hot rice and daal but tastes good with chapatis too.

Lauki Chana Dal


Lauki-Chana Daaal (Bottle Gourd with Split Chickpeas)

Ingredients

  • Lauki/Bottle Gourd, cubed- 1 small size (1.5 cups)
  • Pre-soaked Chana Daal/Split Chickpeas)- 2 tbsp
  • Finely chopped garlic -4 pods
  • Green chilies-1-2 or as per taste
  • Methi/Fenugreek seeds-1 tsp
  • Asafoetida-1/2 tsp
  • Turmeric-1 tsp
  • Salt-1.5 tsp or as per taste
  • Mustard oil-1 tbsp or any oil of choice

Instructions

  1. Heat oil in a pressure cooker or a thick bottomed wok then reduce flame and add asafoetida, fenugreek seeds, green chilies and garlic and sauté for a few seconds till the fenugreek seeds start to release an aroma and change colour . Make sure to stir continuously and not increase the flame as the seeds burn fast and that would spoil the dish
  2. Then drain and add pre-soaked chana daal and turmeric seeds and mix well
  3. Finally add the chopped bottle gourd and salt and pressure cook for 5 minutes from the time pressure sets in
  4. Then turn off the heat and let the pressure release on its own and take off the lid and cook till the water (good quality bottle gourd releases a lot of water) reduces to desired consistency.If you are using a normal wok, just cover and cook till done, keeping the flame to medium low and stirring intermittently. There is no need to add additional water .
https://onewholesomemeal.com/lauki-chana-daal-bottle-gourd-with-lentils/


Categories
Breakfast | 8am Meal Dinner | 8pm Meal

Savoury Masala Oats | Tasty And Healthy

I have a love-hate relationship with Oats. I love to hate it! But there are people in La Familia who like it and couldn’t stop raving about it especially after having the ready-to-eat Masala Oats version from a popular Indian brand.

Oat-hater me hesitatingly and grudgingly accepted it was quite delicious indeed. Now, a more sensible version of me would have simply reordered from my Indian grocer’s and be happy with it. However, I am neither simple nor sensible and do like a good challenge. So, I did the unthinkable! I tried to create my very own version minus the not so great stuff which these ready to eat versions have!

Now, I have never cooked oats in my life. So it did take me a few attempts to perfect this recipe. But once that was done, I was pretty chuffed with myself. I cannot call myself an oats-hater anymore, maybe a grudging lover. I have used chicken stock here and have to admit that it is one ingredient that imparts the maximum amount of flavour. If you follow a vegan or vegetarian diet feel free to substitute it with vegetable stock but try not to use water. Pretty please! Also, I skipped salt as both cheese and stock have a lot of salt. You can add salt as per taste and the stock used.

Here is an easy to follow video of the masala oats recipe. For detailed steps scroll down.

I used the old fashioned rolled oats. You can use steel-cut or instant versions without much effect on the taste. You might need to adjust the amount of liquid to be added and the cooking time would differ as well. Try this recipe for yourself and don’t forget to share how you like it!

Masala Oats by OneWholesomeMeal


Savory Masala Oats

Prep Time: 10 minutes

Cook Time: 10 minutes

Total Time: 20 minutes

Yield: 100

Serving Size: 3-4

Calories per serving: 250

Ingredients

  • Old Fashioned Rolled Oats- 1 cup
  • Chicken or Vegetable Stock-2 cups
  • Chopped onions-1/2 cup
  • Minced garlic- 1 tbsp
  • Chopped and blanched veggies of choice-1 cup (I used carrots, orange bell peppers, cauliflower and green peas)
  • Stir-fried tofu cubes -1/2 cup (optional)
  • Garam Masala-1 tsp
  • Turmeric powder-1tsp
  • Spring Onions, chopped fine- 3 tbsp for garnish
  • Grated Cheddar and Pepper Jack Cheese-1/2 cup
  • Butter-2 tbsp+1 tbsp

Instructions

  1. Melt 2 tbsp butter in a pan and roast the Oats till just brown.Keep the flame low all the time and e careful not to over roast
  2. Transfer and keep aside and in the same pan melt the remaining butter and add garlic and cook till brown followed by chopped onions. Keeping the flame to medium-low fry the onions till nice and brown
  3. Add butter-roasted oats, chicken/veg stock,turmeric powder, garam masala and mix well. Cook covered for a minute till the oats are almost done
  4. Add blanched veggies and tofu and mix well
  5. Add shredded cheese, mix, taste for salt and add salt if needed
  6. Garnish with chopped spring onions and serve hot!
https://onewholesomemeal.com/savoury-masala-oats/


[kkstarratings]

Categories
Afternoon Snack | 3pm Meal Mid-Day Snack | 10 am Meal

Til Mawa Ke Ladoo | Sesame Energy Balls

This sweet is best enjoyed in winter. I know I am a little late, but this til mawa ke ladoo recipe had to be shared. It’s spring now and still a good time to try these little bites of heaven. I kid you not. Once you taste these, you would know what I am talking about.

If you are daunted by getting mawa for these ladoos, don’t be as most Indian provision stores will have it. For some reason, if you are unable to buy it from the store, I promise it is extremely easy to make at home using this method. However, for best results, although it would require some elbow grease, please do make it from scratch using this method. Trust me, it will be worth all the effort. Plus you can always make a little extra and freeze it to save you effort in the future.

Here is an easy to follow video, or scroll down for the recipe.

Quick Tips Before You Get Cooking

The most important ingredient is til or sesame itself. I cannot begin to stress the benefits of sesame, especially for women. These days most of the store-bought sesame is relatively clean but its always better to wash them once and air dry overnight on a flat surface before using them in this recipe. Another little hack to elevate the taste of these ladoos is blending the fennel seeds with the sugar. Powdered sugar mixes quick and easy with the ladoo mixture while the fennel gets homogeneously incorporated bringing out a beautiful flavour in the finished product.

Finally, it is the turn of my beloved coconut. I have to say, I look for excuses to include coconut in my desserts. This isn’t due to the current fads. I genuinely love how it adds a lovely dimension to a recipe without actually overpowering the taste completely. And who can resist its subtle crunch? Roasting the coconut for a minute or two on a low flame brings out the nutty flavour of the coconut but you could also use it as is.

So, without further ado, here is the Til Mawa Ke Ladoo recipe for you to try. You can also try my coconut ladoo recipe here and let me know which one you liked more.

Til Mawa Ke Ladoo by OneWholesomeMeal


Til-Mawa Laddoos

Prep Time: 10 minutes

Cook Time: 15 minutes

Total Time: 25 minutes

Yield: 100

Serving Size: 12-14 medium sized balls

Calories per serving: 134

Ingredients

  • White sesame-3/4 cup
  • Khoya/Mawa (reduced and thickened milk)-3/4 cup
  • Freshly desiccated coconut- 1/4 cup
  • Sugar-1/2 cup
  • Fennel seeds-1/2 teaspoon
  • Green Cardamom-3-4 pods
  • Chopped nuts-1.5 tbsp (optional)
  • Ghee-1 tsp

Instructions

  1. Blend the sugar with fennel seeds to get a powder like texture and keep aside
  2. In a thick bottomed skillet roast the sesame seeds on a medium-low flame with continuous stirring till the seeds just about start to turn light brown. Keep aside and let cool to room temperature
  3. Once the seeds have cooled off, blitz in a blender for a few seconds to get a coarse powder. Please be careful to not blend it too long and get smooth texture.
  4. Powder the cardamom seeds and keep aside
  5. In the same skillet add ghee followed by khoya (mawa) and on a low flame mix them well gently breaking the khoya lumps as you go. Make sure the mixture doesn't stick to the skillet. Continue this process for a minute or so. If the khoya you are using is too moist, then cook it on a low flame for approximately two minutes or until it reaches a semisolid consistency and starts to clump together.If the khoya is fairly dry you would need to "cook" it for a shorter duration and might need to add another teaspoon of ghee
  6. Turn off heat and add the reaming ingredients to the khoya and working quickly, mix well
  7. When the mixture cools down slightly, grease your palms with some ghee and form into tennis ball sized laddoos
  8. The laddoos need to be made when the mixture is fairly warm, a completely cold mixture would not come together well
  9. You could also wet your palms with some water and form the laddoos
https://onewholesomemeal.com/til-mawa-ke-ladoo-sesame-energy-balls/