Categories
Food Photography and Food Styling Uncategorized

Understanding Shutter Speed & an ANNOUNCEMENT

Come June 2021, I would officially be blogging for 4 years now. Time flies and how! I am not the one to show perseverance but that is one trait blogging has taught me and how! It has taken a while but here I am, nowhere close to my goal but a long way from where I started.And that for me is a great feat to celebrate.

And celebrating we are! Why “we” not “I” you might wonder. In order to answer that question, I will have to backtrack a little.

Meera( https://7saffronstreet.com, Preethi (https://cookingwithpree.com) and I have been friends on instagram since a couple of years now.  From being ardent lovers of food to becoming bloggers and eventually morphing into food photographers we’ve had very similar journeys. Along the way we’ve experienced our own learnings, hurdles and wins. When we look back at our starting points and look forward at our future milestones, one thing stands out as a common and strong goal for all three of us.  It is the passion to teach and spread the knowledge back into the community where we derived it from. And this is what our little celebration is about- Giving back! ‘Coz if you ask me, there is no better way to celebrate but by sharing and growing together.

To give a shape to this goal, nurture and propel it continually, we are launching a food photography club called “The Food Foto Club” on Instagram. Through this club we intend to power up your food photography journey by sharing our experience and guidance periodically. We will also invite experts in the field from time to time to share their wisdom.

That’s not all, each time we share, we welcome you all to share your images based on the learnings with us. And last but not the least exciting giveaways from time to time too.

I truly hope that this initiative of ours will make your photography journey a tad easier and much more fun! ‘Coz isn’t learning a lot more easier when one is having FUN?

To kick off this collaboration we decided to start from the very basics- The Golden Triangle- breaking down the three pillars of Food Photography for you. While Meera and Preethi will share about Aperture and ISO respectively, in this post I am going to demystify  SHUTTER SPEED.

Breaking Down Shutter Speed

Camera is similar to the human eye in many ways. It plays with light and forms images just like our eyes do. Just like the iris in human eye shrinks and enlarges thereby controlling the amount of light that enters the eye, a camera’s shutter opens and shuts to control the amount of light entering the camera. And how quickly or slowly it opens and shuts, decides the amount of light entering the camera.

Impact on Exposure

This speed of shutting and opening of the shutter is typically measured in fractions of a second. For example, 1/4 means a quarter of a second, while 1/250 means one-two-hundred-and-fiftieth of a second (or four milliseconds), which means when your camera is set at 1/4 shutter speed, the shutter closes considerably slower than when it is set at 1/250.

And as you might have guessed by now, longer the shutter stays open, more amount of light comes in resulting in brighter and more exposed images ; conversely , faster the shutter speed, relatively lesser amount of light comes in and resulting image is relatively less bright.

“Shutter Speed is a Fraction

But let that not be a Distraction

Decrease the Denominator

And make your images Brighter.”

The six images below are an illustration of how shutter speed effects exposure. All images have been shot at ISO 400 and Aperture f/4.0.

As you can see with reducing shutter speed the image gets more exposed.

Impact on Capturing Degree of Motion

Shutter Speed has a two pronged effect- not only does it effect the level of exposure as explained above but it also affects the degree of movement captured. A faster shutter speed(1/200 and above) captures movement in a more crisp fashion and allows for less motion blur (as illustrated in the first image below).Whereas a slower shutter speed (because the shutter is open for longer) will allow for more motion blur (as illustrated in the last image below).

As you may have guessed by now, while capturing motion is a skill we do want to learn as food photographers, using extremely high (1/1000 and higher) or extremely low (1/8 and lower)speeds is very rare. However creativity follows no rules and it is good to know the technicalities in order to bring our creative vision to life.

In below illustrations I share 4 images at 4 different shutter speeds- 1/200 sec,1/15 sec, 1/4 sec and 1 second. Do note for shutter speeds higher than 1/200 , to avoid shake and a blurry image a tripod is required. Also, I have modified the ISO to control exposure so images are not over or under exposed with changing shutter speeds. Aperture is fixed at f/5.6.

Take time to observe how the stream of milk looks different with changing shutter speed.

As you can see with reducing shutter speed the milk stream tends to freeze more.

You could try out the same yourself with a similar subject or even with flour, sugar, flour, steam or smoke.

I am going to leave you with a question to ponder on- In what food/still life photography scenarios is motion blur a good thing?

————————————————————————————————————————————————————-

Want to dig a tad deeper and understand how Direction of Light impacts your images? Download my free E-Book here.
Categories
Food Photography and Food Styling

Styling Dal-Tips and Behind the Scenes

Styling Dal-Tips and Behind the Scenes
Meera Seetharaman-Food Stylist & Photographer
From when she was a little girl, Meera Seetharaman has been interested in all things food. Passion for food has been a constant thread in her life which led her to find her love for food photography. An Information Technology professional by day, Meera moonlights as a freelance photographer, food stylist and content creator. The varied culinary experiences and memories she has accrued through the years, starting from her mom’s kitchen to her own, has enabled her to add depth and uniqueness to her food photographs. Triggering her audience’s nostalgia through the stories she weaves into her dark and moody photographs is her cup of chai. She loves playing with natural light and expressing her food stories through simple, clean and rustic styling. She excels at styling Indian food and adds an authentic and soulful touch to it.
Meera hails from Chennai, India and currently lives with her family in the North Eastern United States. You can view her work at www.7saffronstreet.com, www.instagram.com/meera.seetharaman and www.stocksy.com/meeraseetharaman.


Before we get into Styling Dal-Tips and Behind the Scenes let us understand the reasons behind the choice of subject.

Why Dal?

One of the questions I get asked very frequently is how to style a very simple dish such as ‘Dal’ and make it look inviting. Dals are Indian lentils and there are so many varieties of them. The term is also used to refer to cooked versions of these lentils.

What is Dal?

Cooked Dal is a simple, but comforting and delicious dish that resembles a soup or stew.  They are tempered with ghee and select spices and usually eaten with white rice or Indian flatbread Roti. You can consider Dal as India’s lifeline and every household across the country has its own preferred recipe for it.

Now you know why Dal is important to every Indian and why every Indian food photographer would want to photograph and showcase it. Although it is a delicious, gut friendly and most sought after food, it doesn’t present a glamorous appeal the way colorful salads or cupcakes would. It doesn’t also have an inviting texture like pastas or sandwiches.

So how do we get drool worthy images of a plain yellow liquid? 

Power It Up With Your Story

Nothing drives styling and adds depth to an image like a good story does. Every food has a story and so does ‘your’ Dal. What is that you want your audience to take away looking at your image? How is your Dal unique and different from others? Why do you even want to showcase your Dal? Giving these questions a careful thought will give a good jumpstart to your styling process.

A few things I wanted this image to convey:

  • It is a very aromatic dal (as signified by the onions and garlic)
  • I love eating dal with flame roasted pappads
  • The dal is hot and fresh (notice the tongs and clean garnish/tadka)
  • I love to eat my dal with a generous squeeze of lime

Use Rustic Background and Props That Add Character

The right choice of backdrops and pertinent props not only help you deliver the story, but they also amplify it greatly. In my opinion rustic backdrops and vintage props share a vibe that exhibit Indian food so beautifully. Here’s why I think so:

  • Our recipes and cooking methods are hundreds and thousands of years old
  • We use our traditional and old fashioned utensils (like kadhai) even today in our daily lives
  • I learned to cook from my mom and grandma, whose kitchens portrayed a very rustic feel

I did not look beyond my kitchen to find props for this image. From the kadhais(pans) to the cutting boards, everything in there is stuff I use everyday in your kitchen

Vintage looking backdrops and props impart such a strong and powerful character to your frames. They have the ability to trigger nostalgia in your audience and make them feel the image as opposed to merely ‘looking’ at them.

Keep The Colours Minimal and Balanced 

Yellow foods could be tricky to work with. The bright color draws the attention of the viewers right away. However, they may turn out to be overpowering also for the very same reason. When the hero is of a really flashy color like this Dal, it is important to keep the overall color palette very simple and balanced.

  • A subtle blue or gray background highlights yellow food beautifully. White does a good job there too, but I think medium colors gives a closer to home feel
  • Adding too much of other flashy colors such as red (think spices) to the frame, which is very typical with styling Indian food, not only makes your styling cliched, but also contributes to color clashes
  • Including onions, green chilies, cilantro etc. in the scene just enough to tell the story keeps the colors simple, cohesive and balanced
  • The props also have been chosen with a very careful consideration of their colors and their impact to the overall frame

Incorporate Layers to Make Your Hero Stand Out

Layers elevate the aesthetic appeal of any food. Using layers is a good technique to add emphasis on the hero and isolating them from other elements in the frame. They however have to be chosen thoughtfully and in alignment with your story. The layers must look natural and fit into the frame cohesively . The objective of using them is to elevate the interest of the hero and the overall image. Make sure they don’t take the spotlight away from the hero or clutter the frame.

There’s a lot going on in this image when it comes to layers

  • I’ve used the cutting board as a layer to frame my hero (Dal) and make it stand out from the rest of the elements in the frame. I’ve nested the kadhais here to add some interest
  • The tadka(seasoning on top) and herbs are layers added directly on the hero and the way they’ve been placed is very intentional. The idea is to make the Dal more attractive and spark the “I WANT TO EAT THAT NOW!” feeling
  • The bamboo plates on the side are also layered just too add a wee bit more interest

Bring About a Lived-in Feel

An intentional mess strings the different elements in the frame together and imparts a homey and lived-in touch to the image.

Imagine how your cooktop or counter looks like just after you finished cooking

Try recreating that in your frame, albeit minimally. A napkin thrown into the scene casually, a few crumbs/bits of the food strewn here and there, tiny clippings of herbs etc. add a very organic finishing touch to your image. What’s important here is to know how much is too much. When it comes to mess, little goes a long way. Too much of it makes the scene look very clumsy and unappealing.

In conclusion, think deeply through your story, make intentional choices of every element and their position in the frame and build it step by step. Practice patience and most importantly have a ton of fun!

Here is a short stop-motion for you to see how I styled the above Dal image 


——————————————————————————————————————————

Some other posts on Food Styling & Photography that you might find helpful:

Behind the Scenes & Styling Tips by Ritumbhara Chinnabalan

Shooting Closeups with Standard Lenses

How to create and style unique fusion dishes for food photography

Categories
Food Photography and Food Styling Uncategorized

How to create and style unique fusion dishes for food photography

How to create and style unique fusion dishes for food photography
Jay- Food Stylist and Photographer

Hello 🙂

I am Jayashree. You can call me Jay. I am a former technology professional. Food photography started as a creative outlet for me, but soon turned into a professional pursuit. I think of creativity as a way of life. I am deeply inspired by nature. My lifelong interest in human nature and learning has now morphed into a deep observation of online interaction. I am always looking for ways to effectively use technology without compromising on wellbeing. I think better when I write. You can read some of my posts on creativity, photography and wellbeing at https://boiledbeanstudio.com/ creativity/. My recent photography work can be found on Instagram @boiledbeanstudio

What do I mean by fusion dishes?

Let’s think of fusion dishes as those that combine elements of different cuisines or techniques.

We live in a world where most of us are exposed to different cuisines and foods from different parts of the world. As food photographers/stylists, food is our main muse and model. So most of us also tend to be foodies and cooking enthusiasts. In this post, let’s look at how we can cook and style fusion dishes so that they make for unique and interesting subjects for the camera.

Culinary heritages and traditional recipes are of course valuable and must be preserved. But in today’s world where influences come from multiple sources and legacies, it is also important to learn to use and hone them effectively in our work. So if your food and work are fuelled by multiple cuisines and cultures, and you want to express that amalgamation through your cooking or photography, then this post might help you get started.

How to create fusion foods?

So here are some ways:

  1. Switch-up the appearance and presentation of a dish
  2. Replace or switch-up ingredients or flavours from different cuisines
  3. Switch-up cooking techniques

In this post, we are only looking into the first method, which is also the easiest. I will be exploring the other two methods in the upcoming posts of this series and will soon publish them on my website https:// boiledbeanstudio.com/creativity/

Why should we change the appearance of a dish at all?

Because sometimes, it is fun to switch up things and break the monotony.

Sometimes, as photographers, it is our job to present familiar subjects in new and interesting ways.

Sometimes, small tweaks in presentation help elevate an already great dish.

And is that all?

Not really. Eating is a multi-sensory act. When we look at food presented in an appealing way, the pleasure centres in our brains wake up and whirr into action. Anticipations are created, expectations are set. And as food photographers, we know this already. We even try to take advantage of this fact by styling our subjects such that we provide effective visual cues to the viewer. The drips, the drops, the spraying of water, the brushing of oil, the glistening of syrup, the dropping of crumbs — all go to convey everything we want the viewer to sense and feel through the visual medium.

Defamiliarising works wonders

Going by the same logic, if we switch-up the presentation of a dish using non-traditional methods, add some fresh new cues, style the scene differently, we could stimulate curiosity and generate interest. Defamiliarising is a powerful way to direct attention to our images in a visually overloaded world. Even a Kheer-Desensitised viewer might take notice and wonder, if it is presented like a crème brûlée. It’s the “surprise element” that might just do the trick. Surprise elements are a good thing in photography.

Lastly, this whole effort might serve a deeper purpose. I have come to realise that foodies mainly come in two categories — those willing to try unfamiliar food and those that are not. The first group is easier to please because their main motivation is to seek new experiences or create new memories. The second group however, needs a bit more coaxing. Their main motivation is comfort, familiarity and stability so when food looks too different from their regular fare, they may never even try sampling a dish, let alone attempt to cook it.

Avoiding Stereotypes

Sometimes the stereotypes surrounding a cuisine is also to blame. Too spicy, too sweet, too bland, too ugly can be some of the unnecessary generalisations applied to many cuisines, which in reality may have much to offer to anyone that takes the time to learn them. Putting a new spin on an existing dish by adding a few familiar touches may just wean the second group into appreciating something new, in small, not-so-scary bites.

Via photography, or any other art, we seek to influence — even if it is in small ways. And since food is already a great connector of people, removing or reducing a few unnecessary mental blocks can be a great way to win over new audiences. As an added bonus, we might even end up rekindling interest in an already existing audience. And that is always a good thing.

Now that we have explored the reasons, let’s look at how to go about creating such fusion subjects effectively, with the help of an example.

How do we pick the right (fusion)dish for food photography?

Not all recipes lend themselves well for a fusion experiment. So how do we choose? Here are a few starting points that led me to creating an excellent fusion dish from its classic beginnings.

Styling

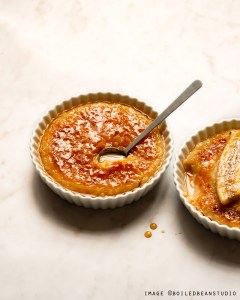
Recently, I added a culinary torch to my food styling toolkit. When I was looking for ways of using it, I learned that one of its most popular uses is in caramelising a layer of sugar on Crème brûlée, which, if not for this final step, would have simply remained custard in a cup. The crunchy sugar shell is what elevates the dish in its taste, texture and appearance. This made me think — “What other familiar dish can we elevate using a sugar shell”?

This is how Kheer brûlée first popped in my mind.

Ingredients

Like custard, which is the basis for Crème brûlée, Kheer is a simple, milk based dessert. And most versions of kheer use sugar as the sweetener (some use jaggery). So I thought it would work well with a sugar shell (and it did)!

Instinct (and information)

Kheer is a well known Indian/South Asian kin of milk pudding, prepared in many different ways. I also now know (from Instagram images) that every country/culture has a variation of this dessert, even though it is called by different names in different languages and prepared on different occasions. But in its simplest form, it is simply a milk-and-rice pudding. Everybody already knows this dessert in some form or other, and that can be a good foundation on which to build a fusion dish.

Application

So now you know how I picked my fusion candidate. But how would you use this information in your own projects? Here is how. The next time you enjoy a dish, or see a food image with an eye-catching presentation, make a mental note of its most appealing visual feature and the technique that was used to create it. (Pretty Ruffles? Glossy caramelisation? Shape? ).When you are cooking something easy and familiar back at home, recall this new feature, and think about how (and if) it can be incorporated into the homely dish and make it even better and prettier. If it feels like it might work well, you’ve scored a new project topic! And if it doesn’t sit right, you can simply move on and think about it all over again for another dish! The point here is to have enough specific material to recall at the right time.

I am sure that you can think up your own unique combinations, if you put your mind to it. And unique subjects are a good thing in photography.

Experimenting on what to tweak

The first time I create a changeling, I don’t try to photograph it. I just experiment and play around to see what happens. It is always practical to focus on one challenging task at a time. When I first played around with the butane torch, I did not even bother making the kheer. I started by sprinkling different types of sweeteners on a baking tray and caramelising them. This helped me get a better control of the tool and technique. It also made me realise that fine white sugar, raw sugar, brown sugar and jaggery powder all burn at a different rate, leaving very different colours and textures of residues!

I also realised from trial and error, that it might be best to make the sugar layer thin at first (so that it could caramelise uniformly) and then iteratively add on more layers to get a thick, glossy shell in the end. But this meant that there would already be so much sugar in the dish! So I made a mental note to omit (drastically reduce) sweetening the kheer while cooking to balance the taste.

Another thing I realised was that sugar would need a firm surface to sit on, and some kheer versions are runny. So in order to make the surface firm, I may have to chill the kheer in refrigerator.

By simply experimenting and breaking down the steps, I was able to make all these notes and corrections before even beginning to cook the kheer.

How to “style” the final dish

Since we are trying to switch up the presentation here, it is important to style the fusion dish well for stronger impact. Here are some starting points to think about:

Simplify matters by picking up the styling of the dish from which you imported the switch-up feature. In this case, that would be Crème brûlée.

Style it like a whole other dish! Since the switch up focus here is on appearance, we can be imaginative! But let there be a method to the madness — be guided by your style, seasons or props. For example, I did not have ramekins on hand to style my dish just like Crème brûlée. I had pretty white ceramic tart shells though, so I decided to style the new dish like little pies.

The one thing do I avoid though, is to style the dish in the way the original dish is usually styled. I think that it would undo the impact and drag the dish back to where it started. This whole exercise was to create unique subjects — remember? Still, that’s only a personal preference, so feel free to style it any which way you like — so long as it feels right for you, and your target audience.

That’s it for now, let’s talk about other effective ways to create unique fusion food subjects soon. If you wan’t to read more, you’ll find more posts on my website https://boiledbeanstudio.com/creativity/

Until then, let’s be adventurous!

How to create and style unique fusion dishes for food photography

Find similar posts on food styling here and here.

Categories
Food Photography and Food Styling Guest Blogs

Shooting Closeups with Standard Lenses

Shooting Closeups with Standard Lenses
Shilpa Kerur- Food Content Creator & Photographer

Hello guys! I am Shilpa, a food content creator based in Bangalore, India and the person behind my blog and Instagram page: Vanilla Trails.

A little about myself

I am an engineer by profession and quit a 9 year stint in the IT sector to  finally follow my passion for food. I discovered my love for food quite recently. Until 10 years ago, I didn’t even know I liked exploring new cuisines and flavours nor did I know that I was capable of cooking even rice let alone bake fancy desserts.

It was my love for baking and creating healthy recipes that began my journey of food photography. I wanted to be able to share these recipes and pictures with everyone.

A self taught baker and food photographer most of my knowledge is thanks to generous people who have shared their knowledge on their blogs and YouTube channels. Here is my humble attempt to share a few tips on shooting close ups with standard lenses that I have learnt along the way.

Shooting Closeups doesn’t have to be an expensive affair

We all love the magic of a good closeup shot- the beauty in the details that our eyes don’t commonly register.

For clicking a good closeup shot, one needs a macro lens. It lets you get closer to the subject, capture the details that our naked eye can’t even see. That’s why most of us find a close up shot so fascinating!

Macro lenses undoubtedly are the best way to capture a closeup. However when one is beginning their photography journey it may not always be the most economical option.

So what do you do if you love closeup shots and you don’t have a macro lens? Well, here are some things that will help you take beautiful close up pictures with your regular lens.

Things to keep in mind while shooting close-ups

The first thing to understand when you are trying to click closeups shots, is – the more enlarged an object more visible the details. So one has to focus on capturing as much details as possible to take a good close up shot. Here are some factors to consider.

Shooting Closeups with Standard Lenses-Tips & Tricks

Aperture

Use a high F-stop number. This means that the aperture is high leading to a wider depth of field. Wide depth of field indicates that it keeps maximum things in the frame in focus. It is always a good idea to have as much detail of the object in focus as possible. Because when we see the object enlarged, which is what happens when we shoot close up, the details are that much more visible. Blurry closeups are hardly attractive. A good F-stop number to work with in this case, will be just 1 or 2 stops below the maximum value on your camera for that lens.

Light and ISO when shooting closeups

The second thing to consider while clicking closeup is to shoot in enough light, even if you want a moody feel to your pictures. Clicking in low light always affects the details. It will also require you to shoot with a higher ISO to increase the amount of light in the frame. But this in turn will introduce noise in the picture and the details will not be as sharp as needed for a closeup shot.

Tripod is key when shooting closeups

The next thing that helps big time is using a tripod. Clicking handheld can create a blur with even the slightest movement of our hands. A tripod ensures that there are no compromises in terms of sharpness because of any camera movement. This results in sharper images.

Minimum focus distance when shooting closeups

Another factor that plays a big role when trying to click closeup, is not to get too close to the subject physically when shooting.

What is Minimum Focus Distance?

Every lens has a minimum distance at which it can start to focus well. The minimum focus distance is the shortest distance at which a lens can focus. Set up your camera at the closest point from where you can clearly focus on the subject, without compromising the quality/sharpness.

Click pictures from this distance, even if it means you end up framing more area than needed. You can always crop out the unwanted details later.In this case, it is always good to crop the image to focus on the area you want. This ensures we do not miss out on those beautiful details and avoid distortion around the edges. 

Here are some examples of close up shots that have been well appreciated on my blog/instagram account along with  the EXIF data:

Shooting Closeups with Standard LensesBlueberries

Camera settings: F 22 | 8” | 50mm | ISO 200 

Shooting Closeups with Standard LensesCherries

Camera setting: F 18 | 2” | 50mm | ISO 100

Shooting Closeups with Standard LensesPopcorn

Camera settings: F 18 | 4” | 50mm | ISO 100

Shooting Closeups with Standard LensesSesame seeds

Camera settings: F 22 | 4” | 50mm | ISO 100 

Editing

One last thing to consider for good closeup pictures is post processing. While editing, do not be afraid to increase the sharpness and clarity just a little bit more. Also sometimes intensifying the shadows makes the image look sharper. So, play with various parameters while editing and see how you can increase the sharpness and intensify the details. And you are all set to create some beautiful closeup pictures!

For more such informative posts do follow my blog and instagram account:

Blog link: https://www.vanillatrails.com/

IG: https://www.instagram.com/vanillatrails/


You may also find the below :

Behind the Scenes & Styling Tips by Ritumbhara Chinnabalan


Categories
Food Photography and Food Styling Guest Blogs

Behind the Scenes & Styling Tips by Ritumbhara Chinnabalan

Behind the Scenes & Styling Tips by Ritumbhara Chinnabalan
Food Photographer & Recipe Developer- Ritumbhara Chinnabalan

Hello! I am Ritumbhara – Food photographer and Recipe Developer based in India. A simple country girl living in a small town in the South Indian state of Tamil Nadu . Had you asked me my future plans two years back, you would have heard a surprisingly different story unveil but here I am today – having found my true calling 🙂

Of all the different things I’ve tried to do, cooking has had my fascination since childhood- from jumping in joy upon sighting a fruit vendor to enjoying chopping vegetables! Few things have never changed for me! I still remain that girl who enjoys the simple things in life. My work is deeply influenced / inspired by exactly the same thing – “ LIFE ”

My town, my culture, the mundane and humble everyday acts that take up my day including feeding and cuddling my chicks. These are some of the things that reflect in my work. One of my mantras is – Art should be evocative, convey a message and make the viewer feel deeply connected . And each of my images is a reflection of the same.

When I am not behind the lens you would find me reading, singing and randomly gazing into nothingness!! If at all you could call it a hobby, lol!!

I would love to start this conversation with one of my favourite quotes by Albert Einstein

IF AT FIRST, THE IDEA IS NOT ABSURD, THEN
THERE IS NO HOPE FOR IT.

How powerful is that to think over right? And this thought is always a driving force behind all my images. After all, aren’t absurd ideas fun?!

Now, before I take you behind the scenes and my creative process for this image , I would break down the complete process into three parts, just for ease of understanding  –

1) Ideation
2) Preparation
3) Actual shoot

In the ‘ Ideation ’ part, we shall go through my thought process prior to the shoot which would cover all the minute details of planning a mood board. This is my most favourite part I must admit 🙂

In the ‘ Prep ’ part we shall go through the trials that take place before the actual shoot

And then the ‘ Actual Shoot ’ itself where we shall discuss the technical aspects of photography- from lighting to composition


Ideation

As mentioned earlier, the time spent on ideation is my favourite part as I feel it gives me the most creative satisfaction.

There are a couple of things I consider and make note of before actually picking up the camera :

  • First and foremost – deciding on the dish that is to be shot – our HERO
  • The story or emotion that I want to convey to the viewer
  • The mood that best helps in bringing out the story- Lighting/Colour scheme/Props
  • Angle of the shot
The dish

I wanted to shoot mini chocolate bundt cakes as you can see in the image. I always love miniature versions of food not just because they are cute but also because you can gulp down your individual portions! lol!

Also, these were super yum and hard to keep my hands off of them while shooting! I know you hear me on this!! So, the heroes in our frame- Mini Chocolate Bundt Cakes.

The story

While I was baking these mini bundt cakes I couldn’t help but note that:

  • they are cute
  • they are geometrical and artistic
  • each one is an individual serving that can keep people at a table happily engaged
  • also, the colour and taste of these minis would evoke a feeling of warmth

Hence, the above had to be translated in the final image too for the viewer to truly enjoy the picture

The mood

A warm mood would do justice to the above story is what I gathered.The kind of warmth which is a reminder of a cozy evening.

Few important tools that would help me achieve this warmth:

  • Lighting
  • Colour scheme
  • Props and the Angle of the shot -Extremely critical in bringing together the desirable mood
The lighting

While we shall go into the details of light source later, here, during the ideation – I considered soft light and shadow play in the frame unlike my usual style where I love deeper and dramatic shadows.
Visualise those really soft shadows cast while the sun begins to set? I thought that would render the warmth that I intended.

Colour Scheme

I wanted to go for an almost monochromatic look where all the elements in the frame are in shades of the same hue / colour. In this case, Brown would be that colour for us. I was not quite sure if it would work at this point because we know – an ALL BROWN image isn’t fun and easy to achieve at times!

So if you notice, not only is the Hero brown here but so is the background different shades of brown.

I chose to compose an all brown image because I thought brown is a colour that exudes a great deal of warmth relative to other colours.

Props

I love this part!! Which food photographer doesn’t love props right? I am someone who goes gaga over beautiful props all the time!!

Also props can make or break an image!! So, it is very important to choose the right props that can elevate the story we intend to convey to the viewer. Here the props I have used are mini and large tart tins and black terracotta plates. There are 3 reasons why I used the tart tins here:

  • First- Their pattern is almost similar to the pattern of the bundt cakes. So, by bringing together the pattern of food and props we can add to the visual interest
  • As I mentioned earlier- the bundt cakes are cute, geometric and artistic. I wanted to use the tart tins as a tool to emphasize these features
  • Layering by using the same prop in different sizes adds drama and a lot of visual interest as well

Another important prop that brings everything together thereby playing a major role in this image is the surface or the background . In this case it is a large vintage door we had at home.

Reasons I wanted to use this door:

  • While flatlays are beautiful, they can sometimes look boring and less appealing with the use of normal plain surfaces that we usually see. So, I wanted to use a surface that was eye catching and had more visual appeal
  • The door had grids and lines that can add different heights to the flatlay
  • The different shades of brown in the surface was perfect to achieve the monochromatic look
Angle of the shot

I wanted to shoot the bundts in a flat-lay mainly to bring in the feel that they could be enjoyed as individual portions by people at a table.


Preparation

Now, after ideating and jotting down all my ideas as discussed above, I usually test shoot to know whether these ideas can become a reality.

For this, even before I start cooking a dish, I set up the complete frame without the food and take trial shots to see if the frame looks good and the results are what I intend to achieve.

Actual Shoot

Lighting

This image was shot in natural light.The source of light here is a south facing window and the image is side lit.

The room I shoot in is really dark with a single source of natural light which is the window. So, I had set up the background (the door) on a table right next to the window (light source).

Composition

When it comes to composing the scene, the surface aka the background (the door) here plays a major role. If you can see its placement , I have placed it diagonally instead of laying it straight.
The main reason behind this was to add to the drama by having the grids run diagonally through the frame.

I also placed the props along the diagonal grids of the door so as to lead the viewer’s eye along the lines and subsequently from one bundt to another
A quick note to add that I am not really a follower of composition rules when it comes to composing an image! Yup! You heard it right 🙂

However if I did have to break down this image as per the various composition guidelines/rules, the following have been at play here:

  • Diagonals- As we saw earlier, the diagonals has worked in 2 ways – By placing the door diagonally & the grids of the door running diagonally
  • Leading Lines- I have used the diagonal grids of the door as the leading lines that leads the viewer’s eye from one bundt to the other
  • Triangles- I’m sure you noticed – the bundts have been placed along triangles which I thought would add to the artistic effect creating a visually intriguing image

And that is all! I am so happy to have shared my knowledge and I really hope you enjoyed this little behind the scenes and found it useful. Please remember – Being a creative is a boon and always be guided by your heart !!

Much love

Ritu

Follow my work on Instagram where I share similar Behind The Scenes & Styling Tips :

https://www.instagram.com/happytummybyritumbhara/

https://www.instagram.com/happytummybyritumbhara/

Categories
Food Photography and Food Styling

Exporting Food Stop Motion Videos for Social Media

This post is in continuation to my earlier post about creating GIFs.This post is about exporting food stop motion videos for social media.

Exporting stop motion videos or GIFs is simple and straightforward and there are a few ways one can do it:

  1. Use free or paid applications like Animoto, Giphy or Dragonframe to create GIFS . There are several other free applications as well but these three in particular produce better quality animation. Dragonframe is the most sophisticated of all & used for high quality stop motion animation by professionals
  2. High quality GIFs can also be created using Adobe Photoshop once you have shot and edited the images you need as explained in this post

So, below are the steps for exporting (food) Stop Motion videos for social media via Photoshop:

This is one of the easiest ways to create and export stop motion videos or GIFs especially if you already have an Adobe suite and you do not want to add more paid applications to your cost. And if you do not have the suite you can download a free 7 day trial version for Photoshop here.  So, let’s begin :

  1. The first step is to create a folder on your computer with the final edited images which you would be using for your stop motion
  2. Then open Photoshop and click on File > Scripts > Load Files into StackExporting Food Stop Motion Videos for Social Media
  3. Then click on browse and holding down the Shift Key select all the files you need for the GIF and click Open Exporting Food Stop Motion Videos for Social Media
  4. Click OK and all the files will be imported in a Single Layered File on the right side of the Photoshop window. These “layers” will eventually become the frames of your stop motionExporting Food Stop Motion Videos for Social Media
  5. Go to Window > Timeline which opens the Timeline panel . Then click on the arrow button in the middle of the Timeline panel and select Create Frame Animation. Click on the button to create a new frame animationExporting Food Stop Motion Videos for Social Media
  6. Go to the menu icon from the upper right corner of the Timeline panel and click Make Frames From Layers.This converts all the layers in the Layers panel into individual frames in your animationExporting Food Stop Motion Videos for Social Media
  7. Click the Play button at the bottom of the Timeline panel to preview your animation . At this point you can also change the time for each frame as desired. I typically keep it at 0.2 seconds. Click Reverse Frames from the Timeline Panel if your animation is playing in reverse Exporting Food Stop Motion Videos for Social MediaExporting Food Stop Motion Videos for Social Media
  8. Click the repeat menu from the bottom of the Timeline panel and select Forever. This will create a looping animationExporting Food Stop Motion Videos for Social Media

Exporting the Animation as GIF

  1. Go to File > Export > Save for Web (Legacy) and select 256 from the Colors dropdown menu, change the width and height under Image Size based on the online platform you would be using the GIF for . Typically 2000 pixels works across various platforms. Then select Forever from the Looping Options menu
  2. Preview the GIF from the bottom left corner of the Export window
  3. Click Save and select a destination for your animated GIF and done! You are all set !

Pro Tip- Recommended for creating GIFs for Instagram

If you are like me and create your GIFs primarily for Instagram then you need to follow an additional step- make your GIF “insta-friendly!”

Yes, unfortunately Instagram so far doesn’t allow standard GIF formats so your GIF needs to be converted using a software that makes it compatible. I use GIF Maker. All you need to do is Airdrop the GIF to your phone, open the GIF Maker application, import your GIF, convert and export to your phone and share! This is recommended if your GF is not 3 seconds long

There is another (and quicker) way to do it too- exporting your GIF as a video. This means you follow all steps until Step 6 and then repeat your frames (press shift and select all frames one by one and click on the little square box with a plus sign in it on the bottom left of the window) till the complete frame is at least 3 seconds long (for example: at least 10 frames of 0.3 seconds each or 15 frames of 0.2 seconds each like in the below example).Exporting Food Stop Motion Videos for Social Media

Then you export the frames as Video- File > Export > Render VideoExporting Food Stop Motion Videos for Social Media

Adjust the Size to 2000X2000 or lower if desired and save Exporting Food Stop Motion Videos for Social Media

Airdrop to your phone and share away :))