Categories
Dinner | 8pm Meal Lunch | 1pm Meal Uncategorized

One Pot Mushroom Pulao/Pilaf

One of the most popular vegetarian sources of protein are mushrooms. With so many varieties available they are very popular amongst Chefs for creating a variety of recipes. And Mushroom Pulao/Pilaf is one such loved recipe introduced to me by a Chef.

Before I take you down the memory lane and share my story about this one pot mushroom pulao, let us take a few minutes to understand the varieties of mushrooms there are and their uses.

Kinds of Mushroom and how best to use them

Cremini mushroom with its delicate texture make for great stir fries and even raw in salads. Portobello is bigger and has a richer and meatier taste and I love to use them in vegetarian versions of chicken curries and are also great for grilling. Shittake with their thicker stems can be used similarly. Portobello are also a great vegetarian substitutes in burgers with their big caps.

Enokis are great for stir fries, salads and hot pot. Porcini have a woodsy flavour and are great in pasta sauces and risottos; basically quite popular in Italian and French cooking.

The most exotic variety is Morels which have rich nutty flavour and spongy structure that helps absorb sauces. They are not quite commonly available and also quite expensive (also USD 500 a kilo according to this article by South China Morning Post).  With a honeycomb appearance they are quite pretty to look at too! They are delicious on omelettes and steaks.

Memories of Khumb Pulao

I first tried morels during my stint with Taj Hotels when one of my Chefs invited me to try his special Khumb Pulau. I was in awe of the flavours that dish had to offer. It was nothing like anything I had tasted ever before and needless to say I tried to coax the said Chef to share the recipe but as one would guess-failed. It was one of his prized possessions and no way he was going to share it with me.

I did learn about morels from him though and that the best ones come for Kashmir and are pretty hard to forage. If I remember correctly the pulaao had a few kinds of mushrooms but morels imparted the most beautiful flavours.

I have since seen them here in Hong Kong wet markets but never been too sure to pick some. However the taste of Morel Pulaao has stayed with me and that is what inspired me to create this One Pot Mushroom Pulaao recipe.

I have used Shittake, Portobello and Cremini varieties in this recipe but if you do manage to lay your hands on Morels do swap some of the other mushrooms with equal quantities of Morel.

Tips to Make Perfect One Pot Mushroom Pulao:

  1. Use good quality vegetarian broth. Chicken broth can be used too but that overpowers the flavours of mushroom sometimes (depending on the brand). Hence I recommend sticking to vegetarian
  2. Before you make this pulaao I suggest you test your brand of basmati rice separately to see the amount of liquid(water/broth)  it needs to cook just right (not too mushy and not too hard). The ratio of rice to liquid is usually 1:2 but can also be 1:1.5 in some cases
  3. Roast the nuts in some ghee before using them as garnish for extra richness or you could just dry roast them to keep it light and healthy
  4. It tastes even better the day after so if you are planning to make it for a gathering or party make it the night before and then store in a wide glass container so that the grains do not pile up too much and make the bottom layers mushy
  5. If for some reason you end up adding too much liquid , turn off the heat when the rice is 90% cooked (remember we do not want overcooked rice for pulaao); then using a strainer bring out the cooked rice and spread on a parchment lined baking sheet and let cool to room temperature. Then refrigerate for a few hours before reheating and serving
  6. It is always a good idea to reheat pulaao in a shallow baking dish in a preheated oven at 145 degrees. Spread the rice evenly. Then sprinkle some water/vegetable stock all over the rice, cover tightly with foil, poke a few holes into the foil and heat stirring occasionally with a fork for even distribution of heat. Around 15-20 minutes should be enough
  7. Add salt while taking into account that the vegetable stock would be already seasoned

Ingredients for One Pot Mushroom Pulao

  1. Long grained Basmati Rice: 2 cups
  2. Vegetable stock: 3 cups (or as needed based on the brand of rice. Refer to point 2 under Tips)
  3. Shittake Mushrooms, sliced : 1.5 cups
  4. Portobello Mushrooms, sliced: 1 cup
  5. Cremini Mushrooms, sliced: 1/4 cup
  6. Sesame Oil: 2 tbsp
  7. Dry roasted or ghee roasted chopped nuts and raisins (almonds, pistachios, cashews): 2.5 tbsp
  8. Ghee- 2 tbsp
  9. Ginger, finely chopped: 4 tbsp
  10. Spring Onions, finely chopped: 2 tbsp
  11. Salt and freshly ground pepper to season

Method to make One Pot Mushroom Pulao

  1. Preheat oven to 145 degrees Fahrenheit
  2. In a thick bottomed wok bring the veg stock to boil , add ghee and season with some salt and add pre-washed rice . Cook on a medium flame until just done; spread on a parchment lined baking tray and set aside
  3. In the same wok, heat oil and add ginger and sauté for a minute or two until raw smell disappears. Then add mushrooms. Add Shittake first as it takes the longest to cook, followed by Portobello and Cremini. Give each kind of mushroom 5 minutes to cook before adding the next variety. Keep the flame medium-low, spread out the mushrooms well and avoid stirring them too much . We do not want to overcook the shrooms and want to retain the crunch. The process shouldn’t take more than 15 minutes
  4. Turn off the heat and add spring onions and mix gently
  5. While the rice and mushrooms are cooking, coarsely chop nuts and raisins and roast on a low flame in some ghee till lightly browned and keep aside
  6. Add cooked mushrooms and spring onions to cooked rice and mix gently with a flat spatula or fork
  7. Cover the baking tray with rice tightly with foil and poke few holes into it all over using a toothpick
  8. Let it sit in the oven for 7 minutes at 145 degrees to absorb flavours (time might vary depending on the oven), then bring out and add roasted nuts and raisins and freshly ground black pepper
  9. Serve right away with a side of raita

One Pot Mushroom Pulaao

One Pot Mushroom Pulao

Prep Time: 15 minutes

Cook Time: 30 minutes

Total Time: 45 minutes

Yield: 100

Serving Size: 4

Ingredients

  • Long grained Basmati Rice: 2 cups
  • Vegetable stock: 3 cups (or as needed based on the brand of rice. Refer to point 2 under Tips)
  • Shittake Mushrooms, sliced : 1.5 cups
  • Portobello Mushrooms, sliced: 1 cup
  • Cremini Mushrooms, sliced: 1/4 cup
  • Sesame Oil: 2 tbsp
  • Dry roasted or ghee roasted chopped nuts and raisins (almonds, pistachios, cashews): 2.5 tbsp
  • Ghee- 2 tbsp
  • Ginger, finely chopped: 4 tbsp
  • Spring Onions, finely chopped: 2 tbsp
  • Salt and freshly ground pepper to season

Instructions

  1. Preheat oven to 145 degrees Fahrenheit
  2. In a thick bottomed wok bring the veg stock to boil , add ghee and season with some salt and add pre-washed rice . Cook on a medium flame until just done; spread on a parchment lined baking tray and set aside
  3. In the same wok, heat oil and add ginger and sauté for a minute or two until raw smell disappears. Then add mushrooms. Add Shittake first as it takes the longest to cook, followed by Portobello and Cremini. Give each kind of mushroom 5 minutes to cook before adding the next variety. Keep the flame medium-low, spread out the mushrooms well and avoid stirring them too much . We do not want to overcook the shrooms and want to retain the crunch. The process shouldn't take more than 15 minutes
  4. Turn off the heat and add spring onions and mix gently
  5. While the rice and mushrooms are cooking, coarsely chop nuts and raisins and roast on a low flame in some ghee till lightly browned and keep aside
  6. Add cooked mushrooms and spring onions to cooked rice and mix gently with a flat spatula or fork
  7. Cover the baking tray with rice tightly with foil and poke few holes into it all over using a toothpick
  8. Let it sit in the oven for 7 minutes at 145 degrees to absorb flavours (time might vary depending on the oven), then bring out and add roasted nuts and raisins and freshly ground black pepper
  9. Serve right away with a side of raita 
https://onewholesomemeal.com/one-pot-mushroom-pulao-pilaf/

Some other Pulao/Pilaf recipes you may like:

Methi Pulaao | Fresh Fenugreek Leaves

Prawn Pulao Recipe | Easy Recipe with Coconut Milk

Tandoori Cauliflower Pulao | Tandoori Gobi Rice Recipe


Categories
Food Photography and Food Styling Uncategorized

How to create and style unique fusion dishes for food photography

How to create and style unique fusion dishes for food photography
Jay- Food Stylist and Photographer

Hello 🙂

I am Jayashree. You can call me Jay. I am a former technology professional. Food photography started as a creative outlet for me, but soon turned into a professional pursuit. I think of creativity as a way of life. I am deeply inspired by nature. My lifelong interest in human nature and learning has now morphed into a deep observation of online interaction. I am always looking for ways to effectively use technology without compromising on wellbeing. I think better when I write. You can read some of my posts on creativity, photography and wellbeing at https://boiledbeanstudio.com/ creativity/. My recent photography work can be found on Instagram @boiledbeanstudio

What do I mean by fusion dishes?

Let’s think of fusion dishes as those that combine elements of different cuisines or techniques.

We live in a world where most of us are exposed to different cuisines and foods from different parts of the world. As food photographers/stylists, food is our main muse and model. So most of us also tend to be foodies and cooking enthusiasts. In this post, let’s look at how we can cook and style fusion dishes so that they make for unique and interesting subjects for the camera.

Culinary heritages and traditional recipes are of course valuable and must be preserved. But in today’s world where influences come from multiple sources and legacies, it is also important to learn to use and hone them effectively in our work. So if your food and work are fuelled by multiple cuisines and cultures, and you want to express that amalgamation through your cooking or photography, then this post might help you get started.

How to create fusion foods?

So here are some ways:

  1. Switch-up the appearance and presentation of a dish
  2. Replace or switch-up ingredients or flavours from different cuisines
  3. Switch-up cooking techniques

In this post, we are only looking into the first method, which is also the easiest. I will be exploring the other two methods in the upcoming posts of this series and will soon publish them on my website https:// boiledbeanstudio.com/creativity/

Why should we change the appearance of a dish at all?

Because sometimes, it is fun to switch up things and break the monotony.

Sometimes, as photographers, it is our job to present familiar subjects in new and interesting ways.

Sometimes, small tweaks in presentation help elevate an already great dish.

And is that all?

Not really. Eating is a multi-sensory act. When we look at food presented in an appealing way, the pleasure centres in our brains wake up and whirr into action. Anticipations are created, expectations are set. And as food photographers, we know this already. We even try to take advantage of this fact by styling our subjects such that we provide effective visual cues to the viewer. The drips, the drops, the spraying of water, the brushing of oil, the glistening of syrup, the dropping of crumbs — all go to convey everything we want the viewer to sense and feel through the visual medium.

Defamiliarising works wonders

Going by the same logic, if we switch-up the presentation of a dish using non-traditional methods, add some fresh new cues, style the scene differently, we could stimulate curiosity and generate interest. Defamiliarising is a powerful way to direct attention to our images in a visually overloaded world. Even a Kheer-Desensitised viewer might take notice and wonder, if it is presented like a crème brûlée. It’s the “surprise element” that might just do the trick. Surprise elements are a good thing in photography.

Lastly, this whole effort might serve a deeper purpose. I have come to realise that foodies mainly come in two categories — those willing to try unfamiliar food and those that are not. The first group is easier to please because their main motivation is to seek new experiences or create new memories. The second group however, needs a bit more coaxing. Their main motivation is comfort, familiarity and stability so when food looks too different from their regular fare, they may never even try sampling a dish, let alone attempt to cook it.

Avoiding Stereotypes

Sometimes the stereotypes surrounding a cuisine is also to blame. Too spicy, too sweet, too bland, too ugly can be some of the unnecessary generalisations applied to many cuisines, which in reality may have much to offer to anyone that takes the time to learn them. Putting a new spin on an existing dish by adding a few familiar touches may just wean the second group into appreciating something new, in small, not-so-scary bites.

Via photography, or any other art, we seek to influence — even if it is in small ways. And since food is already a great connector of people, removing or reducing a few unnecessary mental blocks can be a great way to win over new audiences. As an added bonus, we might even end up rekindling interest in an already existing audience. And that is always a good thing.

Now that we have explored the reasons, let’s look at how to go about creating such fusion subjects effectively, with the help of an example.

How do we pick the right (fusion)dish for food photography?

Not all recipes lend themselves well for a fusion experiment. So how do we choose? Here are a few starting points that led me to creating an excellent fusion dish from its classic beginnings.

Styling

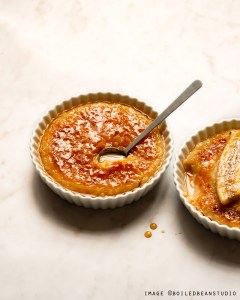
Recently, I added a culinary torch to my food styling toolkit. When I was looking for ways of using it, I learned that one of its most popular uses is in caramelising a layer of sugar on Crème brûlée, which, if not for this final step, would have simply remained custard in a cup. The crunchy sugar shell is what elevates the dish in its taste, texture and appearance. This made me think — “What other familiar dish can we elevate using a sugar shell”?

This is how Kheer brûlée first popped in my mind.

Ingredients

Like custard, which is the basis for Crème brûlée, Kheer is a simple, milk based dessert. And most versions of kheer use sugar as the sweetener (some use jaggery). So I thought it would work well with a sugar shell (and it did)!

Instinct (and information)

Kheer is a well known Indian/South Asian kin of milk pudding, prepared in many different ways. I also now know (from Instagram images) that every country/culture has a variation of this dessert, even though it is called by different names in different languages and prepared on different occasions. But in its simplest form, it is simply a milk-and-rice pudding. Everybody already knows this dessert in some form or other, and that can be a good foundation on which to build a fusion dish.

Application

So now you know how I picked my fusion candidate. But how would you use this information in your own projects? Here is how. The next time you enjoy a dish, or see a food image with an eye-catching presentation, make a mental note of its most appealing visual feature and the technique that was used to create it. (Pretty Ruffles? Glossy caramelisation? Shape? ).When you are cooking something easy and familiar back at home, recall this new feature, and think about how (and if) it can be incorporated into the homely dish and make it even better and prettier. If it feels like it might work well, you’ve scored a new project topic! And if it doesn’t sit right, you can simply move on and think about it all over again for another dish! The point here is to have enough specific material to recall at the right time.

I am sure that you can think up your own unique combinations, if you put your mind to it. And unique subjects are a good thing in photography.

Experimenting on what to tweak

The first time I create a changeling, I don’t try to photograph it. I just experiment and play around to see what happens. It is always practical to focus on one challenging task at a time. When I first played around with the butane torch, I did not even bother making the kheer. I started by sprinkling different types of sweeteners on a baking tray and caramelising them. This helped me get a better control of the tool and technique. It also made me realise that fine white sugar, raw sugar, brown sugar and jaggery powder all burn at a different rate, leaving very different colours and textures of residues!

I also realised from trial and error, that it might be best to make the sugar layer thin at first (so that it could caramelise uniformly) and then iteratively add on more layers to get a thick, glossy shell in the end. But this meant that there would already be so much sugar in the dish! So I made a mental note to omit (drastically reduce) sweetening the kheer while cooking to balance the taste.

Another thing I realised was that sugar would need a firm surface to sit on, and some kheer versions are runny. So in order to make the surface firm, I may have to chill the kheer in refrigerator.

By simply experimenting and breaking down the steps, I was able to make all these notes and corrections before even beginning to cook the kheer.

How to “style” the final dish

Since we are trying to switch up the presentation here, it is important to style the fusion dish well for stronger impact. Here are some starting points to think about:

Simplify matters by picking up the styling of the dish from which you imported the switch-up feature. In this case, that would be Crème brûlée.

Style it like a whole other dish! Since the switch up focus here is on appearance, we can be imaginative! But let there be a method to the madness — be guided by your style, seasons or props. For example, I did not have ramekins on hand to style my dish just like Crème brûlée. I had pretty white ceramic tart shells though, so I decided to style the new dish like little pies.

The one thing do I avoid though, is to style the dish in the way the original dish is usually styled. I think that it would undo the impact and drag the dish back to where it started. This whole exercise was to create unique subjects — remember? Still, that’s only a personal preference, so feel free to style it any which way you like — so long as it feels right for you, and your target audience.

That’s it for now, let’s talk about other effective ways to create unique fusion food subjects soon. If you wan’t to read more, you’ll find more posts on my website https://boiledbeanstudio.com/creativity/

Until then, let’s be adventurous!

How to create and style unique fusion dishes for food photography

Find similar posts on food styling here and here.

Categories
Dinner | 8pm Meal Lunch | 1pm Meal Uncategorized

Kurkuri Bhindi-Easy Oven Baked Recipe

Kurkuri Bhindi is a dish loved by all. For that matter bhindi, Okra or Lady’s Finger is quite a versatile vegetable. Not only can it be cooked in a zillion different ways ,it is seldom disliked. Most kids who would say no to all green veggies will say yes to the bhindi. One of my favorite ways to eat bhindi is just stir frying it in mustard oil with diced onions and potatoes; no spices, just turmeric , salt and green chilies. If made well it makes for the perfect side with hot ghee rice and daal. Most Indian kids may (or may not) have fond memories of eating bhindi with pooris or parathas in their school lunchbox. I also have a Zaatar flavoured Sesame-Peanut Bhindi recipe on the blog that you will love.

This dish however was not an everyday thing growing up. One would eat it at restaurants or parties and celebrations. I do not think if my mother ever made it at home. But things are quite different these days and almost all popular restaurant dishes are being recreated at home so I decided to my own baked version at home.

The recipe itself is pretty straightforward but it does need some prep and tedious slicing. Because we are baking and not frying the bhindi (which is how this dish is traditionally made), it is imperative that all slices are more or less similar in size for even baking.

Preparing Bhindi (okra) for Baked Kurkuri Bhindi

  1. Make sure you use the most tender bhindi for this recipe
  2. Wash the bhindi well one by one under running water
  3. Drain well and spread out on a clean kitchen towel and let dry preferably for a few hours . This can be done well ahead of time
  4. In case you wash, dry and place bhindi in the refrigerator, bring it out a couple of hours before cooking and wipe well with a kitchen towel before slicing
  5. Next, chop off the tip and the bottom then working carefully slice the bhindi vertically into half; then further slice the halves into thin sticks (see video below for reference)
  6. Discard the seeds
  7. You can even refrigerate the bhindi for unto a day in advance at this stage

Ingredients

  1. Bhindi/Okra: 150 grams
  2. Besan or chickpea flour: 1/4 cup
  3. Rice flour: 1 tbsp
  4. Amchoor+Chaat Masala- 1 teaspoon
  5. Garam Masala: 1/2 tsp
  6. Turmeric powder- 3/4 tsp
  7. Red Chili powder: 1 tsp or as per taste
  8. Coriander powder: Little less than 1 tsp
  9. Ajwain (carrot seeds)-1/2 tsp
  10. Mustard Oil: Approximately 1/3 cup and a little extra
  11. Lime juice : 1 tbsp
  12. Salt: 1 tsp or as per taste

Method for Baked Kurkuri Bhindi

  1. Preheat your oven to 220 degrees for a minimum of 15 minutes. The bhindi will not turn out nice and crispy if the oven is not hot enough
  2. Line a baking sheet with foil and then place a sheet of baking parchment on top. This makes sure the bhindi will not stick to the bottom and come out easily
  3. Add all the dry ingredients with the bhindi, mix well and add mustard oil and give it a final mix. Do not add salt at this stage
  4. Mix in the lime juice and bake for 7-10 minutes or until the bhindi is half cooked and still retains its green colour . The time may vary based on the oven
  5. Add salt, mix well and bake for another 5-7 minutes
  6. If through the process you feel the mix is too dry feel free to spray some more oil while baking

Watch a step by step recipe video here

Baked Kurkuri Bhindi- Quick to put together side

Prep Time: 20 minutes

Cook Time: 20 minutes

Total Time: 40 minutes

Yield: 100

Serving Size: 3

Ingredients

  • Bhindi/Okra: 150 grams
  • Besan or chickpea flour: 1/4 cup
  • Rice flour: 1 tbsp
  • Amchoor+Chaat Masala- 1 teaspoon
  • Garam Masala: 1/2 tsp
  • Turmeric powder- 3/4 tsp
  • Red Chili powder: 1 tsp or as per taste
  • Coriander powder: Little less than 1 tsp
  • Ajwain (carrot seeds)-1/2 tsp
  • Mustard Oil: Approximately 1/3 cup and a little extra
  • Lime juice : 1 tbsp
  • Salt: 1 tsp or as per taste

Instructions

  1. Preheat your oven to 220 degrees for a minimum of 15 minutes. The bhindi will not turn out nice and crispy if the oven is not hot enough
  2. Line a baking sheet with foil and then place a sheet of baking parchment on top. This makes sure the bhindi will not stick to the bottom and come out easily
  3. Add all the dry ingredients with the bhindi, mix well and add mustard oil and give it a final mix. Do not add salt at this stage
  4. Mix in the lime juice and bake for 7-10 minutes or until the bhindi is half cooked and still retains its green colour . The time may vary based on the oven
  5. Add salt, mix well and bake for another 5-7 minutes
  6. If through the process you feel the mix is too dry feel free to spray some more oil while baking
https://onewholesomemeal.com/baked-kurkuri-bhindi-quick-to-put-together-side/

Categories
Tips and Tricks Uncategorized

Easy DIY Gift/Cookie Box for Festive Season

It is that time of the year again! The best time when festivals and celebrations come knocking at our doors and there are parties and treats galore. It is my favourite time of the year indeed!

An Ambivert? Not good fun this festive season. Or maybe it is?

Apart from cooking and meeting friends and family, what I love the most is giving presents. You heard it right! I love giving presents. Of course receiving some is great too but I am one of those weirdos who enjoy giving gifts more than receiving them, so much so I bought half a dozen presents in anticipation of Diwali and parties that come with it. It is another story that most of those presents are still sitting in my cupboard because guess what, I hardly got invited to any parties. LOL! Real problems of being an ambivert. Thankfully I have never been the one to have any FOMO and am always more grateful to being home alone rather than being invited to gatherings which make one uncomfortable (read people pulling each others down/ clinging and trying to “demystify” every spoken word) and you leave these places mentally and emotionally exhausted.

Anyhow! When it came to sharing Diwali sweets with some of my closest friends, rather than gifting store bought mithai, I decided to make some at home. That was the easier part. However, I had left the planning to very last minute and I did not have enough time to order custom size boxes. The ones available were either too big to too tiny. After fretting and fuming and almost resorting to store bought mithai I decided to take the packing matter into my own hands as well(quite literally) and that is how this easy DIY Gift/Cookie Box happened !

I happened to be at Ikea to pick up some props for a client’s shoot when I eyed these square boxes which were just the right height and width for my mythical gift box. So, I did a happy dance and gathered what I needed to gather and headed home a happy trooper. For someone who had hated art and craft at school with passion, I was pretty excited at the idea of creating my own Diwali hamper.Easy DIY Gift/Cookie Box for Festive Season

Material Needed to Create Your Easy DIY Gift/Cookie Box for Festive Season

  1. Ikea square box
  2. Cardboard packaging (from your grocery store or even used cereal cartons)
  3. Glue gun
  4. Baking parchment
  5. Muffin wrappers of desired colour ( I used white and gold)
  6. Ruler
  7. A pair of scissors
  8. Wrapping tissue or brown paper as desired to wrap the box in. I used gold net
  9. Sweets and snacks and/or other presents for the gift box


Easy DIY Gift/Cookie Box for Festive Season

Steps to Create Your Easy DIY Gift/Cookie Box for Festive Season

  1. The first step is to finalise how many and what gift items would go into your goody box. Once that is out of your way you can finalise the measurements of each compartment . Do not stress, it doesn’t have to be precise and cast in stone. If things start to look awry you can always move the compartments around and re-glue. Having said that having a clear plan helps save precious time
  2. Once items are finalised, next is to ear mark and measure out the compartments where those items need to be placed
  3. Then based on the above measurements cut out the cardboards half a centimetre smaller than the inside width of the box where the cardboards need to be placed; the height of these cardboard “dividers” would be the same as the box(see the final image below)
  4. Glue the pieces to the board and to each other (wherever needed) and let them sit for a couple of hours so they dry well before proceeding to the next step
  5. Make parchment paper pouches if you have sweets/cookies that do not fit muffin liners. I used this simple technique to make mine. But there are many other tutorials out there you can choose from depending on your requirement & the time you have at hand
  6. Before you start filling your gift boxes make sure to cut out the wrapping paper and tissue to the right size (large enough to gather and wrap the gift box)
  7. Next place the gift box in the centre of the wrapping paper and start to fill out the box
  8. Then wrap, tie, tag and we are good to go!

What went into my Diwali Gift BoxEasy DIY Gift/Cookie Box for Festive Season

  1. Til-Mawa laddoo
  2. Cheese Biscuits
  3. Besan Barfis
  4. Coconut Laddoos
  5. Gulkand filled fig and pistachios bliss balls ( I will share the recipe on the blog soonest)
  6. Namakparas or nimkis
  7. A couple of sparklers wrapped well in tin foil so it doesn’t interact with the food
  8. Decorative tea candle holders from one of my favourite Hong Kong brand- Adorn Creations Home Decor

Let not the above ideas limit your imagination but just be a guide to create your own unique gift box. Ikea has great options for boxes in all sizes, shapes, colours and materials or just up-cycle small cardboard boxes at home with pretty gift tapes, glitter and coloured paper.Easy DIY Gift/Cookie Box for Festive Season

Categories
Tips and Tricks Uncategorized

Ideas to Reorganize A Kitchen

KITCHEN! The place where magic happens, probably one of the places where us cooks spend maximum time during the day creating heart-warming and nourishing food for our families and loved ones. And yet more often than not, it is this place which gets neglected the most when it comes to order and organisation.

My case is no different. We moved to our apartment almost an year ago and while I spent a considerable amount of time thinking, planning and replanning most of the house, I didn’t give too much thought to the kitchen. Fortunate to have finally found a decent sized kitchen unusual in compact Hong Kong apartments , I got a bit carried away and failed to correctly utilise the storage and space it offered; kept things wherever they fit without putting much thought to maximise space and storage. Needless to say, with a method like this, my cabinets were soon overflowing and I was loosing my mind trying to find things and swinging between one shelf to the other when cooking. With very limited time at hand and the need to put together a full-fledged meal in that duration, it was clearly not helping that I was spending substantial amount of that time trying to find ingredients. I kept procrastinating until one day while cooking I ran out of turmeric powder and being pretty sure I had enough in stock started to look for some. I looked for a freaking 20 minutes before I finally found it. I could have cooked what I was cooking in less than that.

So, I finally decided to reorganise . The big R word was ominously looming over and I wanted to do it without spending too much money and use most of the stuff I already had. My first step was to raid Pinterest , look through as many kitchen reorganisation hacks as possible and save ideas. Pinterest never disappoints! I found two amazing home blogs- Making Home Base and Clean And Scentsible which gave a direction and helped me organise my ideas. I figured that once I categorise the storage areas based on a certain logic and then utilise the height of the shelves rather just the horizontal space, it would be a good start.

The IKEA 365+ food storage boxes came to my rescue. Wide enough, tall enough and stackable. Another product which worked wonders in adding storage space in my tall cabinets was GREJIG, which actually is a collapsable shoe rack but hey it is all about hacks with these amazing products isn’t it? Notice in the “AFTER” image below how the rack without occupying much space itself, adds another level of storage. An absolute find!

My next step was to maximise the storage space for little sachets which could be just stacked on top of the other without eating up precious space that could be used for larger boxes/bottles. Ikea to the rescue again- OBSERVATÖR has to be one of my favourite new products from them. It is so versatile and works like a charm in maximising storage in tall spaces and the best part is no drilling required. Just a word of caution, measure your shelves well to make sure once you clip these baskets on, they do not come in the way of shutting them well because sometimes the space between the shelves and the door is negligible which means once you hang the OBSERVATÖR, the doors won’t shut completely.

Do notice, how moving the shelves around and adding the baskets has freed up so much space and I could actually fit in more stuff from the other cupboards too. And this space became my “Stock Storage”- so basically stuff which I would need to refill my daily consumables cupboard or items I would not need on the daily basis.

The next step was sorting my spice rack. Now, we primarily cook Indian meals but a lot of our meals have Asian and Western flavours and that means a whole lot of spices and keeping them easily accessible becomes so important! The VERIERA is just the right size and fits right into the small space next to my stove. I was even left with some space next to the sink to place an OSTBIT which doubles up as our chopping board and tumbler holder.

I also placed another VERIERA in the cabinet above the spice shelves. This cupboard is now designated for all my baking and breakfast supplies leaving some room for my coffee mugs too!

The KNARRA BASKET came in handy in storing bulky items under the table, mostly heavier rice and flour packets which are best stored at easily accessible places. The HÄLLAN cabinet was the perfect size and went right under our kitchen table to help store my baking and blending pots, pans and other equipment away from sight. Their white colour made sure they went with rest of the kitchen walls and didn’t look ugly and bulky.

The top part of dish drainer BESTÅENDE went on top of one of the baskets and is the perfect storage for my onions/potatoes/ginger/garlic.

The other pot and pans went into cabinet right below the cooking range along with the plates and bowls. The remaining bowls and Tupperware went into a pull out drawer next to the sink.

So, to summarise, my kitchen storage is now broadly divided into the following sections:

  1. Grains & Pasta
    1. Spices & Condiments
    2. Baking & Breakfast
    3. Cooking pots,pans and plates
    4. Baking and Blending equipment
    5. Stock and Snack cupboard (with the snacks strategically placed on the top shelf away from prying hands of kids and adults alike ;))
    6. Bowls, tumblers, and Tupperware

It may not look like it but it took me almost half a day to get the entire kitchen reorganised and this did not include all the mental pre-planning that went into it. So, I do hope that while this post is helpful to you in your own reorganisation, but do remember to use this as a reference to make a plan that suits your needs because they may vary from one individual to another. Also, I am a succour for recycling so I did not discard anything which could be reused except for a few boxes that were damaged and also, bought only the bare minimum from Ikea which I absolutely needed.So, always always look around the house and see what you can reuse and what can be discarded.

And most importantly, I would love to hear from you and see how you ended up using this post to do up your own little kitchen.

Happy Reorganising !

[kkstarratings]

Categories
Uncategorized

Ventings, Musings & New Beginnings!

Dear 2017,

You have been an eventful year! On January 1st 2017, I had little idea how this year would pan out for me. I do not plan long term and believe in going with the flow and boy has the flow been exciting! I have cried tears of hopelessness and frustration as much as I have cried tears of joy and gratitude, the former teaching me as much as the latter. At a point when things seemed the bleakest and totally hopeless, a light has emerged from somewhere to shine some hope. As always, totally unexpected, totally unplanned. I have come to appreciate many things in the 34th year of my life like never before.

While it would be customary to end this year on a positive and feel-good note, I feel the need to do otherwise. The need made stronger by the message from Facebook when I logged into my feed yesterday. I least expected FB to say- Good Morning Asmita! You Received 0 Birthday Wishes this year! Have a great Birthday in 2018!

As much as I would like to say that the message didn’t bother me, it actually did! For a moment at least! Birthdays and anniversaries aren’t made a big deal out of in our family and I had to strain my brain to recall what my 2017 birthday was like! Well! Contrary to what Facebook made out of my “social life”, I did receive a few phone calls and text messages from close family and friends, from people who matter and to be honest, I did not feel bad about those who didn’t! I for one never remember people’s birthdays and do not expect them to either. So, it was all good! Nevertheless, it forced me to think how over-powering social media is in our lives. I remember being so addicted to it until last year myself, so much so that I was spending insane amount of time on Facebook doing absolutely NOTHING! Just wiling away precious, productive time looking into people’s lives. It got to a point that it started to affect me! I felt as if I was doing nothing great with my life, didn’t have enough friends, wasn’t travelling enough to exotic locations, the list is endless. Coincidentally it was also the time when I was about to have my second child and enter the busiest phase of my life. I decided to use this opportunity to go into a complete social media detox- I suspended my FB account, deleted the app from my phone! It wasn’t easy! The first few days it felt like an integral part of my life was missing! Thanks to baby number two, I quickly overcame that phase. I realized I was sleeping better, thinking better and enjoying the present moment more and most importantly it helped me collect my thoughts and plan my career goals. In all honesty, I did miss the good aspects of it sill-the mum forums which doubled up as Agony Aunts and Yellow Pages, the Calendar, which reminded me of people’s birthdays and important events, but all in all it felt like I was freeing myself of an addiction!

I did re-activate my FB account eventually but I am not addicted anymore and use it mostly for promoting my new venture. Interestingly, when I recently started my food blogging journey (which ironically involves a lot of social media usage for sustenance), a lot of friends and acquaintances jested as to how I have turned into an “overnight food blogger”, some friendly comments included- “Wow! You are cooking a lot these days!”, “Hey! I had no idea you cooked (this from someone whom I had not met in the last 8 years of my life)! Or “Treat us to your food also sometimes (from someone who had dined at my place on several occasions!). While most of these were friendly banter and not over-thought remarks, it again brought home the fact that how much social media had overpowered our lives! Just because I did not flaunt my cooking/food/entertaining people at my home on a public forum, I was not ‘cooking enough!” because I wasn’t sharing my plans with the world about what I intended to do with my life, I was an “overnight food blogger!”

In fact I regretted not capturing each of the numerous meals at my home on social media and tagging those I had invited! Damn! That could have been proof that I actually knew how to cook! Lesson learnt!

Anyway, no one can be blamed, because in this age of information overload, memories are short-lived and a person or an event, on most occasions is as relevant as his/her last FB/Insta/Twitter status update. My work requires heavy usage of social media as I feel responsible towards sharing a part of who I am with the people who follow my blog. But I have to confess, it is the hardest part of what I do and is quite draining! Cooking, styling and photography all put together do not take as much out from me as does my time invested being “online” and I have to come to truly appreciate and marvel at the talents of those who do so quite effortlessly both personally and professionally! I guess it takes a certain kind of personality to excel at “online engagement” and I for sure need to better my game on that front! A “to-do” for the New Year 😉 Do you have any tips, words of advice, suggestions as to how you deal with these pressures in your life? I would love to know.

I guess I am done with my venting for 2017! Now to better and more productive things in life! I am extremely excited to share that I would be starting a monthly newsletter for all my blog subscribers which will be a round up of recipes, exciting restaurant deals in and around Hong Kong, cooking hacks, tips and tricks to healthy meal planning and a lot more fun and interesting stuff! Thank you so much for all your support. The little that I have achieved would have been impossible without you. THANK YOU FOR BEING THERE!

Stay tuned and here is to an extremely positive and productive 2018 which involves channelizing our energies into creating something new and not judging someone who is trying to do so! HAPPY NEW YEAR GUYS!


New Beginnings 2018

[kkstarratings]