Categories
Dinner | 8pm Meal Lunch | 1pm Meal Uncategorized

Gatte Ki Sabzee | Raam Saalan

There are days when one doesn’t have enough green veggies in the pantry and then the struggle to put together a hot and fresh meal is real. In times like these Chickpea flour recipes are a saviour.

This recipe for Gatte Ki Sabzee/Raam Saalan for example requires minimal prep and can be put together in no time with basic pantry ingredients. There are various versions of this dish that are popular across India, one of them being Rajasthani Gatte Ka Sabzee which has a yogurt base gravy.Paneer Stuffed Gatte is also quite popular and a slightly more indulgent version of the dish.

While one has a host of versions to pick from, the recipe which I am sharing here today remains a childhood favourite. And the best part? It is great for the waistline too as it uses minimal oil- gattas( chickpea dough dumplings)are steamed and not fried and then dunked in a delicious gravy. And did I mention it is also gluten-free? Win-Win!

Helpful Tips to Make Gatte Ki Sabzee

  1. Kneading the dough well is key. Make sure there are no lumps in the dough and it is smooth
  2. Steam the dumplings on a high flame keeping it covered so it cooks through; stir once in between for even cooking
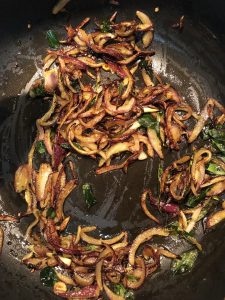
  3. For the gravy I used shallow fried onion paste. This enhances flavours. You could also use raw onion paste but you would need to cook it longer to make sure the raw smell disappears

Ingredients to Make Gatte Ki Sabzee

  1. Besan: 1 cup
  2. Coriander powder: 1/2 tsp
  3. Cumin powder: 1/2 tsp
  4. Red chilli powder: 1/2 tsp
  5. Turmeric powder:1/2 tsp
  6. Ajwain, crushed coarsely: 1 tsp
  7. Ginger-Garlic-Onion paste: Made with 1 small onion+3 inch ginger piece+4-6 garlic pods
  8. Water to knead the besan dough
  9. Dried Bay leaves: 2
  10. Cumin seeds: 1 tsp
  11. Cumin powder: 1/2 tsp
  12. Coriander powder: 1/2 tsp
  13. Garam Masla: 1/2 tsp
  14. Red Chili Powder: 1 tsp
  15. Onion paste:1 cup
  16. Tomato Puree: 1/2 cup
  17. Green Chilies, slit lengthwise: 2 (optional)
  18. Salt: To taste
  19. Oil
  20. Chopped coriander for garnish

Methods to Make Gatte Ki Sabzee

  1. In a wide dish bring together besan, coriander powder, cumin powder, red chilli powder, turmeric powder, ajwain, salt and ginger-garlic-onion paste, and adding a little water at a time start to knead till a soft dough comes together
  2. Grease your palms with half a tablespoon oil and using both hands knead the oil into the dough; cover and set aside for 15 minutes
  3. In the meantime, bring water to boil in a wide and deep skillet. Once it comes to boil, add a tablespoon oil. This water will be used to steam the gattas and the oil prevents the gattas from sticking together
  4. After 15 minutes, make small balls with the prepared dough and roll it between your palms to make approximately 2 centimetre thick “snakes (refer the below video for details)”
  5. Add the prepared dumplings into boiling hot water and cover. Keep the flame high, stir intermittently and continue to steam. Once the gattas are steamed they would start to float on the surface. It takes approximately 12-14 minutes on a high flame
  6. While the gattas are cooking you can start to cook the gravy ; heat oil in a heavy bottomed skillet and add cumin seeds and bay leaf; once the seeds start to splutter add all the powdered masalas and cook on a low flame for a minute or two
  7. Then add onion paste; if using raw onion paste cook it well till oil starts to release and are smell disappears and then add tomato ; if using shallow fired onion paste add tomato puree right after and continue to cook till masalas are well incorporated ,add slit green chilies if using and some hot water as per the desired consistency of gravy and let it simmer
  8. In the meantime drain the steamed gattas on a plate. Do not worry if you see small bubbles on the gattas, it is perfectly normal as the recipe does not use baking soda. It however doesn’t effect the final taste and texture and they disappear when added to gravy
  9. Once cool to touch cut them into 2 centimetre discs and add to the prepared gravy, bring to boil, lower the flame , cover and let it simmer for 3-4 minutes
  10. As it cooks, the gravy thickens because the gattas absorb water, so dilute accordingly
  11. Once done garnish with coriander and serve hot with chapatis or steamed rice

Gatte Ki Sabzee | Raam Salan

Prep Time: 30 minutes

Cook Time: 20 minutes

Total Time: 55 minutes

Yield: 100

Ingredients

  • Besan: 1 cup
  • Coriander powder: 1/2 tsp
  • Cumin powder: 1/2 tsp
  • Red chilli powder: 1/2 tsp
  • Turmeric powder:1/2 tsp
  • Ajwain, crushed coarsely: 1 tsp
  • Ginger-Garlic-Onion paste: Made with 1 small onion+3 inch ginger piece+4-6 garlic pods
  • Water to knead the besan dough
  • Dried Bay leaves: 2
  • Cumin seeds: 1 tsp
  • Cumin powder: 1/2 tsp
  • Coriander powder: 1/2 tsp
  • Garam Masla: 1/2 tsp
  • Red Chili Powder: 1 tsp
  • Onion paste:1 cup
  • Tomato Puree: 1/2 cup
  • Green Chilies, slit lengthwise: 2 (optional)
  • Salt: To taste
  • Oil
  • Chopped coriander for garnish

Instructions

  1. In a wide dish bring together besan, coriander powder, cumin powder, red chilli powder, turmeric powder, ajwain, salt and ginger-garlic-onion paste, and adding a little water at a time start to knead till a soft dough comes together 
  2. Grease your palms with half a tablespoon oil and using both hands knead the oil into the dough; cover and set aside for 15 minutes
  3. In the meantime, bring water to boil in a wide and deep skillet. Once it comes to boil, add a tablespoon oil. This water will be used to steam the gattas and the oil prevents the gattas from sticking together 
  4. After 15 minutes, make small balls with the prepared dough and roll it between your palms to make approximately 2 centimetre thick "snakes (refer the below video for details)"
  5. Add the prepared dumplings into boiling hot water and cover. Keep the flame high, stir intermittently and continue to steam. Once the gattas are steamed they would start to float on the surface. It takes approximately 12-14 minutes on a high flame
  6. While the gattas are cooking you can start to cook the gravy ; heat oil in a heavy bottomed skillet and add cumin seeds and bay leaf; once the seeds start to splutter add all the powdered masalas and cook on a low flame for a minute or two
  7. Then add onion paste; if using raw onion paste cook it well till oil starts to release and are smell disappears and then add tomato ; if using shallow fired onion paste add tomato puree right after and continue to cook till masalas are well incorporated ,add slit green chilies if using and some hot water as per the desired consistency of gravy and let it simmer
  8. In the meantime drain the steamed gattas on a plate. Do not worry if you see small bubbles on the gattas, it is perfectly normal as the recipe does not use baking soda. It however doesn't effect the final taste and texture and they disappear when added to gravy
  9. Once cool to touch cut them into 2 centimetre discs and add to the prepared gravy, bring to boil, lower the flame , cover and let it simmer for 3-4 minutes 
  10. As it cooks, the gravy thickens because the gattas absorb water, so dilute accordingly 
  11. Once done garnish with coriander and serve hot with chapatis or steamed rice
https://onewholesomemeal.com/gatte-ki-sabzee-raam-saalan/

Gatte Ki Sabzee | Raam Salan

Categories
Lunch | 1pm Meal

Daal Peetha | Steamed Glutenfree & Vegan Dumplings

Daal Peetha, colloquially also called as Dalpeethi is as gluten free and vegan as everyday food can get.

No wonder when it comes to vegan or gluten free option these days that are palatable, one finds the world turning to Indian and Asian staples. Cauliflower, chickpeas and daal (lentils) have found a new kind of love and acceptance in the global village. By the way have I ever shared how irksome is “Dhal Soup?” for a South Asian to hear? I mean it is wrong on so many levels! First of, the correct spelling is Daal and not Dhal wherein “D” is actually a soft sound pronounced the same as in “The.”

“Dhal”  on the other hand actually means armour. The protein in lentils is armour for the body sure enough ! But seriously, is it too much to expect that both indigenous recipes and their right pronunciations be popularised? The indigenous communities are to be blamed too. Ever too often we are very eager to provide or accept the wrong version popularised by the west. I think benevolence and acceptance is too deeply ingrained in our culture !

Anyhow, coming to the Daal Peetha recipe. This is popular in East Indian states of Bihar and Uttar Pradesh. Rice flour shell encloses a spicy Chana Daal stuffing which is then steamed .Some versions also include dunking the steamed peethas in a spicy gravy. We, however like to eat it with a spicy tomato chutney, the recipe for which you can find in this post.Feel free to adjust the spice level as desired .

Fair Warning

Working with rice flour is no mean feat. I have tried and failed a couple of times before getting the consistency right.

Some tips that work for me:

  1. Hot water with some ghee to mix with rice flour
  2. Keep the above mixture covered for 20 minutes before kneading
  3. Knead the lukewarm mixture greasing palm well with ghee or oil

Ingredients for Daal Peetha

  1. Rice flour: 1/2 cup
  2. Salt: 1/2 tsp
  3. Ghee or oil: 1 tbsp
  4. Hot water
  5. Chana Daal (Bengal gram), soaked overnight or a minimum 4 hours: 3/4 cup
  6. Jeera (cumin seeds): 1/2 tsp
  7. Ajwain (carom seeds): 1/2 tsp
  8. Turmeric powder: 1/2 tsp
  9. Red chilli powder: 1/2 tsp
  10. Ginger, peeled and chopped: 1 inch
  11. Garlic, chopped fine: 2-3 cloves
  12. Green chilies, chopped fine: 1 (optional)
  13. Coriander leaves, finely chopped: 1 tbsp
  14. Salt: To taste

So, lets get cooking

  1. Bring 1.5 cups of water to boil and add some ghee or oil and half a teaspoon salt
  2. Add rice flour and mix well; cover and keep aside for 20 minutes
  3. In the meantime drain and wash the soaked Chana Daal and keep aside
  4. In a thick bottom skillet heat some oil and add cumin seeds. When seeds start to splutter, reduce heat and add Chana Daal followed by turmeric and red chilli powder and mix well
  5. Cook on low heat with intermittent stirring
  6. Halfway through, add half a cup of water and cover and cook with intermittent stirring until the daal is soft ; keep aside and let it cool
  7. After 20 minutes check the rice flour dough; add some ghee and knead until soft and smooth; cover and keep aside. The dough should come together but not stick to your hands
  8. Once the daal mixture has come to room temperature, add ajwain seeds, green chilies, ginger, garlic, coriander leaves and salt and blend to form a coarse mixture
  9. If you like the stuffing to be on a moister side, add a few tablespoons of water to the above mixture to get the desired consistency
  10. Form the Chana Daal stuffing into one inch small balls and lay out on a plate
  11. Then form the rice dough into discs big enough to accomodate the above stuffing by working quickly and pressing the dough between your greased palms. You could also press the dough between two sheets of greased parchment. Try and keep the discs approximately half a centimetre thick and keep your palms greased while working with the dough to avoid cracking. Form into a spindle shape and place on a greased plate
  12. Repeat the process for the remaining dough and stuffing
  13. Prepare the steamer and steam the peethas by placing them on a steel plate layered with thin muslin until the coating is cooked. Layering with muslin helps in pulling the peethas out easily when the plate is hot
  14. Serve with green chutney or spicy tomato chutney

Daal Peetha

I have attached a short clip here for you to understand the process better:

Daal Peetha

Prep Time: 30 minutes

Cook Time: 15 minutes

Total Time: 45 minutes

Yield: 100

Serving Size: 10 medium sized peethas

Ingredients

  • Rice flour: 1/2 cup
  • Salt: 1/2 tsp
  • Ghee or oil: 1 tbsp
  • Hot water
  • Chana Daal (Bengal gram), soaked overnight for minimum 4 hours: 3/4 cup
  • Jeera (cumin seeds): 1/2 tsp
  • Ajwain (carom seeds): 1/2 tsp
  • Turmeric powder: 1/2 tsp
  • Red chilli powder: 1/2 tsp
  • Ginger, peeled and chopped: 1 inch
  • Garlic, chopped fine: 2-3 cloves
  • Green chilies, chopped fine: 1 (optional)
  • Coriander leaves, finely chopped: 1 tbsp
  • Salt: To taste 

Instructions

  1. Bring 1.5 cups of water to boil and add some ghee or oil and half a teaspoon salt
  2. Add rice flour and mix well; cover and keep aside for 20 minutes
  3. In the meantime drain and wash the soaked Chana Daal and keep aside
  4. In a thick bottom skillet heat some oil and add cumin seeds. When seeds start to splutter, reduce heat and add Chana Daal followed by turmeric and red chilli powder and mix well
  5. Cook on low heat with intermittent stirring
  6. Halfway through, add half a cup of water and cover and cook with intermittent stirring until the daal is soft ; keep aside and let it cool
  7. After 20 minutes check the rice flour dough; add some ghee and knead until soft and smooth; cover and keep aside. The dough should come together but not stick to your hands
  8. Once the daal mixture has come to room temperature, add ajwain seeds, green chilies, ginger, garlic, coriander leaves and salt and blend to form a coarse mixture
  9. If you like the stuffing to be on a moister side, add a few tablespoons of water to the above mixture to get the desired consistency
  10. Form the Chana Daal stuffing into one inch small balls and lay out on a plate
  11. Then form the rice dough into discs big enough to accomodate the above stuffing by working quickly and pressing the dough between your greased palms. You could also press the dough between two sheets of greased parchment. Try and keep the discs approximately half a centimetre thick and keep your palms greased while working with the dough to avoid cracking. Form into a spindle shape and place on a greased plate
  12. Repeat the process for the remaining dough and stuffing
  13. Prepare the steamer and steam the peethas by placing them on a steel plate layered with thin muslin until the coating is cooked. Layering with muslin helps in pulling the peethas out easily when the plate is hot
  14. Serve with green chutney or spicy tomato chutney
https://onewholesomemeal.com/daal-peetha-steamed-glutenfree-vegan-dumplings/

Daal Peetha

Categories
Afternoon Snack | 3pm Meal

Chooda Bhoonja | Chuda Bhaja | Chivda Recipe

Chuda Bhaja, Chivda Bhaja, Chooda Bhoonja and there are many more spellings and names to this popular eastern India recipe.

Bhooja” or “Bhoonja” loosely translates to something roasted or fried. It is a quintessential Bihari snack. It is also popular in Odisha by the name Chooda Baja. Made with one or more roasted or fried ingredients there can be ample varieties that can be found – some to be prepared or eaten right away and some that store well for a few days. Puffed rice (murmure or moodhi), roasted gram, beaten gram (chana choor), flattened rice (poha or chooda or chivda or chuda), peanuts flavoured typically with raw mustard oil, lime, loads of green chilies, onion and coriander come together to create a riot of flavours and textures and make for a healthy and filling snack. 

I have vivid memories of enjoying all kinds of Bhoonja at my Daadi’s (grandmother’s) home. A few jars of recycled Horlicks bottles filled with one of my favourite snacks were a common sight in Daadi’s pantry. I would make sure to scoop out extra helpings of peanuts while serving myself. Peanuts ke bina (without peanuts) no Bhoonja is complete IMHO. 

Chooda Bhoonja My Way

So, I created my own version of Bhoonja – a little sweet, a little spicy, and sour. To half of it I added fried onions, the version we consumed right away and the remaining was stored in airtight containers. My favourite spicy peanut podi or dry chutney was added in good measure to spice things up a bit. Kids loved the sweet and sour flavours too. If you like to keep things simple just add salt to flavour and it will still taste as good. Add fried onions only if you are consuming the Bhoonja right away. Bhoonja when stored with fried onions release moisture and makes the fried poha soft.

I also added raisins and nuts in good measure along with roasted chana daal and peanuts. You can modify this step as well as per your taste and preference. I roasted them in a tablespoon of ghee but you can dry roast it too in a thick bottomed wok. To add more texture you could add fried sliced coconut (fresh or dried).

Step-Wise Recipe With Pictures

Before frying onions, you could also add some green chilies and curry leaves for added flavour and fry the onions till really nice and brown.

Roasted dry fruitsFrying onions

While the onions are frying, you can prepare the Spice Blend for the Bhoonja. I used garlic salt, raw sugar, amchoor, and peanut chutney powder. You could also use rock salt or plain salt.

Garlic Salt

I deep fried the poha as that really uplifts the taste. You can shallow fry it with little oil in a thick bottomed wok until it is well roasted and crispy but I do recommend deep frying for best results. Once the poha is fried, drain it on a kitchen towel and add the fried onions, sprinkle the spice blend all over, and give its nice mix until well incorporated

Deep fried poha for chooda bhunjaChooda Bhoonja With Peanut Podi

Then I transferred the mixture in the same wok used for frying onions and on a very low flame stirred it gently for another 2 minutes before serving it.

Without onions, this chooda bhoonja stores well for up to a week if stored in a dry place in an airtight container.

Chooda Bhoonja

Prep Time: 10 minutes

Cook Time: 20 minutes

Total Time: 30 minutes

Yield: 100

Serving Size: 6-8

Ingredients

  • Poha, thin variety- 2 cups
  • Slivered onion - 1 cup (optional)
  • Green chilies, sliced- 2 (optional)
  • Curry leaf- 10-12
  • Almonds, whole- 10-12
  • Cashews, halved vertically- 10-12
  • Peanuts- 1/2 cup
  • Raisins- 2 tbsp
  • Chana Daal- 2 tbsp
  • Sliced and fried fresh or dried coconut- 1/4 cup
  • Raw or brown sugar- 2 tbsp
  • Amchoor (raw mango powder)- 1 tbsp
  • Rock or regular salt- 1 tbsp or as per taste
  • Peanut Chutney powder- 1.5 tbsp (optional)
  • Ghee-1 tbsp
  • Oil for deep frying

Instructions

  1. Clean the poha well by sifting
  2. In a pan, add some ghee and roast the chana daal until nutty aroma arises and it just about starts to turn brown on the edges; keep aside
  3. In the same pan in the leftover ghee, roast the nuts and raisins and keep aside
  4. Add oil to a wok and once hot, fry the poha in small batches and drain on a kitchen towel; the poha will turn nice and crispy when fried well but do make sure to keep the flame on medium high and work swiftly as poha tends to burn easily
  5. Prepare the spice blend by mixing salt, raw sugar, amchoor and peanut podi powder
  6. If using onions, roast in some oil until nice and brown along with some green chilies and curry leaves, adding the curry leaves and green chilies first followed by onions; set aside
  7. Next mix the fried poha with fried onions, green chilis, curry leaves well
  8. Then sprinkle the spice blend on the above mixture and give it a nice mix
  9. Finally transfer the mixture to the same wok used for frying onions and bring everything together on a low flame
https://onewholesomemeal.com/chuda-bhaja-chooda-bhoonja-chivda-recipe/

Categories
Dinner | 8pm Meal Lunch | 1pm Meal Most Popular Posts

Litti Chokha | Traditional Bihari Recipe

“So, you are a food blogger? What part of India are you from?”

“Bihar”

“Aah! Then you must teach me how to make litti chokha!”

Remarks like this are the reason I have not shared one of the most loved recipes from my home state Bihar! It is almost like saying that Italians eat only pizza. Or that tapas are an everyday feature at the table in a Spanish home! This and many other similar stereotypes and expectations made me almost pledge to never share this recipe. The fact that being a Bihari in India comes with its own share of woes and discriminations, and I had suffered a fair share of them studying and working outside of my home state. This baggage did not help either.

So What Changed?

Well! Let me first share with you a little secret about my personal journey. I have always been a sensitive person. Since I started blogging, it was very hard to deal with constant judgment and brutality. Something that bloggers are perpetually subjected to. I am not exaggerating but most of the brutality came from people who know me. I was already dealing with my own demons already. This added burden did not help. I started to question my decision to blog. Nothing good seemed to be coming out of it. In fact, things were only going south – not many followers on the blog, not much remuneration, and definitely no peace of mind! Then why was I doing what I was doing?

Now, as with most things in my life, by some cosmic intervention, a few things happened almost at the same time which helped to pull me together and bring my mind and soul to a safe place:

  1. I was recommended a book on Goodreads called the Power of Subconscious Mind and I started reading it
  2. A friend who had just completed some sessions happened to speak about her therapist to me
  3. And most importantly in one of the rare moments of optimism I reminded myself why had I started a blog in the first place – for the pure love and joy of sharing!

To deal with constant judgment, remember this – People’s opinion of you is a reflection of their character (and life experiences) and not yours. So, every time I am faced with opinions and unkind remarks I just remind myself of this. I stay true to myself and focus on my goal, no matter what 🙂

It’s in 2020. So Let’s Start New.

Why am I sharing all this with you when I should be focussing on more important matters like the recipe for Litti Chokha? Well! First things first, blogging or not, we all go through significant ups and downs in life. But not all of us are infused with copious amounts of endorphins to deal with these ebbs and flows and take it in our stride. Many of us find ourselves at sea and overwhelmed, to say the least, dealing with these. So, since my job is to share I  took the liberty to share the above with you the things that worked for me and helped me cope. I sincerely hope that at least one if not all of these help you too. Do remember that no matter how much love of family and friends you are surrounded by, there is nothing more important and effective than self-love. So, be it seeing a therapist, taking a few hours every day to be with yourself or just reading a self-help book, take the plunge, without any guilt or second thought. We all need constant reminders- one cannot pour from an empty vessel!

And Finally Litti Chokha!

Coming back to the recipe, there are four parts to it – making the litti, baingan bharta (eggplant mash), aloo bharta (mashed potatoes), and tomato chutney. While together it might sound like a lot of work, when you start putting it together you will realise it really isn’t hard. Just a little bit of planning and patience goes a long way. Here are a few tips to help you make the perfect litti chokhas.

Littis: They should not be disjointed when they come out of the oven hard. If you like them soft and crumbly, double the amount of ghee while kneading the dough. The best way to enjoy them is piping hot. Use two hands to break them and then dunk it in some melted ghee and mix with the bharta/chutney. Traditionally the litti stuffing was some oil, lime juice, and salt. Today however you will find various takes on the stuffing. Here I am sharing the one we enjoy as a family.

Litti-Chickpea flour stuffed whole wheat dumpling

Baingan Bharta: Whether you roast it on an open flame or on an iron tawa placed on an open flame, do slit them halfway in the centre. Not all the way to the end splitting it into two! Insert 6-8 pods of garlic. Roast the baingan and garlic together. Later use the garlic for flavouring both the bhartas and chutney. Yumm!!

Eggplant/Aubergine Mash(perfect accompaniment with Littis and parathas)

Aloo Bharta: You can boil potatoes in a pressure cooker and then further roast in a preheated oven for 5-10 minutes to add that smoky flavour. It would taste great both ways.

Mashed and spiced potatoes/Aloo Bharta

Tamatar Chutney:  Peel the skin of the tomatoes and roughly chop the tomatoes. Mix this with other ingredients of the chutney using a fork or blend together. It just changes the consistency, the former is lumpy and latter is liquid but it doesn’t effect the taste.

Tomato/Tamatar Chutney-Perfect accompaniment with litti Chokha

With my pro-tips up your sleeves, you are sure to rock this recipe 🙂


Litti-Chokha (Chickpea flour stuffed Dumplings with Aubergine Mash)

Prep Time: 30 minutes

Cook Time: 45 minutes

Total Time: 1 hour, 15 minutes

Yield: 100

Serving Size: 3-4

Ingredients

    For Litti Dough
  • Whole wheat flour- 2 cups
  • Ghee- 1.5 tbsp
  • Salt- 1.5 tsp or to taste
  • Water- 1 cup approx (to knead the dough)
  • For Litti Stuffing
  • Sattu (roasted gram flour)- 1 cup
  • Ajwain (carom seeds)- 1/2 tsp
  • Saunf ( fennel seeds)- 1/2 tsp
  • Red Chilli powder- 1/2 tsp
  • Lemon juice- 2 tsps
  • Onion, finely chopped- 1.5 tbsp
  • Coriander leaves, finely chopped- 1.5 tbsp
  • Mustard Oil ( or oil from homemade mango or red chilli pickle)- 2 tsps
  • Finely Chopped Ginger- 1 tsp
  • Finely Chopped Garlic- 1 tsp
  • Salt - 1.5 tsp or as per taste
  • Water- 2 tbsp approx to bring the stuffing together
  • For Baingan Chokha/Bharta
  • Baingan -1 (large variety)
  • Garlic pods roasted - 2-3
  • Green chilies roasted- 1-2 or as per heat level desired
  • Mustard oil- 1 tsp
  • Chopped coriander leaves- 1 tbsp
  • Salt-1.5 tsp or as per taste
  • For Aaloo Chokha
  • Medium sized potatoes- 2
  • Green chilies roasted- 1-2 or as per heat level desired
  • Finely chopped onions -1.5 tbsp
  • Mustard oil- 1 tsp
  • Chopped coriander leaves- 1 tbsp
  • Salt-1.5 tsp or as per taste
  • For Tomato Chutney
  • Medium sized tomatoes- 2
  • Garlic pods roasted - 2
  • Green chilies roasted- 1-2 or as per heat level desired
  • Mustard oil- 1 tsp
  • Chopped coriander leaves- 1 tbsp
  • Salt-1.5 tsp or as per taste

Instructions

    Making Litti Dough
  1. In a deep and wide mixing bowl,place all ingredients; do not add water yet
  2. Between the palm of your hands rub the flour-salt-ghee mix for 5-7 minutes
  3. Then add little water and combine the dough; add water gradually to make sure the dough is of right consistency- soft and pliable and not very hard. Cover and keep aside
  4. Preparing Litti Stuffing
  5. In another deep bowl bring all the stuffing ingredients, except water together and mix well with your hands
  6. Add 1 tbsp water and mix well. The mixture should not be too dry but also not very wet, just sightly clumpy. You can test it by pinching some mixture between your fingers and if it almost holds shape it is good to go; add some more water if its very dry and powdery
  7. Rolling,Stuffing and Baking Litti
  8. Pull out a small ball of dough and roll between your palms as you would when making rotis
  9. Then roll out these balls to make almost a 4-6 inch roti, then place about 2 tbsps of the stuffing mixture in the centre
  10. Seal the edges by bringing them in the centre and pressing together
  11. Then gently roll them between your palms to make a ball
  12. Proceed similarly for the remaining dough
  13. Preheat your oven to 200 degrees and line a baking sheet with foil
  14. Place the stuffed littis on the tray and brush them all over with ghee
  15. Bake for approximately 20-30 minutes or until the exterior is slightly charred and baked well
  16. Also, halfway through the process , flip the littis over for even baking; brush them again with some more ghee
  17. Making Baingan Chokha
  18. Slit the baingan/eggplant halfway (and not all the way till the end), press 6-8 garlic pods inside and roast on open flame or an iron tawa placed on the flame till the exteriors are charred and black and the white inside is cooked through;keep turning the eggplant while roasting so it is evenly done
  19. Roast 4-6 green chilies alongside
  20. Then peel off the skin, remove the stem and pull out the garlic pods
  21. Peel the garlic pods and keep aside
  22. In a bowl mash together two garlic pods, roasted green chilies as per taste, mustard oil, salt and roasted eggplant using a fork until well combined
  23. Garnish with chopped coriander
  24. Making Aaloo Chokha
  25. Boil potatoes in a pressure cooker until done
  26. Roast these boiled potatoes over flame on an iron tawa or in an oven at 200 degrees for 10 minutes; you can also skip the roasting step if you are pressed for time
  27. In a bowl mash together roasted green chilies as per taste, mustard oil, salt and boiled/roasted potatoes
  28. Garnish with chopped coriander
  29. Making Tamatar Chutney
  30. Poke holes into tomatoes and roast on an iron tawa , turning sides till the skin is nice and charred and tomatoes cooked through
  31. Peel the skin, chop into cubes and mix well with the remaining ingredients using a fork or you could blend all ingredients except the coriander to make a more homogeneous thick liquid
  32. Garnish with coriander
  33. Serve hot littis with a side of ghee, chokhas and chutney. Winter is truly incomplete without this meal!
https://onewholesomemeal.com/litti-chokha-traditional-bihari-recipe/

Categories
Dinner | 8pm Meal Lunch | 1pm Meal

Besan Ki Sabzi | Authentic Bihari Recipe

The familiarity of the besan ki sabzi is a great way for me to connect with cherished childhood memories.

I hear and read about kitchens of the future. Kitchens where robots will whip up your favourites with the click of a button. Maximum output with minimal effort. Convenient indeed! Convenience is all one is after these days. Yet we have never lived in a more “inconvenient” time – the inconvenience of the soul. One has access to the best possible spas, medicine and gadgets. Yet one craves for the not so convenient times. Those times when we didn’t have just a button to access world news but knew how are neighbours were doing. The human and humane elements seem to be diminishing in our lives. And convenience is fast replacing compassion.

Traditional Bihari Recipe from Dadi Ma’s Kitchen

One can dine at the best restaurants and enjoy the most delectable of cuisines but nothing nourishes the soul as good old comfort food which transports you back into your grandma’s kitchen. With the pots, and pans clanking, an orderly frenzy with our favourite dishes being prepared. No robot can replicate that! After all, what made grandma’s food special was not just about the ingredients and their quantities, it was the love and affection she cooked with.

This besan ki sabzi is one such dish that will always remind me of my grandmother’s cooking. I recall us kids fighting over hot chickpea fries before they went into the gravy and in a matter of minutes, most of them would vanish. Daadi Ma (grandma) would shoo us out in her usual sweet angry way before she would whip up another batch for the curry. These fritters would make great lunch box snacks too!

Key Steps to Make the Perfect Besan Ki Sabzi

  1. The chickpea batter is made runny but not too watery as shown in the clip below.
  2. While cooking the batter one needs to work fast, keeping the flame low and constantly stirring so it cooks evenly. You may need to add a few tablespoons of oil in this step if the mixture starts to stick to the pan.
  3. The cooked mixture needs to be transferred to a greased plate right away and then kneaded to form an almost smooth dough. Then flatten it out as shown below before cutting out small squares to be fried.

Besan ki Sabzi

Prep Time: 15 minutes

Cook Time: 30 minutes

Total Time: 47 minutes

Serving Size: 3-4

Ingredients

  • Chickpea flour or Besan- 1 cup
  • Water - 1 cup and some extra
  • Ajwain- 1/2 tsp
  • Red chili powder-1/2 tsp (optional)
  • Cumin powder- 1/4 tsp
  • Coriander powder- 1/2tsp
  • Salt- 1.5 tsp or as per taste
  • Fried Onion paste- 3/4 cup ( fry onions in 1tsp oil till translucent, cool and then blend to make a paste)
  • Tomato paste- 1/2 cup
  • Ginger garlic paste- 1 tbsp
  • Cumin seeds-1 tsp
  • Bay leaf- 1
  • Cumin powder- 1/2 tsp
  • Coriander powder- 1 tsp
  • Garam Masala powder- 1/2 tbsp
  • Salt- 1.5 tsp or as per taste
  • Oil- For deep drying and some extra
  • Chopped coriander leaves for garnish -1.5 tbsp

Instructions

  1. In a deep bowl add chickpea flour, ajwain, red chili powder, Cumin powder- 1/4tsp, Coriander powder- 1/2tsp, Salt- 1.5tsp
  2. Gradually add water, mixing well with your clean hand till a smooth, pancake consistency batter , without any lumps is achieved ( see video for reference )
  3. Heat 1 tbsp oil in a non stick pan and add the prepared batter to it with constant stirring
  4. Cook on medium low flame with constant stirring till the batter starts to come together
  5. Turn off heat and transfer to a greased plate and knead with your hands to get an almost smooth dough
  6. Then flatten out the dough with your fingers gently till it reaches almost one centimetre thickness
  7. Cut out small two inch squares and deep fry on a medium flame, flipping sides till golden and drain them on a kitchen towel
  8. In the same pan heat almost approximately 1 tbsp oil and add bay leaf and cumin seeds
  9. Once the seeds start to splatter add the fried onion paste, ginger-garlic paste, 1/2 tsp cumin powder,1 tsp coriander powder, 1/2 tbsp garam masala powder and cook on a medium flame till oil starts to separate , then add tomato paste
  10. Cook for 3-5 minutes on a medium flame then add water and give it a nice mix , add salt as per taste
  11. Then add the fried chickpea squares to the gravy and let it simmer on a low flame uncovered for about 5 minutes
  12. The chickpea fries will absorb considerable amount of water so feel free to add some more hot water to the mix to thin out the gravy as per the desired consistency
  13. Turn off heat, garnish with chopped coriander and let it sit covered for 5 minutes
  14. Serve hot with rice or chapatis
https://onewholesomemeal.com/besan-ki-sabzi-authentic-bihari-recipe/

Categories
Dinner | 8pm Meal Lunch | 1pm Meal

Lauki Chana Dal | Bottle Gourd with Lentils

Lauki Chana Dal is the perfect one-pot meal to give you the wholesomeness of bottle gourd and lentils.

As summer peaks it gets harder to spend time in the kitchen. But also, Mother Nature makes sure we stay hydrated by flooding us with the best summer bounty. Most veggies available through summer have high water content. This makes it easy to digest while having a cooling effect on our system. The gourd family is one such. Vegetables from this family such as cucumbers, angled luffas, pointed gourd, bottle gourd are all high in water and fibre, making them an almost complete meal in themselves.

Bottle gourd is one such staple summer veggie in our household. It is a popular vegetable in the south and southeast Asian region where summer gets extremely hot and sultry. Growing up, this vegetable featured regularly on our menus throughout the week during summer. Many of us from India also know it as Lauki. It is usually not a very well-liked vegetable due to its watery taste. However, if prepared well most people do grow to like it as my fussy husband has 😉 I remember enjoying it with hot ghee rice and chilled yogurt on a hot summer afternoon with some raw onions mixed with pickle masala on the side.

The Benefits of Lauki Chana Dal

Although very healthy, the veggie is low in protein. But that problem gets addressed as soon as you add Chana dal (split chickpeas) to it. It also makes for a much more delicious one-pot meal. Using mustard oil enhances the flavour multiple-fold but feel free to use the oil of your choice. Another key ingredient is fenugreek seeds. They are well known for their multiple benefits. However one needs to be careful while cooking with fenugreek as using an excessive amount makes the food bitter and so does overcooking it.

Using a pressure cook reduces the cooking time to a great extent, however you could use a normal thick bottomed wok as well. Here is a stepwise instruction with images to make this tasty dish.

First, I peeled and cubed a small-sized bottle gourd and kept aside. Then to hot oil, I added fenugreek (methi)seeds, finely chopped garlic, asafoetida, and green chilies (as per taste) and sautéed on medium-low flame for a few seconds making sure the methi doesn’t burn.

To that, I added pre-soaked chana dal (washed and soaked in water for 30 minutes) and turmeric and mixed everything well.

The last step – I added the cubed bottle gourd and salt, mix, and pressure cooked for 5 minutes till the pressure set in. Then turned off the heat and let the pressure release on its own and took off the lid and cooked till the water (good quality bottle gourd releases a lot of water) reduced to the desired consistency.

If you are using a normal wok, just cover and cook till done, keeping the flame to medium-low and stirring intermittently. There is no need to add additional water.

This curry is enjoyed best with hot rice and daal but tastes good with chapatis too.

Lauki Chana Dal


Lauki-Chana Daaal (Bottle Gourd with Split Chickpeas)

Ingredients

  • Lauki/Bottle Gourd, cubed- 1 small size (1.5 cups)
  • Pre-soaked Chana Daal/Split Chickpeas)- 2 tbsp
  • Finely chopped garlic -4 pods
  • Green chilies-1-2 or as per taste
  • Methi/Fenugreek seeds-1 tsp
  • Asafoetida-1/2 tsp
  • Turmeric-1 tsp
  • Salt-1.5 tsp or as per taste
  • Mustard oil-1 tbsp or any oil of choice

Instructions

  1. Heat oil in a pressure cooker or a thick bottomed wok then reduce flame and add asafoetida, fenugreek seeds, green chilies and garlic and sauté for a few seconds till the fenugreek seeds start to release an aroma and change colour . Make sure to stir continuously and not increase the flame as the seeds burn fast and that would spoil the dish
  2. Then drain and add pre-soaked chana daal and turmeric seeds and mix well
  3. Finally add the chopped bottle gourd and salt and pressure cook for 5 minutes from the time pressure sets in
  4. Then turn off the heat and let the pressure release on its own and take off the lid and cook till the water (good quality bottle gourd releases a lot of water) reduces to desired consistency.If you are using a normal wok, just cover and cook till done, keeping the flame to medium low and stirring intermittently. There is no need to add additional water .
https://onewholesomemeal.com/lauki-chana-daal-bottle-gourd-with-lentils/