Categories
Food Photography and Food Styling Uncategorized

How to create and style unique fusion dishes for food photography

How to create and style unique fusion dishes for food photography
Jay- Food Stylist and Photographer

Hello 🙂

I am Jayashree. You can call me Jay. I am a former technology professional. Food photography started as a creative outlet for me, but soon turned into a professional pursuit. I think of creativity as a way of life. I am deeply inspired by nature. My lifelong interest in human nature and learning has now morphed into a deep observation of online interaction. I am always looking for ways to effectively use technology without compromising on wellbeing. I think better when I write. You can read some of my posts on creativity, photography and wellbeing at https://boiledbeanstudio.com/ creativity/. My recent photography work can be found on Instagram @boiledbeanstudio

What do I mean by fusion dishes?

Let’s think of fusion dishes as those that combine elements of different cuisines or techniques.

We live in a world where most of us are exposed to different cuisines and foods from different parts of the world. As food photographers/stylists, food is our main muse and model. So most of us also tend to be foodies and cooking enthusiasts. In this post, let’s look at how we can cook and style fusion dishes so that they make for unique and interesting subjects for the camera.

Culinary heritages and traditional recipes are of course valuable and must be preserved. But in today’s world where influences come from multiple sources and legacies, it is also important to learn to use and hone them effectively in our work. So if your food and work are fuelled by multiple cuisines and cultures, and you want to express that amalgamation through your cooking or photography, then this post might help you get started.

How to create fusion foods?

So here are some ways:

  1. Switch-up the appearance and presentation of a dish
  2. Replace or switch-up ingredients or flavours from different cuisines
  3. Switch-up cooking techniques

In this post, we are only looking into the first method, which is also the easiest. I will be exploring the other two methods in the upcoming posts of this series and will soon publish them on my website https:// boiledbeanstudio.com/creativity/

Why should we change the appearance of a dish at all?

Because sometimes, it is fun to switch up things and break the monotony.

Sometimes, as photographers, it is our job to present familiar subjects in new and interesting ways.

Sometimes, small tweaks in presentation help elevate an already great dish.

And is that all?

Not really. Eating is a multi-sensory act. When we look at food presented in an appealing way, the pleasure centres in our brains wake up and whirr into action. Anticipations are created, expectations are set. And as food photographers, we know this already. We even try to take advantage of this fact by styling our subjects such that we provide effective visual cues to the viewer. The drips, the drops, the spraying of water, the brushing of oil, the glistening of syrup, the dropping of crumbs — all go to convey everything we want the viewer to sense and feel through the visual medium.

Defamiliarising works wonders

Going by the same logic, if we switch-up the presentation of a dish using non-traditional methods, add some fresh new cues, style the scene differently, we could stimulate curiosity and generate interest. Defamiliarising is a powerful way to direct attention to our images in a visually overloaded world. Even a Kheer-Desensitised viewer might take notice and wonder, if it is presented like a crème brûlée. It’s the “surprise element” that might just do the trick. Surprise elements are a good thing in photography.

Lastly, this whole effort might serve a deeper purpose. I have come to realise that foodies mainly come in two categories — those willing to try unfamiliar food and those that are not. The first group is easier to please because their main motivation is to seek new experiences or create new memories. The second group however, needs a bit more coaxing. Their main motivation is comfort, familiarity and stability so when food looks too different from their regular fare, they may never even try sampling a dish, let alone attempt to cook it.

Avoiding Stereotypes

Sometimes the stereotypes surrounding a cuisine is also to blame. Too spicy, too sweet, too bland, too ugly can be some of the unnecessary generalisations applied to many cuisines, which in reality may have much to offer to anyone that takes the time to learn them. Putting a new spin on an existing dish by adding a few familiar touches may just wean the second group into appreciating something new, in small, not-so-scary bites.

Via photography, or any other art, we seek to influence — even if it is in small ways. And since food is already a great connector of people, removing or reducing a few unnecessary mental blocks can be a great way to win over new audiences. As an added bonus, we might even end up rekindling interest in an already existing audience. And that is always a good thing.

Now that we have explored the reasons, let’s look at how to go about creating such fusion subjects effectively, with the help of an example.

How do we pick the right (fusion)dish for food photography?

Not all recipes lend themselves well for a fusion experiment. So how do we choose? Here are a few starting points that led me to creating an excellent fusion dish from its classic beginnings.

Styling

Recently, I added a culinary torch to my food styling toolkit. When I was looking for ways of using it, I learned that one of its most popular uses is in caramelising a layer of sugar on Crème brûlée, which, if not for this final step, would have simply remained custard in a cup. The crunchy sugar shell is what elevates the dish in its taste, texture and appearance. This made me think — “What other familiar dish can we elevate using a sugar shell”?

This is how Kheer brûlée first popped in my mind.

Ingredients

Like custard, which is the basis for Crème brûlée, Kheer is a simple, milk based dessert. And most versions of kheer use sugar as the sweetener (some use jaggery). So I thought it would work well with a sugar shell (and it did)!

Instinct (and information)

Kheer is a well known Indian/South Asian kin of milk pudding, prepared in many different ways. I also now know (from Instagram images) that every country/culture has a variation of this dessert, even though it is called by different names in different languages and prepared on different occasions. But in its simplest form, it is simply a milk-and-rice pudding. Everybody already knows this dessert in some form or other, and that can be a good foundation on which to build a fusion dish.

Application

So now you know how I picked my fusion candidate. But how would you use this information in your own projects? Here is how. The next time you enjoy a dish, or see a food image with an eye-catching presentation, make a mental note of its most appealing visual feature and the technique that was used to create it. (Pretty Ruffles? Glossy caramelisation? Shape? ).When you are cooking something easy and familiar back at home, recall this new feature, and think about how (and if) it can be incorporated into the homely dish and make it even better and prettier. If it feels like it might work well, you’ve scored a new project topic! And if it doesn’t sit right, you can simply move on and think about it all over again for another dish! The point here is to have enough specific material to recall at the right time.

I am sure that you can think up your own unique combinations, if you put your mind to it. And unique subjects are a good thing in photography.

Experimenting on what to tweak

The first time I create a changeling, I don’t try to photograph it. I just experiment and play around to see what happens. It is always practical to focus on one challenging task at a time. When I first played around with the butane torch, I did not even bother making the kheer. I started by sprinkling different types of sweeteners on a baking tray and caramelising them. This helped me get a better control of the tool and technique. It also made me realise that fine white sugar, raw sugar, brown sugar and jaggery powder all burn at a different rate, leaving very different colours and textures of residues!

I also realised from trial and error, that it might be best to make the sugar layer thin at first (so that it could caramelise uniformly) and then iteratively add on more layers to get a thick, glossy shell in the end. But this meant that there would already be so much sugar in the dish! So I made a mental note to omit (drastically reduce) sweetening the kheer while cooking to balance the taste.

Another thing I realised was that sugar would need a firm surface to sit on, and some kheer versions are runny. So in order to make the surface firm, I may have to chill the kheer in refrigerator.

By simply experimenting and breaking down the steps, I was able to make all these notes and corrections before even beginning to cook the kheer.

How to “style” the final dish

Since we are trying to switch up the presentation here, it is important to style the fusion dish well for stronger impact. Here are some starting points to think about:

Simplify matters by picking up the styling of the dish from which you imported the switch-up feature. In this case, that would be Crème brûlée.

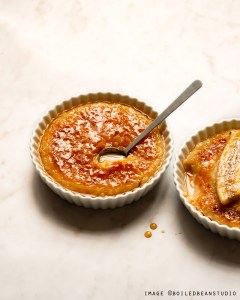
Style it like a whole other dish! Since the switch up focus here is on appearance, we can be imaginative! But let there be a method to the madness — be guided by your style, seasons or props. For example, I did not have ramekins on hand to style my dish just like Crème brûlée. I had pretty white ceramic tart shells though, so I decided to style the new dish like little pies.

The one thing do I avoid though, is to style the dish in the way the original dish is usually styled. I think that it would undo the impact and drag the dish back to where it started. This whole exercise was to create unique subjects — remember? Still, that’s only a personal preference, so feel free to style it any which way you like — so long as it feels right for you, and your target audience.

That’s it for now, let’s talk about other effective ways to create unique fusion food subjects soon. If you wan’t to read more, you’ll find more posts on my website https://boiledbeanstudio.com/creativity/

Until then, let’s be adventurous!

How to create and style unique fusion dishes for food photography

Find similar posts on food styling here and here.

Categories
Dinner | 8pm Meal Lunch | 1pm Meal Uncategorized

Kurkuri Bhindi-Easy Oven Baked Recipe

Kurkuri Bhindi is a dish loved by all. For that matter bhindi, Okra or Lady’s Finger is quite a versatile vegetable. Not only can it be cooked in a zillion different ways ,it is seldom disliked. Most kids who would say no to all green veggies will say yes to the bhindi. One of my favorite ways to eat bhindi is just stir frying it in mustard oil with diced onions and potatoes; no spices, just turmeric , salt and green chilies. If made well it makes for the perfect side with hot ghee rice and daal. Most Indian kids may (or may not) have fond memories of eating bhindi with pooris or parathas in their school lunchbox. I also have a Zaatar flavoured Sesame-Peanut Bhindi recipe on the blog that you will love.

This dish however was not an everyday thing growing up. One would eat it at restaurants or parties and celebrations. I do not think if my mother ever made it at home. But things are quite different these days and almost all popular restaurant dishes are being recreated at home so I decided to my own baked version at home.

The recipe itself is pretty straightforward but it does need some prep and tedious slicing. Because we are baking and not frying the bhindi (which is how this dish is traditionally made), it is imperative that all slices are more or less similar in size for even baking.

Preparing Bhindi (okra) for Baked Kurkuri Bhindi

  1. Make sure you use the most tender bhindi for this recipe
  2. Wash the bhindi well one by one under running water
  3. Drain well and spread out on a clean kitchen towel and let dry preferably for a few hours . This can be done well ahead of time
  4. In case you wash, dry and place bhindi in the refrigerator, bring it out a couple of hours before cooking and wipe well with a kitchen towel before slicing
  5. Next, chop off the tip and the bottom then working carefully slice the bhindi vertically into half; then further slice the halves into thin sticks (see video below for reference)
  6. Discard the seeds
  7. You can even refrigerate the bhindi for unto a day in advance at this stage

Ingredients

  1. Bhindi/Okra: 150 grams
  2. Besan or chickpea flour: 1/4 cup
  3. Rice flour: 1 tbsp
  4. Amchoor+Chaat Masala- 1 teaspoon
  5. Garam Masala: 1/2 tsp
  6. Turmeric powder- 3/4 tsp
  7. Red Chili powder: 1 tsp or as per taste
  8. Coriander powder: Little less than 1 tsp
  9. Ajwain (carrot seeds)-1/2 tsp
  10. Mustard Oil: Approximately 1/3 cup and a little extra
  11. Lime juice : 1 tbsp
  12. Salt: 1 tsp or as per taste

Method for Baked Kurkuri Bhindi

  1. Preheat your oven to 220 degrees for a minimum of 15 minutes. The bhindi will not turn out nice and crispy if the oven is not hot enough
  2. Line a baking sheet with foil and then place a sheet of baking parchment on top. This makes sure the bhindi will not stick to the bottom and come out easily
  3. Add all the dry ingredients with the bhindi, mix well and add mustard oil and give it a final mix. Do not add salt at this stage
  4. Mix in the lime juice and bake for 7-10 minutes or until the bhindi is half cooked and still retains its green colour . The time may vary based on the oven
  5. Add salt, mix well and bake for another 5-7 minutes
  6. If through the process you feel the mix is too dry feel free to spray some more oil while baking

Watch a step by step recipe video here

Baked Kurkuri Bhindi- Quick to put together side

Prep Time: 20 minutes

Cook Time: 20 minutes

Total Time: 40 minutes

Yield: 100

Serving Size: 3

Ingredients

  • Bhindi/Okra: 150 grams
  • Besan or chickpea flour: 1/4 cup
  • Rice flour: 1 tbsp
  • Amchoor+Chaat Masala- 1 teaspoon
  • Garam Masala: 1/2 tsp
  • Turmeric powder- 3/4 tsp
  • Red Chili powder: 1 tsp or as per taste
  • Coriander powder: Little less than 1 tsp
  • Ajwain (carrot seeds)-1/2 tsp
  • Mustard Oil: Approximately 1/3 cup and a little extra
  • Lime juice : 1 tbsp
  • Salt: 1 tsp or as per taste

Instructions

  1. Preheat your oven to 220 degrees for a minimum of 15 minutes. The bhindi will not turn out nice and crispy if the oven is not hot enough
  2. Line a baking sheet with foil and then place a sheet of baking parchment on top. This makes sure the bhindi will not stick to the bottom and come out easily
  3. Add all the dry ingredients with the bhindi, mix well and add mustard oil and give it a final mix. Do not add salt at this stage
  4. Mix in the lime juice and bake for 7-10 minutes or until the bhindi is half cooked and still retains its green colour . The time may vary based on the oven
  5. Add salt, mix well and bake for another 5-7 minutes
  6. If through the process you feel the mix is too dry feel free to spray some more oil while baking
https://onewholesomemeal.com/baked-kurkuri-bhindi-quick-to-put-together-side/

Categories
Dinner | 8pm Meal Lunch | 1pm Meal

Crispy Oven-Baked Fish

For quite some time now I have been contemplating investing in an air-fryer. Most people who possess one highly recommend it and those of us who don’t, contemplate and drool at the thought of binging on all the yummy fried food without the guilt. At least I do. What’s stopping me then you might ask? Like most people living in Hong Kong-Kitchen counter space is a luxury and I am forever trying to figure out best and most efficient storage options. As such an air fryer does seem like bit of a luxury at the moment . Hence for now I am happy creating recipes like this Crispy Oven-Baked Fish which make sure I miss an air-fryer a tad bit less!

Why Baked Fish is Always a Winner?

Fish in itself is a complete meal with all the micro and macro nutrients that it possesses. Most fish cook easily and retain flavours very well. So, be it Indian, Thai, Chinese or Continental flavours, a fish (especially flaky white ones) would do absolute justice to any of it. Not to mention it requires minimal prep and bakes/cooks really fast so it is perfect for those hectic weeknight meals.

We usually do fish once a week- foil baked, pan fried or in curries and soups and sometimes deep fried when we are feeling a tad indulgent. One of my favourite baked fish recipes is the classic Indian Patra Ni Machchi ( whole pomfret or pompanos baked in banana leaves with a spiced coriander-coconut paste). I will be sharing that recipe with you real soon!!

Tips to Make Perfect Crispy Oven-Baked Fish

  1. Use a white fish like Tilapia, Basa(pangasius), Haddock or Sole
  2. Use boneless fillets as they work best for this recipe
  3. Make sure the oven is nice and hot (preheated at least for 15 minutes at 204 degrees) before you pop the prepared fish into it
  4. Prepare your tray by double lining it with foil first and then parchment followed by spraying it with oil
  5. I kept the seasoning simple using only dried parsley, black pepper and some cayenne but feel free to get creative and use your own favourite seasoning mix. We do one with sumac, cayenne and dried red chilli flakes  and it imparts a nice citrusy kick to the crust
  6. Use Japanese Panko Breadcrumbs for best results as they make for the crispiest crusts
  7. To reduce prep time prepare three different stations next to each other- first a wide plate with all purpose flour, salt, black pepper, cayenne, another one with breadcrumbs, salt, the remaining black pepper & parsley and a bowl with eggs beaten lightly & remaining seasoning
  8. Slice the fillets into approximately 2X3 inches size so they are easy to work with and do not break easily while baking
  9. Evenly divide the salt and other seasonings in all the three coatings for best results
  10. I also like to marinate the fish in some lime and pepper and refrigerate for 2-3 hours before cooking but you can do it for 30 minutes or so or skip this step. Marinating in lime helps take out the strong fishy odour

Ingredients for Crispy Oven-Baked Fish

  1. Boneless fillet of any white fish like Tilapia, Basa(pangasius), Haddock or Sole- 300 gms
  2. All purpose flour- 3/4 cup
  3. Panko Bread Crumbs- 1 cup
  4. Dried Parsley- 2.5 tbsp divided into three equal parts
  5. Cayenne Pepper- 1.5 tbsp (or as per taste) divided into three equal parts
  6. Salt: 1.5 tsp (or as per taste) divided into three equal parts
  7. Pepper, coarsely ground : 2 tsp
  8. Two eggs lightly beaten
  9. Lime juice, freshly squeezed, 1/2 tsp black pepper for marinade
  10. Oil to brush/spray on the baking sheet and fish before baking

Method  for Crispy Oven-Baked Fish

  1. Slice the fish fillets into desired size (preferably 2X3 inches) and marinate in lime juice and half a teaspoon black pepper for a minimum of half an hour
  2. In the meantime preheat your oven to 204 degrees and line a baking sheet with some foil topped with parchment and brush oil all over
  3. Prepare three stations for coating the fish. At the first station place a wide plate with All Purpose Flour, one third each of the dried parsley, cayenne pepper, salt and black pepper and mix;
  4. At the second station whisk the eggs in a bowl and add half of the leftover parsley, cayenne and black peppers and salt and mix ; finally at the third station, in a wide plate place Panko Bread Crumbs and the remaining seasonings and mix
  5. Bring the marinated fish out of the fridge five minutes before baking and let it rest
  6. Then begin by lightly coating the fish fillets with All Purpose Flour mix followed by gently dipping it in the bowl with eggs followed finally by the bread crumbs mix
  7. Place the coated fillet on prepared baking pan and continue the same for the remaining 
  8. Spray or brush some oil over the fish and bake for about 20 minutes at 204 degrees , flipping sides halfway through the process for even baking
  9. The baking time may vary according to the oven so make sure to check intermittently . Once the outside coating turns a light golden the fish is done
  10. Serve with a side of garlic mayo, hot sauce and lime wedgesCrispy Oven-Baked Fish

Crispy Oven-Baked Fish

Prep Time: 30 minutes

Cook Time: 20 minutes

Total Time: 50 minutes

Yield: 100

Serving Size: 2-3

Ingredients

  • Boneless fillet of any white fish like Tilapia, Basa(pangasius), Haddock or Sole- 300 gms
  • All purpose flour- 3/4 cup
  • Panko Bread Crumbs- 1 cup
  • Dried Parsley- 2.5 tbsp divided into three equal parts
  • Cayenne Pepper- 1.5 tbsp (or as per taste) divided into three equal parts
  • Salt: 1.5 tsp (or as per taste) divided into three equal parts
  • Pepper, coarsely ground : 2 tsp
  • Two eggs lightly beaten
  • Lime juice, freshly squeezed, 1/2 tsp black pepper for marinade
  • Oil to brush/spray on the baking sheet and fish before baking

Instructions

  1. Slice the fish fillets into desired size (preferably 2X3 inches) and marinate in lime juice and half a teaspoon black pepper for a minimum of half an hour
  2. In the meantime preheat your oven to 204 degrees and line a baking sheet with some foil topped with parchment and brush oil all over
  3. Prepare three stations for coating the fish. At the first station place a wide plate with All Purpose Flour, one third each of the dried parsley, cayenne pepper, salt and black pepper and mix;
  4. At the second station whisk the eggs in a bowl and add half of the leftover parsley, cayenne and black peppers and salt and mix ; finally at the third station, in a wide plate place Panko Bread Crumbs and the remaining seasonings and mix
  5. Bring the marinated fish out of the fridge five minutes before baking and let it rest
  6. Then begin by lightly coating the fish fillets with All Purpose Flour mix followed by gently dipping it in the bowl with eggs followed finally by the bread crumbs mix
  7. Place the coated fillet on prepared baking pan and continue the same for the remaining
  8. Spray or brush some oil over the fish and bake for about 20 minutes at 204 degrees , flipping sides halfway through the process for even baking
  9. The baking time may vary according to the oven so make sure to check intermittently . Once the outside coating turns a light golden the fish is done
  10. Serve with a side of garlic mayo, hot sauce and lime wedges
https://onewholesomemeal.com/crispy-oven-baked-fish/

Categories
Food Photography and Food Styling Guest Blogs

Shooting Closeups with Standard Lenses

Shooting Closeups with Standard Lenses
Shilpa Kerur- Food Content Creator & Photographer

Hello guys! I am Shilpa, a food content creator based in Bangalore, India and the person behind my blog and Instagram page: Vanilla Trails.

A little about myself

I am an engineer by profession and quit a 9 year stint in the IT sector to  finally follow my passion for food. I discovered my love for food quite recently. Until 10 years ago, I didn’t even know I liked exploring new cuisines and flavours nor did I know that I was capable of cooking even rice let alone bake fancy desserts.

It was my love for baking and creating healthy recipes that began my journey of food photography. I wanted to be able to share these recipes and pictures with everyone.

A self taught baker and food photographer most of my knowledge is thanks to generous people who have shared their knowledge on their blogs and YouTube channels. Here is my humble attempt to share a few tips on shooting close ups with standard lenses that I have learnt along the way.

Shooting Closeups doesn’t have to be an expensive affair

We all love the magic of a good closeup shot- the beauty in the details that our eyes don’t commonly register.

For clicking a good closeup shot, one needs a macro lens. It lets you get closer to the subject, capture the details that our naked eye can’t even see. That’s why most of us find a close up shot so fascinating!

Macro lenses undoubtedly are the best way to capture a closeup. However when one is beginning their photography journey it may not always be the most economical option.

So what do you do if you love closeup shots and you don’t have a macro lens? Well, here are some things that will help you take beautiful close up pictures with your regular lens.

Things to keep in mind while shooting close-ups

The first thing to understand when you are trying to click closeups shots, is – the more enlarged an object more visible the details. So one has to focus on capturing as much details as possible to take a good close up shot. Here are some factors to consider.

Shooting Closeups with Standard Lenses-Tips & Tricks

Aperture

Use a high F-stop number. This means that the aperture is high leading to a wider depth of field. Wide depth of field indicates that it keeps maximum things in the frame in focus. It is always a good idea to have as much detail of the object in focus as possible. Because when we see the object enlarged, which is what happens when we shoot close up, the details are that much more visible. Blurry closeups are hardly attractive. A good F-stop number to work with in this case, will be just 1 or 2 stops below the maximum value on your camera for that lens.

Light and ISO when shooting closeups

The second thing to consider while clicking closeup is to shoot in enough light, even if you want a moody feel to your pictures. Clicking in low light always affects the details. It will also require you to shoot with a higher ISO to increase the amount of light in the frame. But this in turn will introduce noise in the picture and the details will not be as sharp as needed for a closeup shot.

Tripod is key when shooting closeups

The next thing that helps big time is using a tripod. Clicking handheld can create a blur with even the slightest movement of our hands. A tripod ensures that there are no compromises in terms of sharpness because of any camera movement. This results in sharper images.

Minimum focus distance when shooting closeups

Another factor that plays a big role when trying to click closeup, is not to get too close to the subject physically when shooting.

What is Minimum Focus Distance?

Every lens has a minimum distance at which it can start to focus well. The minimum focus distance is the shortest distance at which a lens can focus. Set up your camera at the closest point from where you can clearly focus on the subject, without compromising the quality/sharpness.

Click pictures from this distance, even if it means you end up framing more area than needed. You can always crop out the unwanted details later.In this case, it is always good to crop the image to focus on the area you want. This ensures we do not miss out on those beautiful details and avoid distortion around the edges. 

Here are some examples of close up shots that have been well appreciated on my blog/instagram account along with  the EXIF data:

Shooting Closeups with Standard LensesBlueberries

Camera settings: F 22 | 8” | 50mm | ISO 200 

Shooting Closeups with Standard LensesCherries

Camera setting: F 18 | 2” | 50mm | ISO 100

Shooting Closeups with Standard LensesPopcorn

Camera settings: F 18 | 4” | 50mm | ISO 100

Shooting Closeups with Standard LensesSesame seeds

Camera settings: F 22 | 4” | 50mm | ISO 100 

Editing

One last thing to consider for good closeup pictures is post processing. While editing, do not be afraid to increase the sharpness and clarity just a little bit more. Also sometimes intensifying the shadows makes the image look sharper. So, play with various parameters while editing and see how you can increase the sharpness and intensify the details. And you are all set to create some beautiful closeup pictures!

For more such informative posts do follow my blog and instagram account:

Blog link: https://www.vanillatrails.com/

IG: https://www.instagram.com/vanillatrails/


You may also find the below :

Behind the Scenes & Styling Tips by Ritumbhara Chinnabalan


Categories
Tips and Tricks Uncategorized

Easy DIY Gift/Cookie Box for Festive Season

It is that time of the year again! The best time when festivals and celebrations come knocking at our doors and there are parties and treats galore. It is my favourite time of the year indeed!

An Ambivert? Not good fun this festive season. Or maybe it is?

Apart from cooking and meeting friends and family, what I love the most is giving presents. You heard it right! I love giving presents. Of course receiving some is great too but I am one of those weirdos who enjoy giving gifts more than receiving them, so much so I bought half a dozen presents in anticipation of Diwali and parties that come with it. It is another story that most of those presents are still sitting in my cupboard because guess what, I hardly got invited to any parties. LOL! Real problems of being an ambivert. Thankfully I have never been the one to have any FOMO and am always more grateful to being home alone rather than being invited to gatherings which make one uncomfortable (read people pulling each others down/ clinging and trying to “demystify” every spoken word) and you leave these places mentally and emotionally exhausted.

Anyhow! When it came to sharing Diwali sweets with some of my closest friends, rather than gifting store bought mithai, I decided to make some at home. That was the easier part. However, I had left the planning to very last minute and I did not have enough time to order custom size boxes. The ones available were either too big to too tiny. After fretting and fuming and almost resorting to store bought mithai I decided to take the packing matter into my own hands as well(quite literally) and that is how this easy DIY Gift/Cookie Box happened !

I happened to be at Ikea to pick up some props for a client’s shoot when I eyed these square boxes which were just the right height and width for my mythical gift box. So, I did a happy dance and gathered what I needed to gather and headed home a happy trooper. For someone who had hated art and craft at school with passion, I was pretty excited at the idea of creating my own Diwali hamper.Easy DIY Gift/Cookie Box for Festive Season

Material Needed to Create Your Easy DIY Gift/Cookie Box for Festive Season

  1. Ikea square box
  2. Cardboard packaging (from your grocery store or even used cereal cartons)
  3. Glue gun
  4. Baking parchment
  5. Muffin wrappers of desired colour ( I used white and gold)
  6. Ruler
  7. A pair of scissors
  8. Wrapping tissue or brown paper as desired to wrap the box in. I used gold net
  9. Sweets and snacks and/or other presents for the gift box


Easy DIY Gift/Cookie Box for Festive Season

Steps to Create Your Easy DIY Gift/Cookie Box for Festive Season

  1. The first step is to finalise how many and what gift items would go into your goody box. Once that is out of your way you can finalise the measurements of each compartment . Do not stress, it doesn’t have to be precise and cast in stone. If things start to look awry you can always move the compartments around and re-glue. Having said that having a clear plan helps save precious time
  2. Once items are finalised, next is to ear mark and measure out the compartments where those items need to be placed
  3. Then based on the above measurements cut out the cardboards half a centimetre smaller than the inside width of the box where the cardboards need to be placed; the height of these cardboard “dividers” would be the same as the box(see the final image below)
  4. Glue the pieces to the board and to each other (wherever needed) and let them sit for a couple of hours so they dry well before proceeding to the next step
  5. Make parchment paper pouches if you have sweets/cookies that do not fit muffin liners. I used this simple technique to make mine. But there are many other tutorials out there you can choose from depending on your requirement & the time you have at hand
  6. Before you start filling your gift boxes make sure to cut out the wrapping paper and tissue to the right size (large enough to gather and wrap the gift box)
  7. Next place the gift box in the centre of the wrapping paper and start to fill out the box
  8. Then wrap, tie, tag and we are good to go!

What went into my Diwali Gift BoxEasy DIY Gift/Cookie Box for Festive Season

  1. Til-Mawa laddoo
  2. Cheese Biscuits
  3. Besan Barfis
  4. Coconut Laddoos
  5. Gulkand filled fig and pistachios bliss balls ( I will share the recipe on the blog soonest)
  6. Namakparas or nimkis
  7. A couple of sparklers wrapped well in tin foil so it doesn’t interact with the food
  8. Decorative tea candle holders from one of my favourite Hong Kong brand- Adorn Creations Home Decor

Let not the above ideas limit your imagination but just be a guide to create your own unique gift box. Ikea has great options for boxes in all sizes, shapes, colours and materials or just up-cycle small cardboard boxes at home with pretty gift tapes, glitter and coloured paper.Easy DIY Gift/Cookie Box for Festive Season

Categories
Afternoon Snack | 3pm Meal Mid-Day Snack | 10 am Meal

Almond & Besan Laddoos | Refined Sugarfree | Healthy Recipe

And Diwali treats continue. In the series of refined sugar free desserts here is one more-Almond & Besan Laddoos. They are made with chickpea flour (besan) and almond flour and loosely inspired by the Gujarati delicacy Magaj Na Laddoo.

Same-Same But Different

Magaj laddoos and these laddoos are similar yet different. Similar because both use besan and almond flour. Different because these laddoos use more ghee and no milk at all. However, if you do decide to use castor sugar then ghee used is reduced as castor sugar also acts as a binder. You would not need to use the two tablespoons in the end. But between sugar and ghee, you know which is a better option 😉

Magaj Na Laddoos & Sweet Memories

Food is delicious more so because of the love associated with it. No matter how average a cook one’s mother is but “Ma ke haath ka chana (food cooked by mum)” is always specialWhy else but because of all the love she puts in while she cooks for her child. And I think that is the reason why Magaj Na Laddoos are so special to me. Not because my mum made it. But because my lovely roommate’s mum (back in undergrads) would make it and send along after each summer break.

Every evening after the unpalatable mess (cafeteria) dinner all of us friends would gather in Room 311 (the room I shared with three other girls) and open our snack boxes to share. Each box would hold love from home, some homemade some store bought but packed with utmost love and care by our respective mothers. The best part? Each one of us would rejoice in sharing the goodies and savouring the speciality treats from others’ snack boxes. And Magaj na laddoos from P’s snack box would be claimed almost entirely by me. And also the sukhdi and kopra paak. Have I convinced you enough how big a fan of Gujarati sweets I am?!

Then let us proceed to the recipe of the Almond & Besan Laddoos.

Helpful tips to make Almond-Besan Laddoos

  1. Good quality ghee, especially grass-fed cow’s ghee makes all the difference
  2. Roasting the besan-This requires some elbow grease but not to be cut short. A good 15-20 minutes on a low flame till nutty aroma arises and colour of besan starts to change
  3. Blanched almond flour- Almond flour comes in two varieties- raw and blanched. The latter version is recommended for this recipe. If you are unable to find it in stores then worry not! It can be easily made at home.
  4. I used raw cane sugar in the recipe but you can use any kind of brown sugar but make sure to add sugar into the besan after taking it off heat. You do not want sugar to melt and make the mixture runny and unbindable
  5. Once sugar is added, add approximately 2-3 tbsp of melted ghee. Add one tablespoon, give it a nice mix and then the add the remaining ghee gradually, testing as you go if the mixture binds. Depending on the kind of almond flour you use, you would need anywhere between 2-3 tablespoon ghee. Just enough to bind the laddoos
  6. Make sure to wet your palms with water before you start binding the laddoos. This make the binding process easier and also ensures you do not burn your hands
  7. I garnished with rose petals but you could also use chopped almonds and pistachios to garnish

Ingredients to make Almond-Besan Laddoos

  1. Ghee, melted- 1/2 cup+ 2 tbsp
  2. Besan (chickpea flour)-2 cups
  3. Blanched almond flour- 2 tbsp
  4. Raw Sugar/Brown Sugar- 1/2 cup or as per taste
  5. Cardamom powder, freshly ground- 1 tsp
  6. Slivered almonds- 1 tbsp and some extra for garnish
  7. Chopped raisins- 1 tbsp
  8. Dried rose petals for garnish
  9. One cup water

Method to make Almond-Besan Laddoos

  1. Heat ghee in a heavy bottomed pan, once the ghee is hot, reduce the flame to low and add besan
  2. On a very low flame with continuous stirring cook the besan till it starts to change colour to a dark muddy yellow and a nutty aroma arises; this will take approximately 20-25 minutes from start to finish
  3. Once besan is well roasted take it off the flame and add almond flour, brown/raw sugar, chopped raisins and slivered almonds and give it a nice mix
  4. Take the mixture back to the flame and add 2 tbsp ghee and mix again and continue to stir for another 2-3 minutes
  5. Turn off heat, and let the mixture cool down for 5 minutes, then wet your palms and start to roll the mixture into laddoos/balls of desired size ; be careful to wet your palms well to avoid burning
  6. At this stage if you feel the laddoos are not coming together , add some more ghee and bind
  7. Garnish with slivered almonds or rose petals or both

See video below for a step by step:

Almond & Besan Laddoos- Refined Sugarfree Healthy

Prep Time: 15 minutes

Cook Time: 40 minutes

Total Time: 45 minutes

Yield: 100

Serving Size: 12-14 medium sized laddoos

Ingredients

  • Ghee, melted- 1/2 cup+ 2 tbsp
  • Besan (chickpea flour)-2 cups
  • Blanched almond flour- 2 tbsp
  • Raw Sugar/Brown Sugar- 1/2 cup or as per taste
  • Cardamom powder, freshly ground- 1 tsp
  • Slivered almonds- 1 tbsp and some extra for garnish
  • Chopped raisins- 1 tbsp
  • Dried rose petals for garnish
  • One cup water

Instructions

  1. Heat ghee in a heavy bottomed pan, once the ghee is hot, reduce the flame to low and add besan
  2. On a very low flame with continuous stirring cook the besan till it starts to change colour to a dark muddy yellow and a nutty aroma arises; this will take approximately 20-25 minutes from start to finish
  3. Once besan is well roasted take it off the flame and add almond flour, brown/raw sugar, chopped raisins and slivered almonds and give it a nice mix
  4. Take the mixture back to the flame and add 2 tbsp ghee and mix again and continue to stir for another 2-3 minutes
  5. Turn off heat, and let the mixture cool down for 5 minutes, then wet your palms and start to roll the mixture into laddoos/balls of desired size ; be careful to wet your palms well to avoid burning
  6. At this stage if you feel the laddoos are not coming together, add some more ghee and bind
  7. ogether , add some more ghee and bind
  8. Garnish with slivered almonds or rose petals or both
https://onewholesomemeal.com/almond-besan-laddoos-refined-sugarfree-healthy-recipe/

Almond & Besan Laddoos- Refined Sugarfree Healthy Recipe