Categories
Lunch | 1pm Meal Most Popular Posts

Vegan Beetroot and Tofu Burger

While I am very excited that I cracked this Vegan Beetroot and Tofu Burger recipe and cannot wait to share with you, I also have an urge to share something else as important.

We live in difficult times. Phones are smarter than people and our planet is in the wrong hands. Most of us continue to live in the optimism bubble that the human race is going to find a way. Maybe it will and everything will be alright eventually. But we need to take some preventive steps nonetheless. Unfortunately very few of us are actually doing so

My Two Bits

We as a family are committed to taking baby steps too. We almost never use single-use plastic-shoppings bags, straws, water bottles. This year we are also committed to reducing our meat consumption. Red meat at home was always a no-no, and now even white meat is consumed once a week. And I am always looking for ways to make delicious, meat-free meals at home.

Finding The Middle Path

The boys love a good burger. The could have it thrice a day, seven days a week. And I usually do not stop them from enjoying a regular burger when we are out, but at home, it is mostly veg or at the most chicken. And over time I have realised that burgers are a great way to conceal veggies and make it a complete meal!

The Impossible Burgers are a current rage here in Hong Kong (and I presume the rest of the world too) and la familia loves it. And because I love a good challenge, I decided to create it at home :))

Using the ready to use impossible meat was a possibility. I wanted to try something different, however.  So, I used some other special ingredients. And boy it tasted gooood! The fussy family polished it off for lunch and wanted the same thing for dinner too! Mission (Im)Possible was well accomplished!!

Vegan Beetroot Patty

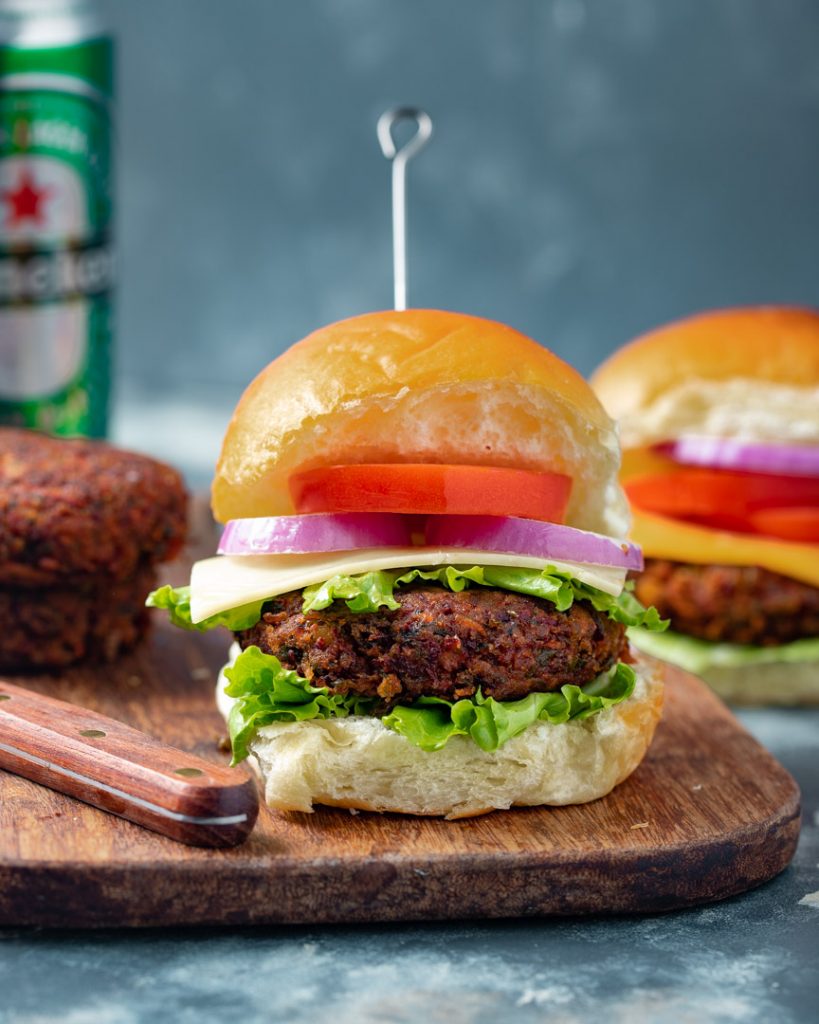
The star ingredient was of course finely grated beetroot.  I have another version of beetroot tikkis or cutlets on the blog, but this time I decided to switch things around a bit and also played with flavours. I also gave a desi (Indian) twist to it. Two ingredients that greatly impacted the texture were hard tofu (the variety one uses for frying) and boiled mashed green peas. I also added boiled potatoes, breadcrumbs, and roasted chickpea flour as binders. And threw in some spinach(which I cooked with onions and garlic) to make the patty healthier and wholesome. Raw onions release water when they come in contact with salt , making the patty soggy and hard to bind, hence I cooked the onions with garlic until translucent. And last but most importantly, I added Chettinad Spice Mix to flavour things up a bit. I did mean it when I said, the simple way doesn’t come easily to me :))


Vegan Beetroot Burger

Prep Time: 60 minutes

Cook Time: 15 minutes

Total Time: 1 hour, 15 minutes

Yield: 100

Serving Size: 6-8

Ingredients

    For the patty
  • Beetroot, finely grated- 1 cup
  • Carrot, finely grated -1/4 cup
  • Boiled and mashed green peas- 1/2 cup
  • Spinach finely chopped cooked with onion and garlic- 1/3 cup
  • Potato, mashed - 2/3 cup
  • Tofu, mashed - 1/2 cup
  • Finely chopped onion-1/2 cup
  • Finely chopped garlic- 1 tbsp
  • Roasted Chickpea flour- 1/2 cup
  • Breadcrumbs- 1cup
  • Coriander (dhaniya) powder- 1 tsp
  • Chettinad Masala- 3 tsp ( feel free to swap it with garam masala or cajun spice as desired)
  • Salt- 1 tbsp or to taste
  • Oil for shallow frying
  • For the burger
  • Burger buns- 4
  • Butter to warm the buns in
  • Lettuce
  • Tomato
  • Onions
  • Mild or Smoked Cheddar Cheese Slices
  • Other vegetables or accompaniments of choice you enjoy in your burger

Instructions

  1. Boil two medium sized potatoes, mash and keep aside
  2. Boil green peas, drain water completely, mash and keep aside
  3. Roast the chickpea flour on a low flame, stirring continuously for 2-3 minutes till a nutty aroma releases; be careful not to over roast and burn, just enough until the flour slightly change colour
  4. In a thick bottomed pan add some oil and to it add garlic ; stir on a low flame until light brown and fragrant , then add onion and cook till translucent
  5. Add chopped spinach to the above mix and cook till tender; keep aside to cool
  6. In a wide and deep bowl add all ingredients of the patty and mix well; taste for salt and adjust if needed
  7. Form into discs almost as big or a tad smaller than your burger bun and refrigerate for 30 minutes
  8. Heat oil in a pan and shallow fry the patties until golden and crispy, flipping sides halfway through
  9. Lightly toast the burger buns on both sides in a pan with melted butter
  10. Assemble your burger and enjoy with your favourite dip!
https://onewholesomemeal.com/vegan-beetroot-tofu-burger/

Vegan Beetroot Patty
Categories
Dinner | 8pm Meal Lunch | 1pm Meal Most Popular Posts

Litti Chokha | Traditional Bihari Recipe

“So, you are a food blogger? What part of India are you from?”

“Bihar”

“Aah! Then you must teach me how to make litti chokha!”

Remarks like this are the reason I have not shared one of the most loved recipes from my home state Bihar! It is almost like saying that Italians eat only pizza. Or that tapas are an everyday feature at the table in a Spanish home! This and many other similar stereotypes and expectations made me almost pledge to never share this recipe. The fact that being a Bihari in India comes with its own share of woes and discriminations, and I had suffered a fair share of them studying and working outside of my home state. This baggage did not help either.

So What Changed?

Well! Let me first share with you a little secret about my personal journey. I have always been a sensitive person. Since I started blogging, it was very hard to deal with constant judgment and brutality. Something that bloggers are perpetually subjected to. I am not exaggerating but most of the brutality came from people who know me. I was already dealing with my own demons already. This added burden did not help. I started to question my decision to blog. Nothing good seemed to be coming out of it. In fact, things were only going south – not many followers on the blog, not much remuneration, and definitely no peace of mind! Then why was I doing what I was doing?

Now, as with most things in my life, by some cosmic intervention, a few things happened almost at the same time which helped to pull me together and bring my mind and soul to a safe place:

  1. I was recommended a book on Goodreads called the Power of Subconscious Mind and I started reading it
  2. A friend who had just completed some sessions happened to speak about her therapist to me
  3. And most importantly in one of the rare moments of optimism I reminded myself why had I started a blog in the first place – for the pure love and joy of sharing!

To deal with constant judgment, remember this – People’s opinion of you is a reflection of their character (and life experiences) and not yours. So, every time I am faced with opinions and unkind remarks I just remind myself of this. I stay true to myself and focus on my goal, no matter what 🙂

It’s in 2020. So Let’s Start New.

Why am I sharing all this with you when I should be focussing on more important matters like the recipe for Litti Chokha? Well! First things first, blogging or not, we all go through significant ups and downs in life. But not all of us are infused with copious amounts of endorphins to deal with these ebbs and flows and take it in our stride. Many of us find ourselves at sea and overwhelmed, to say the least, dealing with these. So, since my job is to share I  took the liberty to share the above with you the things that worked for me and helped me cope. I sincerely hope that at least one if not all of these help you too. Do remember that no matter how much love of family and friends you are surrounded by, there is nothing more important and effective than self-love. So, be it seeing a therapist, taking a few hours every day to be with yourself or just reading a self-help book, take the plunge, without any guilt or second thought. We all need constant reminders- one cannot pour from an empty vessel!

And Finally Litti Chokha!

Coming back to the recipe, there are four parts to it – making the litti, baingan bharta (eggplant mash), aloo bharta (mashed potatoes), and tomato chutney. While together it might sound like a lot of work, when you start putting it together you will realise it really isn’t hard. Just a little bit of planning and patience goes a long way. Here are a few tips to help you make the perfect litti chokhas.

Littis: They should not be disjointed when they come out of the oven hard. If you like them soft and crumbly, double the amount of ghee while kneading the dough. The best way to enjoy them is piping hot. Use two hands to break them and then dunk it in some melted ghee and mix with the bharta/chutney. Traditionally the litti stuffing was some oil, lime juice, and salt. Today however you will find various takes on the stuffing. Here I am sharing the one we enjoy as a family.

Litti-Chickpea flour stuffed whole wheat dumpling

Baingan Bharta: Whether you roast it on an open flame or on an iron tawa placed on an open flame, do slit them halfway in the centre. Not all the way to the end splitting it into two! Insert 6-8 pods of garlic. Roast the baingan and garlic together. Later use the garlic for flavouring both the bhartas and chutney. Yumm!!

Eggplant/Aubergine Mash(perfect accompaniment with Littis and parathas)

Aloo Bharta: You can boil potatoes in a pressure cooker and then further roast in a preheated oven for 5-10 minutes to add that smoky flavour. It would taste great both ways.

Mashed and spiced potatoes/Aloo Bharta

Tamatar Chutney:  Peel the skin of the tomatoes and roughly chop the tomatoes. Mix this with other ingredients of the chutney using a fork or blend together. It just changes the consistency, the former is lumpy and latter is liquid but it doesn’t effect the taste.

Tomato/Tamatar Chutney-Perfect accompaniment with litti Chokha

With my pro-tips up your sleeves, you are sure to rock this recipe 🙂


Litti-Chokha (Chickpea flour stuffed Dumplings with Aubergine Mash)

Prep Time: 30 minutes

Cook Time: 45 minutes

Total Time: 1 hour, 15 minutes

Yield: 100

Serving Size: 3-4

Ingredients

    For Litti Dough
  • Whole wheat flour- 2 cups
  • Ghee- 1.5 tbsp
  • Salt- 1.5 tsp or to taste
  • Water- 1 cup approx (to knead the dough)
  • For Litti Stuffing
  • Sattu (roasted gram flour)- 1 cup
  • Ajwain (carom seeds)- 1/2 tsp
  • Saunf ( fennel seeds)- 1/2 tsp
  • Red Chilli powder- 1/2 tsp
  • Lemon juice- 2 tsps
  • Onion, finely chopped- 1.5 tbsp
  • Coriander leaves, finely chopped- 1.5 tbsp
  • Mustard Oil ( or oil from homemade mango or red chilli pickle)- 2 tsps
  • Finely Chopped Ginger- 1 tsp
  • Finely Chopped Garlic- 1 tsp
  • Salt - 1.5 tsp or as per taste
  • Water- 2 tbsp approx to bring the stuffing together
  • For Baingan Chokha/Bharta
  • Baingan -1 (large variety)
  • Garlic pods roasted - 2-3
  • Green chilies roasted- 1-2 or as per heat level desired
  • Mustard oil- 1 tsp
  • Chopped coriander leaves- 1 tbsp
  • Salt-1.5 tsp or as per taste
  • For Aaloo Chokha
  • Medium sized potatoes- 2
  • Green chilies roasted- 1-2 or as per heat level desired
  • Finely chopped onions -1.5 tbsp
  • Mustard oil- 1 tsp
  • Chopped coriander leaves- 1 tbsp
  • Salt-1.5 tsp or as per taste
  • For Tomato Chutney
  • Medium sized tomatoes- 2
  • Garlic pods roasted - 2
  • Green chilies roasted- 1-2 or as per heat level desired
  • Mustard oil- 1 tsp
  • Chopped coriander leaves- 1 tbsp
  • Salt-1.5 tsp or as per taste

Instructions

    Making Litti Dough
  1. In a deep and wide mixing bowl,place all ingredients; do not add water yet
  2. Between the palm of your hands rub the flour-salt-ghee mix for 5-7 minutes
  3. Then add little water and combine the dough; add water gradually to make sure the dough is of right consistency- soft and pliable and not very hard. Cover and keep aside
  4. Preparing Litti Stuffing
  5. In another deep bowl bring all the stuffing ingredients, except water together and mix well with your hands
  6. Add 1 tbsp water and mix well. The mixture should not be too dry but also not very wet, just sightly clumpy. You can test it by pinching some mixture between your fingers and if it almost holds shape it is good to go; add some more water if its very dry and powdery
  7. Rolling,Stuffing and Baking Litti
  8. Pull out a small ball of dough and roll between your palms as you would when making rotis
  9. Then roll out these balls to make almost a 4-6 inch roti, then place about 2 tbsps of the stuffing mixture in the centre
  10. Seal the edges by bringing them in the centre and pressing together
  11. Then gently roll them between your palms to make a ball
  12. Proceed similarly for the remaining dough
  13. Preheat your oven to 200 degrees and line a baking sheet with foil
  14. Place the stuffed littis on the tray and brush them all over with ghee
  15. Bake for approximately 20-30 minutes or until the exterior is slightly charred and baked well
  16. Also, halfway through the process , flip the littis over for even baking; brush them again with some more ghee
  17. Making Baingan Chokha
  18. Slit the baingan/eggplant halfway (and not all the way till the end), press 6-8 garlic pods inside and roast on open flame or an iron tawa placed on the flame till the exteriors are charred and black and the white inside is cooked through;keep turning the eggplant while roasting so it is evenly done
  19. Roast 4-6 green chilies alongside
  20. Then peel off the skin, remove the stem and pull out the garlic pods
  21. Peel the garlic pods and keep aside
  22. In a bowl mash together two garlic pods, roasted green chilies as per taste, mustard oil, salt and roasted eggplant using a fork until well combined
  23. Garnish with chopped coriander
  24. Making Aaloo Chokha
  25. Boil potatoes in a pressure cooker until done
  26. Roast these boiled potatoes over flame on an iron tawa or in an oven at 200 degrees for 10 minutes; you can also skip the roasting step if you are pressed for time
  27. In a bowl mash together roasted green chilies as per taste, mustard oil, salt and boiled/roasted potatoes
  28. Garnish with chopped coriander
  29. Making Tamatar Chutney
  30. Poke holes into tomatoes and roast on an iron tawa , turning sides till the skin is nice and charred and tomatoes cooked through
  31. Peel the skin, chop into cubes and mix well with the remaining ingredients using a fork or you could blend all ingredients except the coriander to make a more homogeneous thick liquid
  32. Garnish with coriander
  33. Serve hot littis with a side of ghee, chokhas and chutney. Winter is truly incomplete without this meal!
https://onewholesomemeal.com/litti-chokha-traditional-bihari-recipe/

Categories
Dinner | 8pm Meal Lunch | 1pm Meal

Besan Ki Sabzi | Authentic Bihari Recipe

The familiarity of the besan ki sabzi is a great way for me to connect with cherished childhood memories.

I hear and read about kitchens of the future. Kitchens where robots will whip up your favourites with the click of a button. Maximum output with minimal effort. Convenient indeed! Convenience is all one is after these days. Yet we have never lived in a more “inconvenient” time – the inconvenience of the soul. One has access to the best possible spas, medicine and gadgets. Yet one craves for the not so convenient times. Those times when we didn’t have just a button to access world news but knew how are neighbours were doing. The human and humane elements seem to be diminishing in our lives. And convenience is fast replacing compassion.

Traditional Bihari Recipe from Dadi Ma’s Kitchen

One can dine at the best restaurants and enjoy the most delectable of cuisines but nothing nourishes the soul as good old comfort food which transports you back into your grandma’s kitchen. With the pots, and pans clanking, an orderly frenzy with our favourite dishes being prepared. No robot can replicate that! After all, what made grandma’s food special was not just about the ingredients and their quantities, it was the love and affection she cooked with.

This besan ki sabzi is one such dish that will always remind me of my grandmother’s cooking. I recall us kids fighting over hot chickpea fries before they went into the gravy and in a matter of minutes, most of them would vanish. Daadi Ma (grandma) would shoo us out in her usual sweet angry way before she would whip up another batch for the curry. These fritters would make great lunch box snacks too!

Key Steps to Make the Perfect Besan Ki Sabzi

  1. The chickpea batter is made runny but not too watery as shown in the clip below.
  2. While cooking the batter one needs to work fast, keeping the flame low and constantly stirring so it cooks evenly. You may need to add a few tablespoons of oil in this step if the mixture starts to stick to the pan.
  3. The cooked mixture needs to be transferred to a greased plate right away and then kneaded to form an almost smooth dough. Then flatten it out as shown below before cutting out small squares to be fried.

Besan ki Sabzi

Prep Time: 15 minutes

Cook Time: 30 minutes

Total Time: 47 minutes

Serving Size: 3-4

Ingredients

  • Chickpea flour or Besan- 1 cup
  • Water - 1 cup and some extra
  • Ajwain- 1/2 tsp
  • Red chili powder-1/2 tsp (optional)
  • Cumin powder- 1/4 tsp
  • Coriander powder- 1/2tsp
  • Salt- 1.5 tsp or as per taste
  • Fried Onion paste- 3/4 cup ( fry onions in 1tsp oil till translucent, cool and then blend to make a paste)
  • Tomato paste- 1/2 cup
  • Ginger garlic paste- 1 tbsp
  • Cumin seeds-1 tsp
  • Bay leaf- 1
  • Cumin powder- 1/2 tsp
  • Coriander powder- 1 tsp
  • Garam Masala powder- 1/2 tbsp
  • Salt- 1.5 tsp or as per taste
  • Oil- For deep drying and some extra
  • Chopped coriander leaves for garnish -1.5 tbsp

Instructions

  1. In a deep bowl add chickpea flour, ajwain, red chili powder, Cumin powder- 1/4tsp, Coriander powder- 1/2tsp, Salt- 1.5tsp
  2. Gradually add water, mixing well with your clean hand till a smooth, pancake consistency batter , without any lumps is achieved ( see video for reference )
  3. Heat 1 tbsp oil in a non stick pan and add the prepared batter to it with constant stirring
  4. Cook on medium low flame with constant stirring till the batter starts to come together
  5. Turn off heat and transfer to a greased plate and knead with your hands to get an almost smooth dough
  6. Then flatten out the dough with your fingers gently till it reaches almost one centimetre thickness
  7. Cut out small two inch squares and deep fry on a medium flame, flipping sides till golden and drain them on a kitchen towel
  8. In the same pan heat almost approximately 1 tbsp oil and add bay leaf and cumin seeds
  9. Once the seeds start to splatter add the fried onion paste, ginger-garlic paste, 1/2 tsp cumin powder,1 tsp coriander powder, 1/2 tbsp garam masala powder and cook on a medium flame till oil starts to separate , then add tomato paste
  10. Cook for 3-5 minutes on a medium flame then add water and give it a nice mix , add salt as per taste
  11. Then add the fried chickpea squares to the gravy and let it simmer on a low flame uncovered for about 5 minutes
  12. The chickpea fries will absorb considerable amount of water so feel free to add some more hot water to the mix to thin out the gravy as per the desired consistency
  13. Turn off heat, garnish with chopped coriander and let it sit covered for 5 minutes
  14. Serve hot with rice or chapatis
https://onewholesomemeal.com/besan-ki-sabzi-authentic-bihari-recipe/

Categories
Dinner | 8pm Meal Lunch | 1pm Meal

Lauki Chana Dal | Bottle Gourd with Lentils

Lauki Chana Dal is the perfect one-pot meal to give you the wholesomeness of bottle gourd and lentils.

As summer peaks it gets harder to spend time in the kitchen. But also, Mother Nature makes sure we stay hydrated by flooding us with the best summer bounty. Most veggies available through summer have high water content. This makes it easy to digest while having a cooling effect on our system. The gourd family is one such. Vegetables from this family such as cucumbers, angled luffas, pointed gourd, bottle gourd are all high in water and fibre, making them an almost complete meal in themselves.

Bottle gourd is one such staple summer veggie in our household. It is a popular vegetable in the south and southeast Asian region where summer gets extremely hot and sultry. Growing up, this vegetable featured regularly on our menus throughout the week during summer. Many of us from India also know it as Lauki. It is usually not a very well-liked vegetable due to its watery taste. However, if prepared well most people do grow to like it as my fussy husband has 😉 I remember enjoying it with hot ghee rice and chilled yogurt on a hot summer afternoon with some raw onions mixed with pickle masala on the side.

The Benefits of Lauki Chana Dal

Although very healthy, the veggie is low in protein. But that problem gets addressed as soon as you add Chana dal (split chickpeas) to it. It also makes for a much more delicious one-pot meal. Using mustard oil enhances the flavour multiple-fold but feel free to use the oil of your choice. Another key ingredient is fenugreek seeds. They are well known for their multiple benefits. However one needs to be careful while cooking with fenugreek as using an excessive amount makes the food bitter and so does overcooking it.

Using a pressure cook reduces the cooking time to a great extent, however you could use a normal thick bottomed wok as well. Here is a stepwise instruction with images to make this tasty dish.

First, I peeled and cubed a small-sized bottle gourd and kept aside. Then to hot oil, I added fenugreek (methi)seeds, finely chopped garlic, asafoetida, and green chilies (as per taste) and sautéed on medium-low flame for a few seconds making sure the methi doesn’t burn.

To that, I added pre-soaked chana dal (washed and soaked in water for 30 minutes) and turmeric and mixed everything well.

The last step – I added the cubed bottle gourd and salt, mix, and pressure cooked for 5 minutes till the pressure set in. Then turned off the heat and let the pressure release on its own and took off the lid and cooked till the water (good quality bottle gourd releases a lot of water) reduced to the desired consistency.

If you are using a normal wok, just cover and cook till done, keeping the flame to medium-low and stirring intermittently. There is no need to add additional water.

This curry is enjoyed best with hot rice and daal but tastes good with chapatis too.

Lauki Chana Dal


Lauki-Chana Daaal (Bottle Gourd with Split Chickpeas)

Ingredients

  • Lauki/Bottle Gourd, cubed- 1 small size (1.5 cups)
  • Pre-soaked Chana Daal/Split Chickpeas)- 2 tbsp
  • Finely chopped garlic -4 pods
  • Green chilies-1-2 or as per taste
  • Methi/Fenugreek seeds-1 tsp
  • Asafoetida-1/2 tsp
  • Turmeric-1 tsp
  • Salt-1.5 tsp or as per taste
  • Mustard oil-1 tbsp or any oil of choice

Instructions

  1. Heat oil in a pressure cooker or a thick bottomed wok then reduce flame and add asafoetida, fenugreek seeds, green chilies and garlic and sauté for a few seconds till the fenugreek seeds start to release an aroma and change colour . Make sure to stir continuously and not increase the flame as the seeds burn fast and that would spoil the dish
  2. Then drain and add pre-soaked chana daal and turmeric seeds and mix well
  3. Finally add the chopped bottle gourd and salt and pressure cook for 5 minutes from the time pressure sets in
  4. Then turn off the heat and let the pressure release on its own and take off the lid and cook till the water (good quality bottle gourd releases a lot of water) reduces to desired consistency.If you are using a normal wok, just cover and cook till done, keeping the flame to medium low and stirring intermittently. There is no need to add additional water .
https://onewholesomemeal.com/lauki-chana-daal-bottle-gourd-with-lentils/


Categories
Lunch | 1pm Meal Mid-Day Snack | 10 am Meal

Avocado Parathas With Mint and Methi

I doubled up in surprise when a few years back my sweet friend P told me her cook in the US makes Avocado Parathas! Firstly, I had never heard of parathas with avocados. I couldn’t imagine for the life of me what they would taste like. Secondly, I thought about the poor Spaniard who first discovered them. The thought of what we desis are doing to his wonder fruit, must make him turn in his grave.

Now, I do not eat avocados often. I have nothing against them. Just that it is hard to find locally grown options here in Hong Kong. Eating the imported avocados all the way from Spain or the US makes me cringe at the thought of the carbon footprint it creates. So, it is very rare that I buy them and whenever I do, parathas happen. As most of us would know, avocados have what the nutritionists call the “good fat”. While on the topic, here is a little trivia about Avocados I found on Reader’s Digest.

It’s Great for the Lunch Box

Coming back to the parathas. Due to the “good fat” parathas made out of avocados are soft and require very little additional fat like ghee or butter. Unlike most parathas, they remain soft long after being cooked. Therefore, they make for great lunch box options too! I took advantage of the fresh methi (fenugreek leaves) that is abundantly available in winter and decided to throw some in along with fresh mint leaves. Feel free to add just avocados or other greens available in your kitchen. The dough can be prepped the night before. Make sure you keep it out of the fridge for 15 minutes before cooking.

For the detailed recipe, you may have a look at the simple tutorial video.


If this is the first time that you are making parathas, do not stress about the shape. That is a thing of practice. I hardly make rotis and parathas myself. Whenever I do, they never turn out the perfect circle until I have rolled out a few. As long as they are thin, and cook evenly, these avocado parathas will taste great. Make the most of winters and enjoy these yummies with a hot cup of chai during breakfast.

Avocado Parathas by OneWholesomeMeal


Avocado-Mint-Methi (fenugreek) Parathas

Prep Time: 25 minutes

Cook Time: 15 minutes

Total Time: 40 minutes

Yield: 100

Serving Size: Makes 12-15 medium sized thin parathas

Calories per serving: 180 per paratha

Ingredients

  • Wholewheat Flour(Aatta)-3 cups
  • Fully ripe Avocados,peeled and cubed- 2 cups
  • Methi,finally chopped-1 cup
  • Mint leaves, finely chopped-1/2 cup
  • Turmeric powder-1 tsp
  • Ajwain(caraway seeds)-1tsp
  • Kalonji (onion seeds/black caraway)-1tsp
  • Salt-1.5tsp or as per taste
  • Water-1/2 cup to be used as required
  • Ghee or Oil for shallow frying the parathas

Instructions

  1. Take all ingredients except ghee and water in a deep and wide bowl convenient for kneading
  2. Using both hands mix all ingredients together with the dough breaking the avocados into the mixture with your fingers while you knead
  3. Halfway through, wet your hands with very little water and continue to knead till you get a smooth homogeneous dough typically softer than the usual roti dough. Be very careful while adding water as you do not want the dough to be too sticky which would make it harder to roll out
  4. The moisture from avocados and the greens is enough to bring the dough together so it would need very little water
  5. Once done, cover the bowl with a lid and let the dough rest for 15-20 minutes. This helps it smoothen out and extremely pliable
  6. After 20 minutes , place a tava or flat thick bottomed skillet on the flame while you roll out a tennis ball sized dough into a thin , round paratha. Make sure the pressure on the rolling pin isn't too strong else the paratha wouldn't roll out evenly
  7. When the iron skillet is hot, reduce the flame to medium high and carefully place the paratha on the pan
  8. Once you see air bubble start to form, flip it over till bubbles form again, then smear 1 teaspoon of ghee along the periphery of the paratha and on the surface;cook gently pressing down with a spatula till the paratha starts to puff up. This takes 15-20 secs
  9. Flip and cook the other side similarly making sure you do not over cook or burn the paratha
  10. Drain it on a kitchen towel to soak excess oil and enjoy with a side of freshly set yogurt, mint chutney or even ketchup and a hot cup of masala chai
https://onewholesomemeal.com/avocado-parathas-with-mint-and-methi/


[kkstarratings]

Categories
Afternoon Snack | 3pm Meal Mid-Day Snack | 10 am Meal

Enduri Pitha | Traditional Odia Recipe

This traditional Odia recipe is similar to the idli from south India. I discovered the Eduri Pitha late, but am I glad I did!

I love idlis for their versatility. By adding one or more grated veggies of your choice to the idli, it becomes a complete meal with a side of chutney or sambhar. Also, as it is so easy to whip up, it features regularly on the menu at home.

Soon after I got married into an Odia family I came across the sweet version of this family favourite. Called Enduri (pronounced “en-do-ree”) Pitha, it had all my favourite things and more. Enduri Pitha is primarily prepared during Prathamastami, a festival that celebrates the eldest born in the family. It is served as an offering to the deity. Freshly desiccated coconut enlaces palm jaggery and is steamed between layers of the fermented rice-lentil batter. The bliss of devouring piping hot pithas dunked in sambhar or coconut chutney is something that can not be expressed in words. Needless to say, when the kids first tried it, it was a massive hit! And since it is refined sugar-free, I did not mind if they (and us) indulged in it a tad more. Thus Parthmashtmi or not, this pitha is enjoyed irrespective.

It tastes best if one uses freshly desiccated coconut and palm jaggery. However, I have made it with dried desiccated coconut and regular jaggery and cannot complain about the taste.

Step By Step Enduri Pitha, A Traditional Odia Recipe

1. Prepare a regular idli batter as you would for normal idlis. Once done, crush or finely chop approximately one cup of jaggery, one cup desiccated coconut, and some raisins/sultanas (optional) and keep aside.


2. Next prepare the idli moulds by greasing them with ghee or coconut oil. Then scoop 1 tablespoon of batter onto the stand. Layer it with 1 teaspoon jaggery and 1 teaspoon coconut. Then cover it with another scoop of batter.

3. Steam it as you would a regular idli. Serve hot with a side of sambhar and/or chutney.


Coconut-Jaggery Idlis (Enduri Pitha)

Prep Time: 15 minutes

Cook Time: 15 minutes

Total Time: 30 minutes

Yield: 100

Serving Size: 4

Ingredients

  • Idli batter-2 cups
  • Desiccated Coconut-1 cup
  • Finely chopped or crushed jaggery-3/4 cup
  • Raisins or Sultanas- 2 tbsp (optional)
  • Oil- 1tbsp (for greasing the idli moulds)

Instructions

  1. Prepare all ingredients as shown in the step by step above
  2. Spoon in 1 tbsp of batter on greased moulds, then add 1 tsp each of coconut,jaggery and raisins. Feel free to adjust the amount of jaggery and coconut as per taste but do keep in mind that adding too much jaggery would make the idlis "bleed out" too much
  3. Then spoon in another tbsp batter making a sandwich
  4. Steam as you would regular idlis (for approximately 15-20 minutes) based on the kind of steamer you use
  5. Serve hot with saambhar and/or coconut chutney
https://onewholesomemeal.com/enduri-pitha-traditional-odia-recipe/

[kkstarratings]