If you are a crustacean fan (in your meals) then the chance are high that you would love this Prawn Pulao recipe with coconut milk. It is super easy to put together and so delicious that you will come back looking for seconds.
If you ask me, very few things spell comfort like a well made pulaao. Holding a bowlful of this rice dish with a spicy pickle or raita on the side , scooping out spoonfuls , savouring the aroma before devouring the morsels, in my opinion, is comfort which can bring peace to most distressed of minds.
And that this Prawn Pulaao is a complete one pot meal, makes it an even more desirable option on the menu. You can play around with the ingredients and sneak in some veggies too.
Some helpful tips to make a delicious Prawn Pulao:
- If possible try to test the brand of rice for the amount of water it takes to cook without having to drain any excess. Some long grained Basmatis cook well in 1:1 water ratio (1 cup rice to 1 cup liquid) , some 1:1.5 (1 cup rice to 1.5 cups of liquid) and some need 1:2. Testing this ratio out in advance will make sure you get perfectly cooked grains- not too mushy or not too hard
- In case you are unable to test it out in advance start with 1:1 (1 cup rice to 1 cup prawn stock) and reserve the rest. Test the doneness of rice 10 minutes into the cooking and if needed add more stock. Trial and error is the best way to get perfectly cooked grains
- I used already cleaned and deveined prawns . In case you buy fresh prawns, see here how to clean them
- Overcooking prawns impart a chewy and rubbery texture so be careful to not overcook
- Perfectly cooked prawns retain a mildly translucent pinkish colour while overcooked ones turn white
- Boiling prawns for 3-4 minutes is enough to cook them. Then drain and instantly transfer in an ice bath to stop the cooking process
- You can make extra prawn stocks by boiling more prawns than needed for the recipe and freeze it for later. This way you can have a lovely prawn flavoured pulao with veggies even if you do not have prawns on hand
- Controlling heat is important so the rice cooks evenly without burning
- Use a thick bottomed deep wok for even cooking
- Fresh coconut milk is best for the recipe, but thinned out coconut cream or canned coconut milk works as well
Ingredients for Prawn Pulaao:
- Fresh or frozen, deveined prawns: 500 gm
- Water: 2.5-3 cups depending on the kind of rice (see tips above)
- Salt: 1.5 tsp or to taste
- Onion, chopped fine: 1.5 cups
- Tomato, chopped: 1 cup
- Green chilies, chopped fine: 2 or as per taste
- Cloves (long): 4
- Cinnamon Stick (daalcheeni): 2 two inch pieces
- Green cardamom (choti elaichi): 3
- Bay leaf (tej patta): 1
- Garlic, minced: 1.5 tbsp
- Ginger, chopped fine: 1.5 tsp
- Turmeric powder: 1/2 tsp
- Red chilli powder: 1/2 tsp
- Basmati or any long-grained rice: 2 cups
- Coconut Milk: 1 cup
- Fresh coriander for garnish
- Ghee or Oil
Method to make Prawn Pulaao:
- Clean prawns and season with half a teaspoon each of red chilli and turmeric powders and set aside for 15 minutes
- Wash rice well and keep aside
- Bring 3 cups water to boil, then reduce heat and add prawns and cover; cook for 3-4 minutes
- Turn off heat and let prawns sit in the water for another minute, then drain and transfer prawns into ice bath to stop the cooking process
- Retain broth for later
- Sprinkle some salt on the cooked prawns and set aside
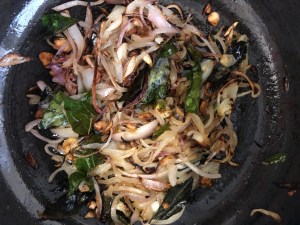
- In a deep and heavy bottomed wok heat some ghee, add onions and fry till light brown
- Then add the whole spices- cinnamon, bay leaf, cloves and cardamom and sauté on a medium high flame for 30 seconds until fragrant
- Add garlic and ginger and sauté for another minute or so until raw smell disappears
- Add tomato, chilli, turmeric and red chilli powder and cook until the spice blend well and tomatoes are cooked through and soft forming a homogenous mixture
- Then add prawns and mix well; stir for half a minute
- Add rice and cook for another minute keeping the flame low
- Add prawn stock and coconut milk, salt to taste , mix well and bring to boil; reserve some stock if the brand of rice used doesn’t need a lot of liquid to cook(see tips above)
- Cover and simmer until done. This should take approximately 15-20 minutes
- Halfway through you can test for doneness and add more stock if needed and adjust seasoning accordingly
- Garnish with coriander and serve hot with a side of papad, pickle or raita

Watch a step by step video here :
Ingredients
- Fresh or frozen, deveined prawns: 500 gm
- Water: 2.5-3 cups depending on the kind of rice (see tips above)
- Salt: 1.5 tsp or to taste
- Onion, chopped fine: 1.5 cups
- Tomato, chopped: 1 cup
- Green chilies, chopped fine: 2 or as per taste
- Cloves (long): 4
- Cinnamon Stick (daalcheeni): 2 two inch pieces
- Green cardamom (choti elaichi): 3
- Bay leaf (tej patta): 1
- Garlic, minced: 1.5 tbsp
- Ginger, chopped fine: 1.5 tsp
- Turmeric powder: 1/2 tsp
- Red chilli powder: 1/2 tsp
- Basmati or any long-grained rice: 2 cups
- Coconut Milk: 1 cup
- Fresh coriander for garnish
- Ghee or Oil
Instructions
- Clean prawns and season with half a teaspoon each of red chilli and turmeric powders and set aside for 15 minutes
- Wash rice well and keep aside
- Bring 3 cups water to boil, then reduce heat and add prawns and cover; cook for 3-4 minutes
- Turn off heat and let prawns sit in the water for another minute, then drain and transfer prawns into ice bath to stop the cooking process
- Retain broth for later
- Sprinkle some salt on the cooked prawns and set aside
- In a deep and heavy bottomed wok heat some ghee, add onions and fry till light brown
- Then add the whole spices- cinnamon, bay leaf, cloves and cardamom and sauté on a medium high flame for 30 seconds until fragrant
- Add garlic and ginger and sauté for another minute or so until raw smell disappears
- Add tomato, chilli, turmeric and red chilli powder and cook until the spice blend well and tomatoes are cooked through and soft forming a homogenous mixture
- Then add prawns and mix well; stir for half a minute
- Add rice and cook for another minute keeping the flame low
- Add prawn stock and coconut milk, salt to taste , mix well and bring to boil; reserve some stock if the brand of rice used doesn't need a lot of liquid to cook(see tips above)
- Cover and simmer until done. This should take approximately 15-20 minutes
- Halfway through you can test for doneness and add more stock if needed and adjust seasoning accordingly
- Garnish with coriander and serve hot with a side of papad, pickle or raita

Some other Pulaao Recipes you may like:
https://onewholesomemeal.com/tandoori-cauliflower-nuts-pulaao-tandoori-gobhi-pulaao/